Computational Photography (Part 1): An Introduction
With the author’s permission, this post is translated from Vasily Zubarev’s “Computational Photography — From Selfies to Black Holes”. Most of the content stays faithful to the original meaning; a small portion is adjusted based on the translator’s interpretation. The “I” in the text refers to the original author. Translator notes are explicitly marked as “Translator’s note”. The original post is extremely long, so I split it into multiple parts and translate them one by one.
One major reason modern smartphones became so widely popular is the cameras they carry. Pixel can produce great results in near-complete darkness; Huawei zooms as if you were using binoculars; Samsung phones ship with eight-element lens stacks; and iPhones can even make you feel a bit superior among friends. Behind these phone cameras, there are some truly incredible innovations.
By contrast, DSLR cameras seem to be gradually fading. Even though Sony still releases impressive new products every year, the pace of updates from manufacturers is clearly slowing down, and their primary revenue increasingly comes from video creators.
Translator’s note: Sony is indeed impressive. Here are technical details of the flagship Sony A1 announced in 2021: Sony A1 絕對影像王者 頂尖技術力的展現
I personally own a $3000 Nikon camera, but whenever I travel, I still take photos with an iPhone. Why?
I tried to find an answer online. I found plenty of discussions about “algorithms” and “neural networks”, but almost nobody clearly explained how these technologies actually affect what a photo looks like. Journalists just list product spec numbers; bloggers keep posting more unboxing articles; camera enthusiasts only care whether the colors look pleasing. Oh internet, you give us so much information. We love you.
So I spent a large part of my life trying to understand what’s really going on. In this post, I’ll explain everything I know about what’s behind smartphone cameras—otherwise I’ll probably forget it all soon anyway.
¶ What Is Computational Photography?
If you look up computational photography anywhere, including Wikipedia, you’ll likely see a definition along the lines of: “Computational photography is the use of digital computation to enhance or extend the capabilities of digital photography and image processing, rather than relying on optical processes alone.” Most of this is correct, except for some details—for example, computational photography can even include autofocus, and it also includes useful things like light-field cameras. It seems the “official” definition is still a bit vague, and we still don’t really understand what computational photography actually is.
A light-field camera captures the light field formed by a scene. Besides recording the intensity and color of light at different positions, it also records the direction of the incoming light rays. A regular camera can only record intensity at different positions.
Professor Marc Levoy at Stanford is a pioneer in computational photography. He is currently working on the Google Pixel camera. In his article, he offers another explanation: “Computational imaging lets us enhance and extend what’s feasible in digital photography—making the photos we take look so ordinary, yet they are nearly impossible to achieve with traditional cameras.” I agree with this definition more, and I will follow it in the rest of this series.
Therefore, smartphones are the root of everything—smartphones had no choice but to bring people a new kind of photography technology: computational photography.
Smartphones have noisy sensors and relatively mediocre lenses. According to the laws of physics, they should only give us terrible images—until developers figured out how to break the physical limits: faster electronic shutters, powerful processors, and better software.

Most important research in computational photography happened around 2005–2015, but that is already “old science”. What we see today, and what we carry in our pockets, is a new era of technology and knowledge.
Computational photography is not just HDR or “night selfie mode”. Recent black hole imaging would be absolutely impossible without modern computational methods. If we tried to photograph a black hole with a normal telescope, we’d need a lens as large as the Earth. But by placing eight radio telescopes around the globe and running some pretty cool Python code, we obtained the world’s first photo of an event horizon.

But for selfies, it’s also very useful—don’t worry too much.
📝 Computational Photography: Principles and Practice
📝 Marc Levoy: New Techniques in Computational photography
Throughout this series I’ll include links that point to articles 📝 or videos 🎥 that I think are great, so you can go deeper into what you’re interested in—because I can’t explain everything in a short post.
¶ Origins: Digital Processing
Back in 2010, Justin Bieber released his first album, Burj Khalif had just opened in Dubai, and we still couldn’t capture spectacular cosmic phenomena—because our photos were noisy 2-megapixel JPEGs.
When faced with such photos, our first heartfelt wish was to hide the embarrassing image quality behind “Vintage” photo filters. And that’s when Instagram was born!

Math and Instagram
Thanks to Instagram, anyone could easily apply photo filters. As a man who once reverse-engineered X-Pro II, Lo-Fi, and Valencia (filter names) for “research purposes”, I still remember that these filters basically had three components:
-
Color settings (hue, saturation, brightness, contrast, levels, etc.) are the basic parameters—similar to traditional photographic filters used by photographers long ago.

-
Tone mapping is a mapping over a vector of values—for example, it tells us “a red tone of 128 should be changed to 240.” It is usually used for single-color adjustments. Here is an example: an X-Pro II tone map.

-
Overlay—using a semi-transparent image with dust, grain, small illustrations, or anything else, and overlaying it on top of the base image to create a new effect. It is not used as often.

Modern filters do far more than these three pieces, and things get more mathematically complex. With hardware shader support and OpenCL on phones, these computations are easy to run on the GPU—honestly, it’s insanely cool. We could already do this in 2012. Today, any kid can do similar effects with CSS, though he still might not get invited to prom.
However, progress in filters continues. For example, some people implement nonlinear filters on Dehancer. Unlike simple “mapping” changes, they use fancy and complex transformation functions, which opens up more possibilities for filters.
With nonlinear transformations you can achieve many variations, but processing becomes complicated—and humans are not good at complicated work. Fortunately, we can use numerical methods or neural networks to do the same things, but much more easily!
¶ Automated Adjustments and the Dream of “One Click”
Once everyone got used to filters, we even integrated filters directly into the camera. Who first thought of putting filters into a camera is hard to trace, but we do know that as early as iOS 5.0 (released in 2011), we already had a public API for “auto enhance image”. It seems Jobs realized filters had been in use for a long time even before the API was made public.
Automatic image adjustment is essentially the same thing we do in photo editing software: fix highlights and shadows, add brightness, remove red-eye, correct skin tones, and so on. Users never think that this “magical enhanced camera” is backed by just a few lines of code.
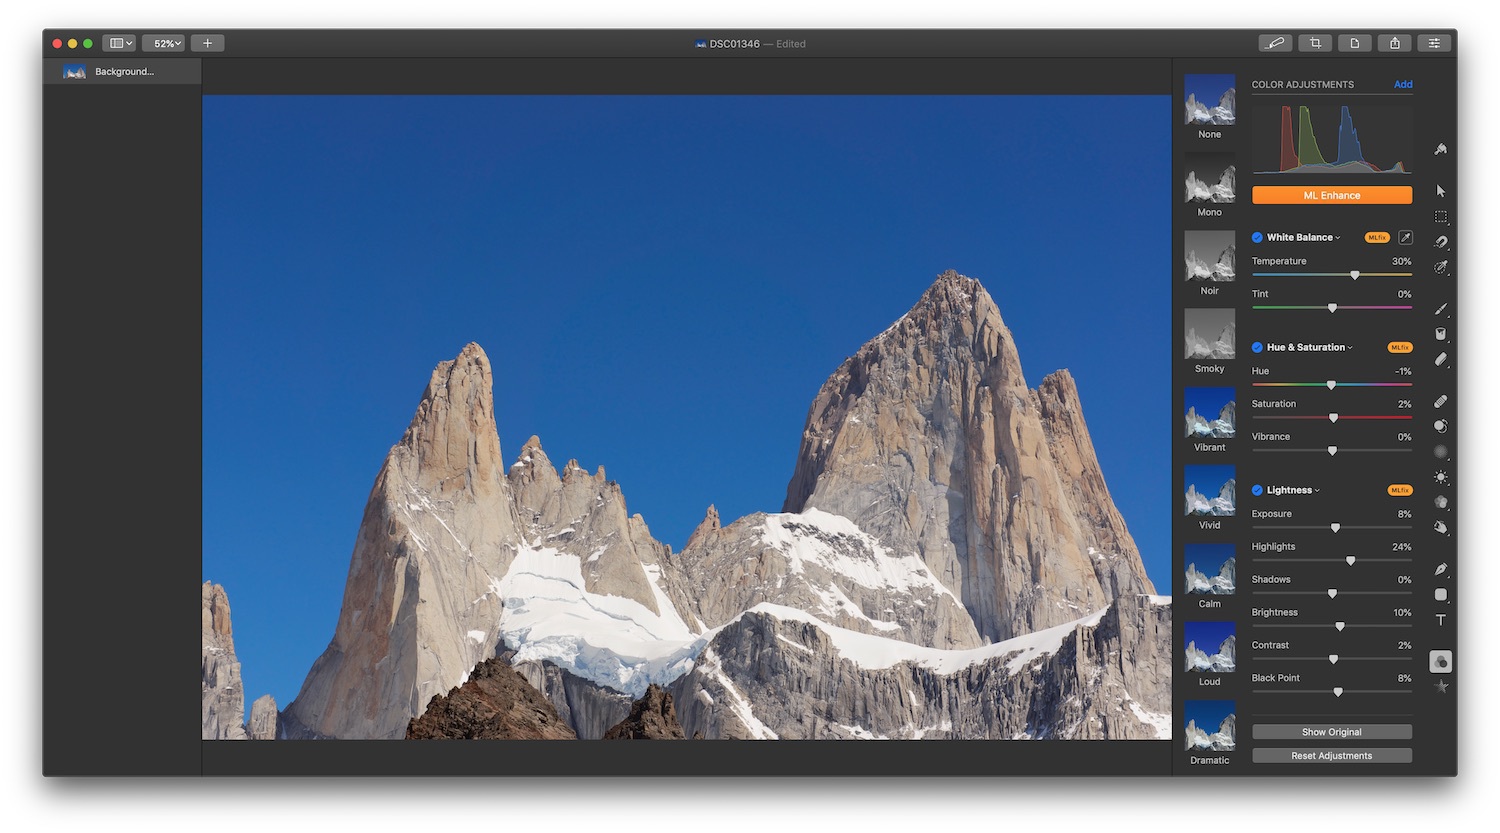
(Machine learning enhancement in Pixelmator)
Today, the “one-click generation” war has moved into the domain of machine learning. People who are tired of manually crafting style mappings now turn to CNNs and GANs and let computers adjust the retouching sliders for us. In other words, we give the machine an image, and it decides various “optical” parameters on its own, producing an image closer to what we perceive as a “good photo”. You can visit the official pages of tools like Photoshop or Pixelmator Pro and see how they advertise their latest ML-powered features. You can probably guess that ML won’t work perfectly forever—but you can always train your own model with lots of data and get better results. The resources below might help you… or not 😂
📝 Image Enhancement Papers
📝 DSLR-Quality Photos on Mobile Devices with Deep Convolutional Networks
Stacking: The 90% Contributor in Smartphones
Real computational photography comes from stacking—a technique that stacks multiple images one by one. For smartphones, taking dozens of photos within a second is easy. Because the mechanical design inside phones doesn’t have components to adjust shutter speed (the aperture is fixed), they use an electronic shutter (as opposed to a traditional mechanical shutter). The processor simply tells the sensor how many milliseconds of photons it should collect, and you get a photo.
Technically, a phone can take photos at video-like speeds (we don’t usually take photos at 60fps, right?). It can even record video at photo-level quality (4K video is already “high quality” at around 40 megapixels, while photos can easily go beyond 100 megapixels). But doing so increases data transfer and processing load, so software is ultimately constrained by hardware.
Stacking has existed for a while. Some people use Photoshop to produce insanely sharpened HDR photos or panoramas at 18000×600 pixels. And there are even more things you can try—waiting for you to explore!
People call this kind of post-processing “Epsilon Photography”. It means continuously tweaking camera parameters (exposure, focus, or position) and combining them into an image that would be impossible with a single shot. In practice, we call it stacking. Today, 90% of innovations in mobile device cameras are based on it.
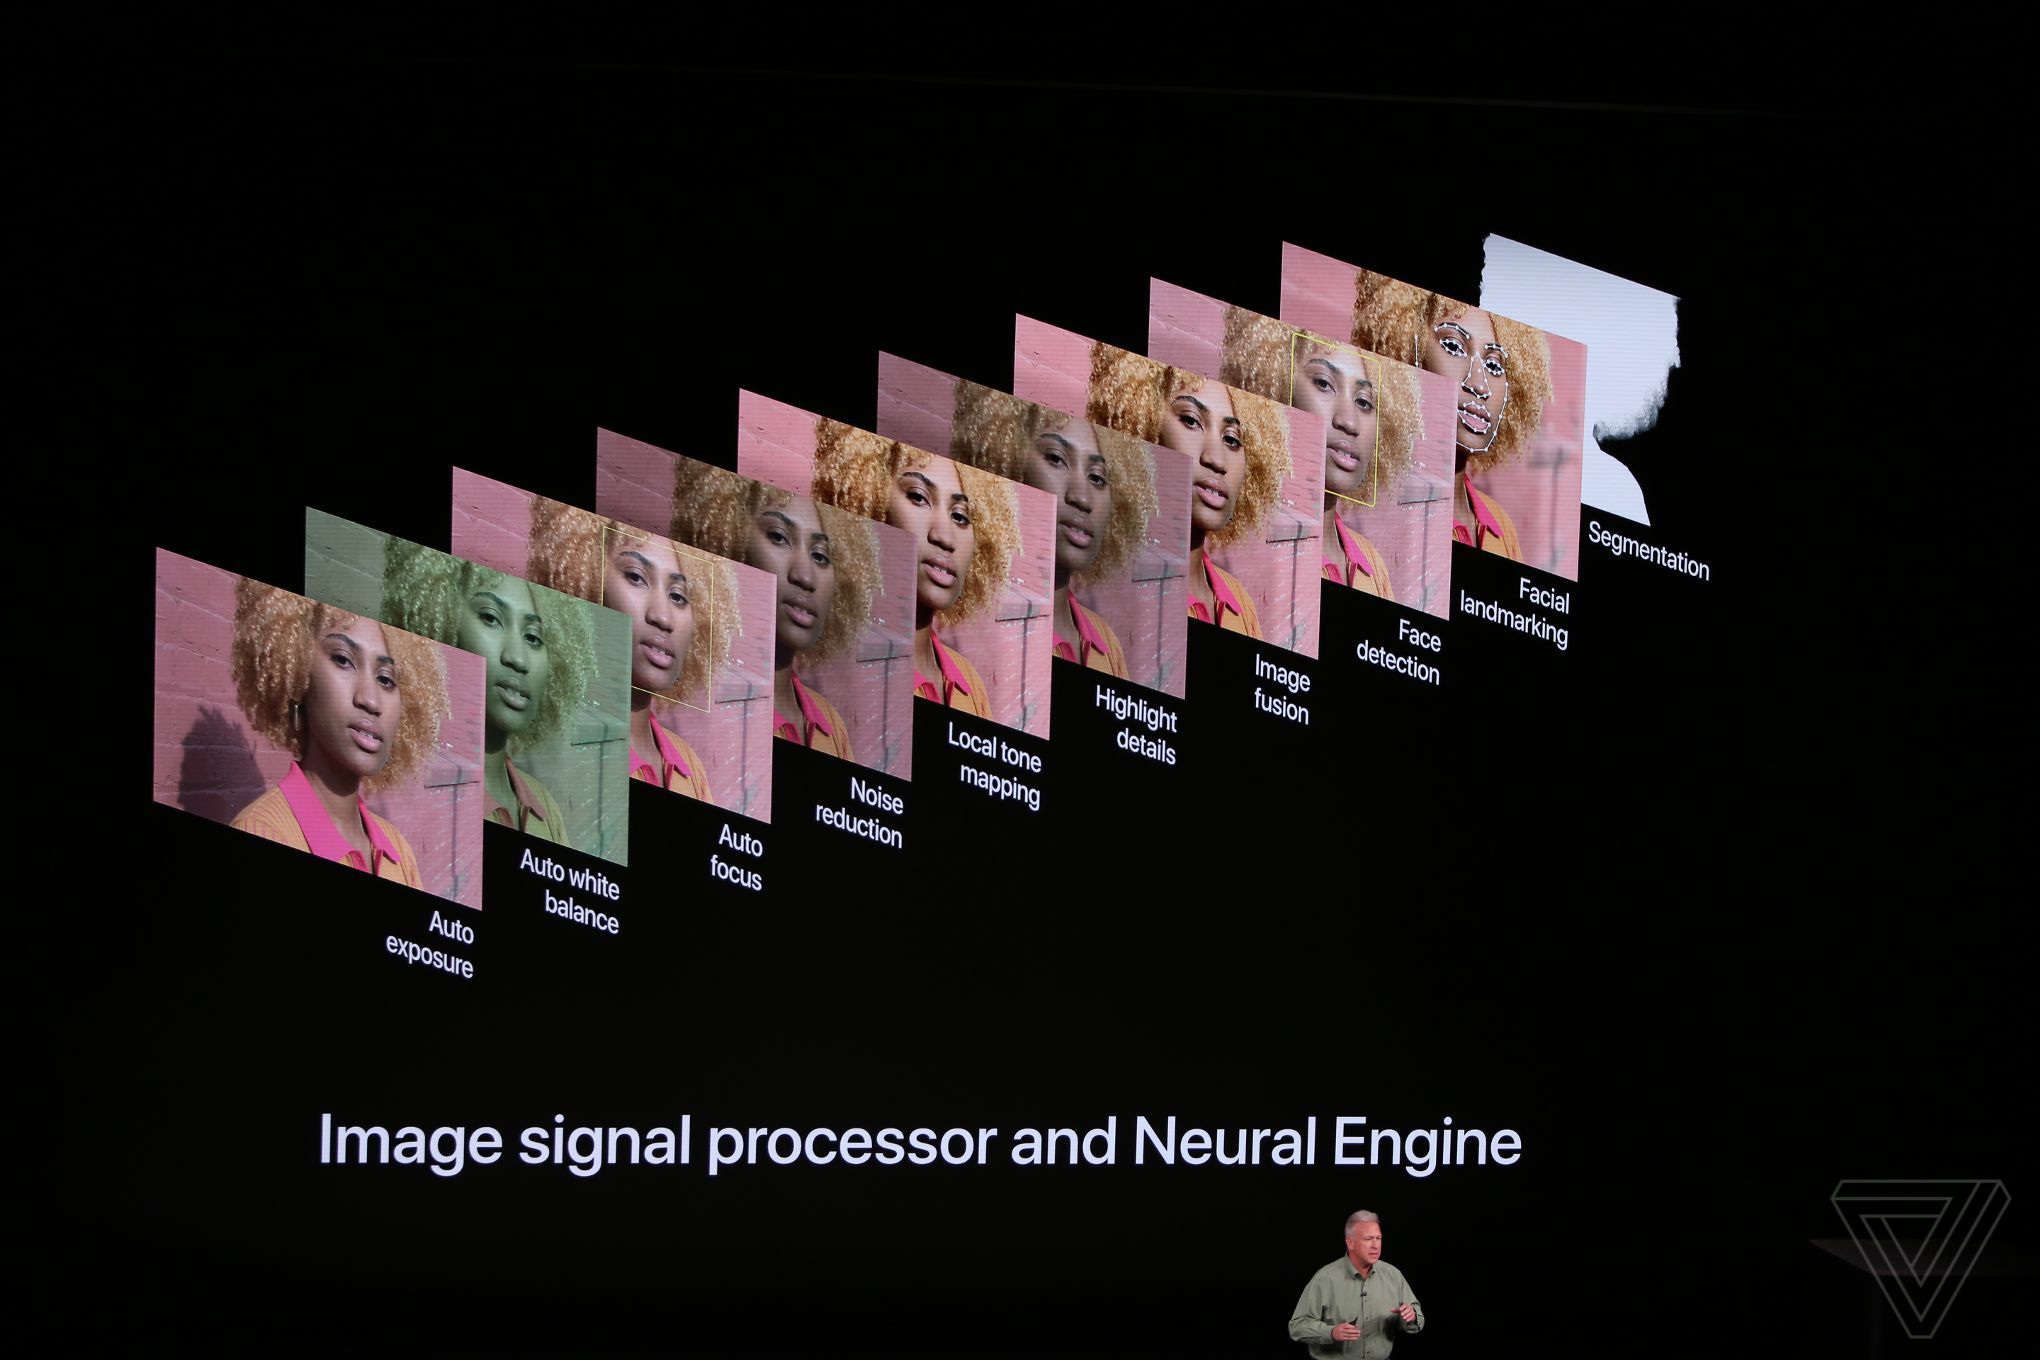
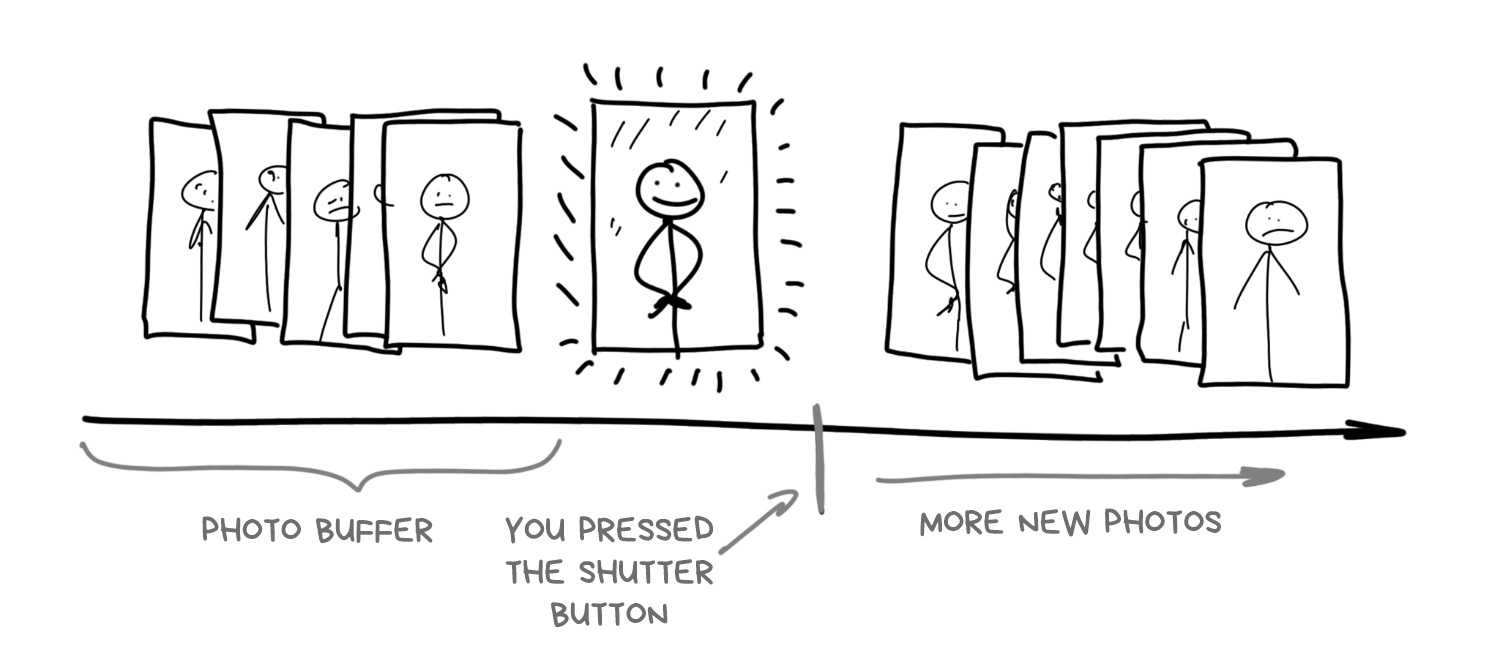
Although many people don’t care how phone cameras work, it is crucial to understanding smartphone photography as a whole: a modern smartphone camera starts taking photos the moment you open it. This makes sense, because it needs to show you an image on the screen. Besides continuously capturing frames, it also stores high-resolution images in a circular buffer and keeps them for a few seconds.
When you press the “take photo” button, the phone has already taken the photo long ago—the camera is simply using the last frame in the buffer.
This is how phone cameras work today—at least high-end smartphones. Buffering enables zero shutter lag (the delay between pressing the shutter and actually capturing the photo), a long-awaited feature for photographers. Some even wish shutter lag could be negative. By pressing the button, the phone can “browse the past”, fish out the last 5–10 frames from the buffer, and start analyzing and combining them aggressively. So we no longer even need explicit HDR or night mode—the camera software will process those frames from the buffer, and users may not even realize their photos are heavily processed.
In fact, this is what iPhones and Pixels do today.
¶ Exposure Stacking: HDR and Light Control

An old debate is whether camera sensors can capture the full brightness range that the human eye can see. Some say no, because the eye can see up to 25 f-stops, while even top full-frame sensors reach only about 14. Others argue that this is not the right comparison, because the eye is assisted by the brain: the brain adjusts your pupils and “completes” the image with neural processing. So the instantaneous dynamic range of the eye is actually no more than 10–14 f-stops. It’s hard! Let’s leave these debates to scientists.
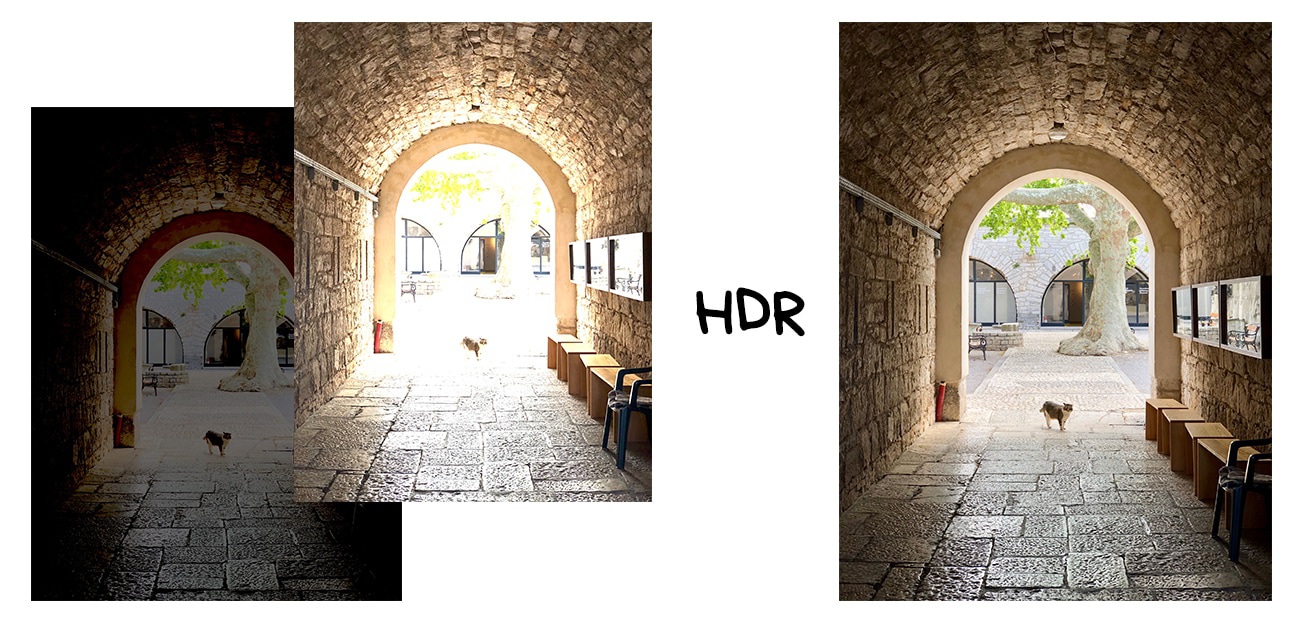
But the problem remains: when you take a photo of a friend against a blue sky with any phone, if you don’t use HDR, you either get a clear sky but your friend is dark, or your friend is clear but the sky is overexposed.
Long ago, people found a solution: HDR (High Dynamic Range) to expand the brightness range. When the scene’s brightness range is too wide, we can capture it in three (or more) steps: take multiple photos with different exposure settings—a “normal” one, a brighter one, and a darker one. Then we use the brighter photo to fill shadows, and use the darker photo to recover overexposed regions.
The last thing we need to solve is auto bracketing: we need to know how to distribute and adjust exposure across frames so the merged photo does not become overexposed. But today, any engineering student can do this with a bit of Python code.
When the simple algorithms in the latest iPhone, Pixel, and Galaxy cameras detect that you are shooting on a sunny day, they automatically enable HDR mode. You can even see how the phone switches into buffer mode to store more images—FPS drops and the preview becomes more vivid. On my iPhone X, the moment it switches is clearly visible. Next time, take a closer look at your smartphone!
The main drawback of bracketed HDR is that it becomes unbelievably useless in low light. Even under household lamps, photos are still dark, and even phones cannot align and stack them well. To solve this, Google announced a different HDR method as early as 2013 on Nexus smartphones: it uses time stacking.
📝 What Is HDR: Concepts, Standards, and Related Aspects
¶ Time Stacking: Long Exposure and Time Lapse

Time stacking lets you get a long-exposure effect from a series of short-exposure photos. This approach was invented by astronomy enthusiasts who love capturing star trails at night. Even with a tripod, you can’t realistically keep the shutter open for two hours, because you must compute all the settings in advance, and any tiny shake ruins the entire result. So they decided to split the process into many few-minute photos and then stack them in Photoshop.

(Star trails are composed by stacking a series of photos, which makes exposure easier to control.)
So the camera never truly performed a long exposure. We simulate the effect by combining multiple consecutive shots. For a long time, many smartphone apps used this trick, but now almost every manufacturer includes it as a standard camera feature.

(A long exposure made from iPhone Live Photos in three clicks)
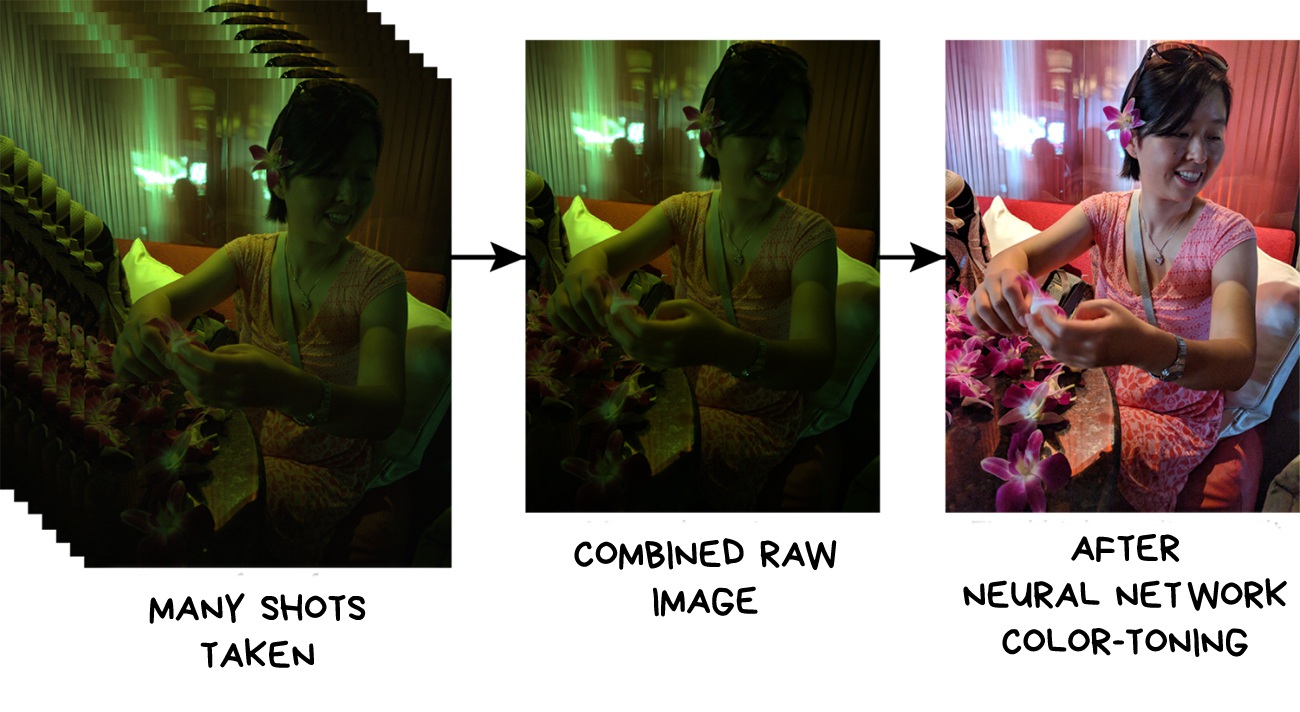
Now, back to Google and its “night HDR”. It turns out that time bracketing can create a decent HDR in the dark. This technology first appeared in Nexus 5 and was called HDR+. It is still so popular that it is even praised in the latest Pixel presentations.
HDR+ is very simple: once the camera detects you are shooting in the dark, it takes the last 8–15 RAW frames from the buffer and stacks them together. This way, the algorithm collects more information about dark regions, minimizes noisy pixels, and avoids cases where the camera fails to capture photons in certain frames for some reason.
Imagine this: you don’t know what a Capybara looks like, so you decide to ask five people. Their stories are mostly similar, but each person mentions unique details, so compared to asking only one person, you get more information. Pixels in a photo work the same way: more information, sharper, and less noise.
📝 HDR+: Low Light and High Dynamic Range photography in the Google Camera App
Stacking photos taken from the same location produces the same “fake long exposure” effect as the star-trail example above. With dozens of frames combined, an error in one frame can be corrected by others. Just imagine how many times you’d have to hammer the shutter button on a DSLR to achieve this.

There is only one thing left: automatic color space mapping. Photos shot in the dark often break color balance (yellowish or greenish), so we need to fix it manually. In early versions of HDR+, this was handled by simple automatic tone fixes, like an Instagram filter. Later, they used neural networks to restore colors.
Night Sight was born from this—the “night photography” feature on Pixel 2, 3, and newer. The description says “HDR+ is built on machine learning”. In reality, it’s just a fancy name for neural networks plus all HDR+ post-processing steps. By training the model on “before” and “after” datasets, we can produce a beautiful image from a set of dark and messy photos.
By the way, this training dataset is public. Maybe people at Apple will pick it up and finally teach the “best camera in the world” to shoot in the dark?
In addition, Night Sight computes motion vectors of objects in the frames and uses stabilization to handle blur. Because long exposures easily produce blur, a smartphone can take sharp parts from other frames and stack them to remove blurry portions.
📝 Night Sight: Seeing in the Dark on Pixel Phones
📝 Introducing the HDR+ Burst Photography Dataset
