計算攝影學 (Computational Photography) 簡介
- 2021-06-03
- Liu, An-Chi 劉安齊
本文翻譯自 Vasily Zubarev 所寫的「Computational Photography-From Selfies to Black Holes」。大部分內容衷於呈現原意,少部分會根據譯者對原文詮釋稍作修改,內文中的「我」皆是指原作者,而譯者的註解會特別標示「譯按」。
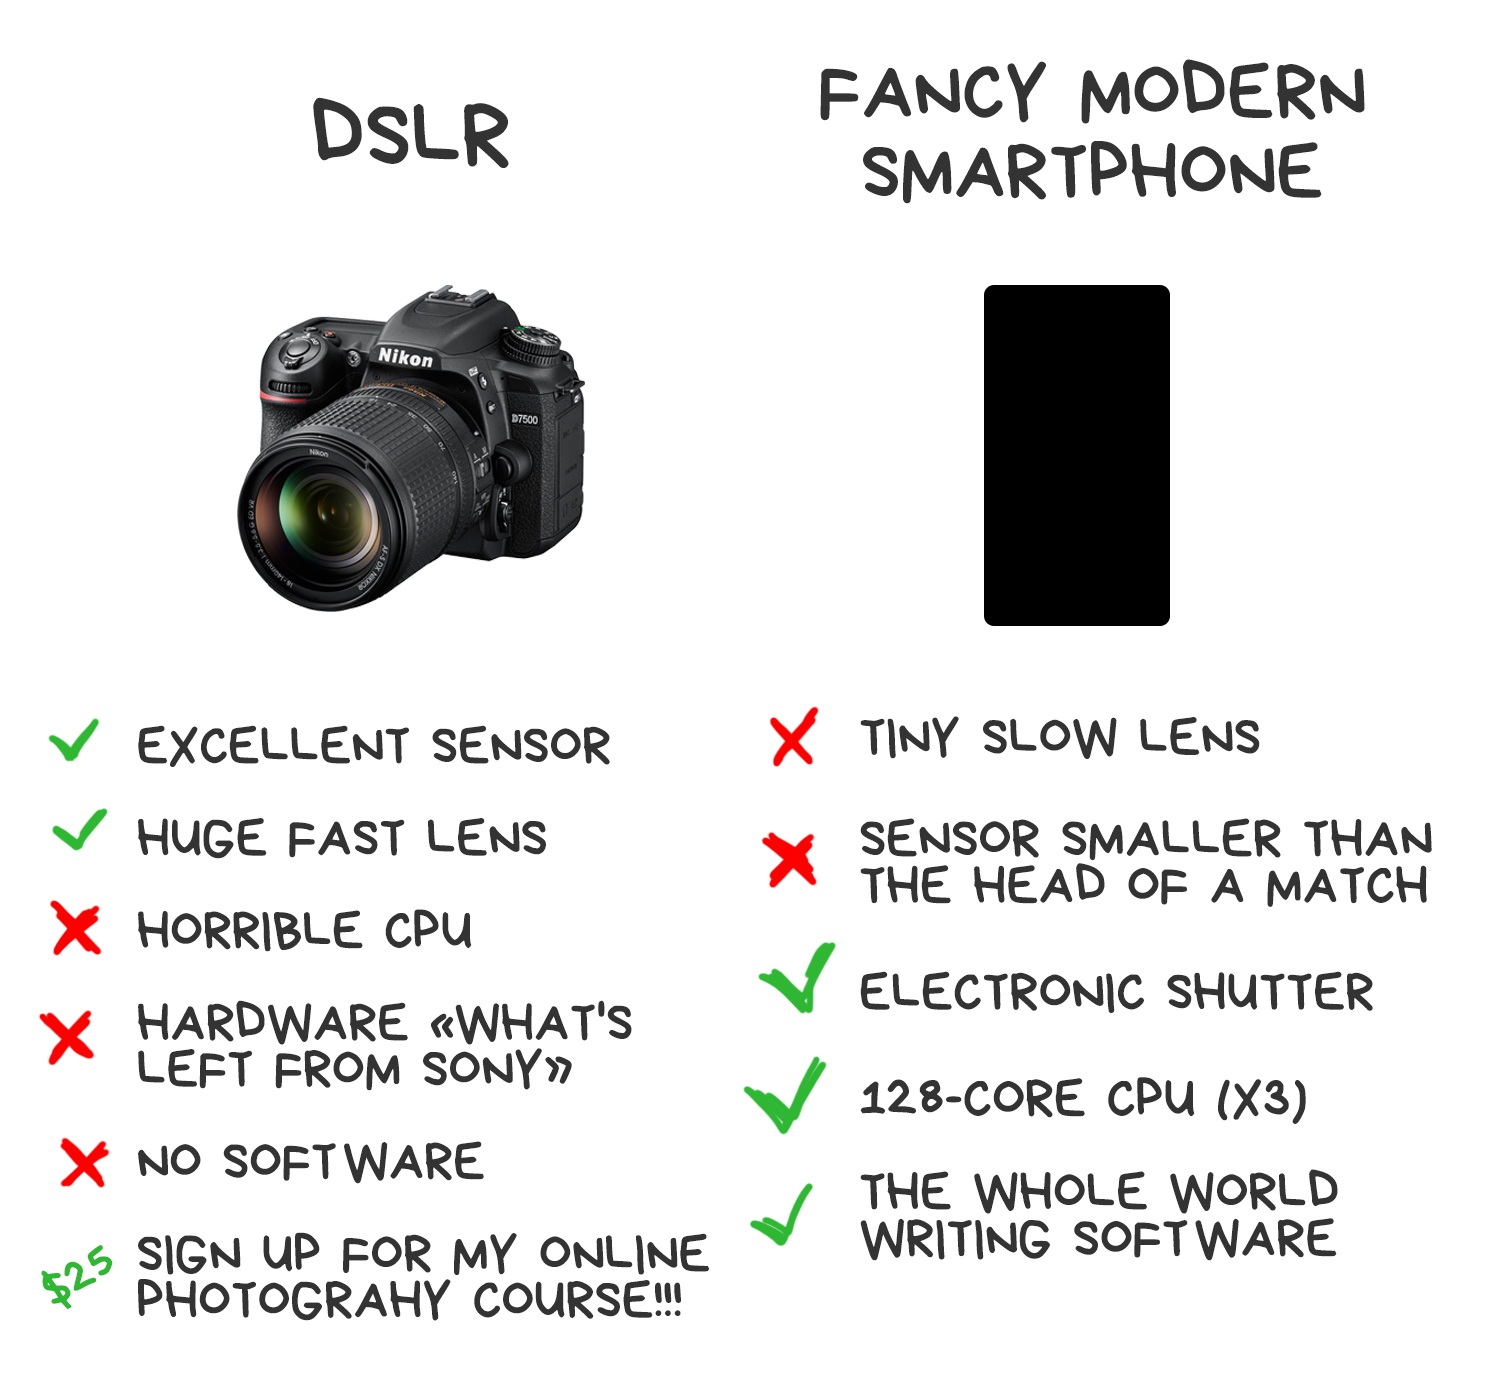
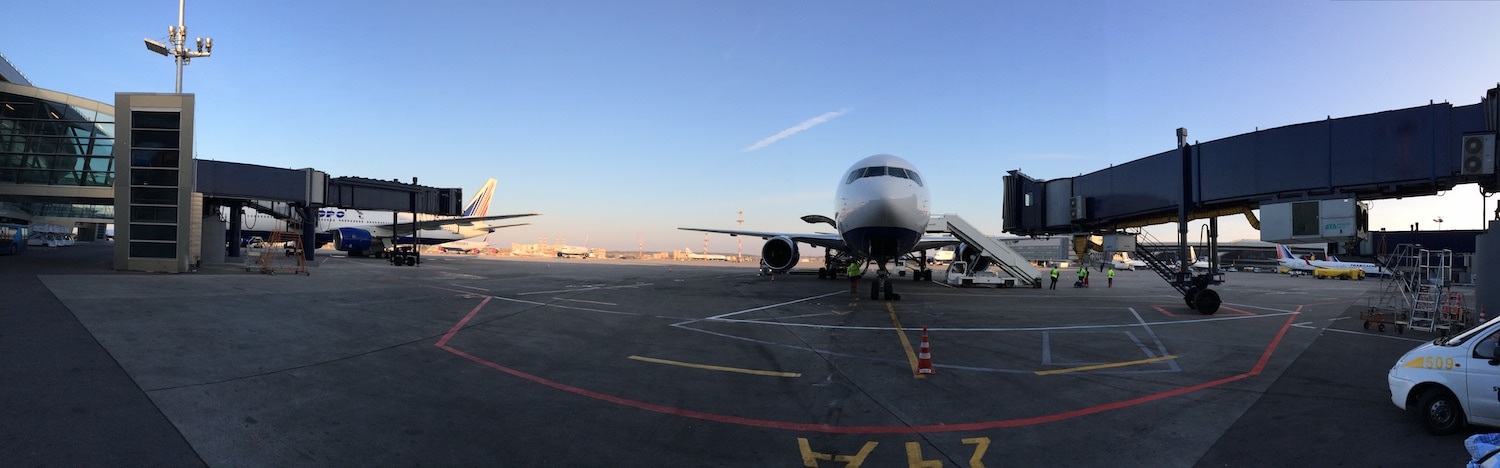
現今智慧手機之所以可以這麼普遍流行,很大一部分需要歸功於搭載他們上面的相機。Pixel 可以在全黑的情況下有好效果,華為手機放大就像使用雙筒望遠鏡,三星手機搭載了八面鏡片,iPhone 的本身甚至就讓你在朋友中優越了不少。在這些手機相機的背後,其實藏有著不可思議的創新。
相對地,單眼相機 (DSLRs) 似乎漸漸式微。儘管 Sony 每年仍推陳出新使人驚艷,但製造商的更新數度顯然持續減緩,甚至主要的營收來源只剩下那些影片創作者。
譯按:不過 Sony 確實還是滿厲害的,可以看他今年 (2021) 最新發表高階旗艦機 Sony A1 技術細節:Sony A1 絕對影像王者 頂尖技術力的展現
我自己就有一台美金 $3000 的尼康相機,但每當我旅行時仍然用 iPhone 來拍照,這是為甚麼?
我在網路上尋找這個問題的答案,我發現很多有關「演算法」與「神經網路」的討論,但卻沒人可以清楚地解釋這些技術到底是怎樣去影像一張照片的呈現。新聞記者僅僅只是把一些產品規格的數據寫出來,部落客只是繼續產生更多開箱文,相機狂熱者只會在意相機呈現的顏色品質是否滿意。噢!網路呀,你給我們真多資訊,真愛你。
於是,我花了大半輩子去了解這背後的種種原理,我將在這篇文解釋我關於手機相機背後的所有事情,不然我大概也不久就忘光光了吧!
¶ 甚麼是計算攝影學
關於計算攝影學 (Computational Photography),任何地方,包含維基百科,你將會得到這樣的定義:「計算攝影學是採用數位計算的方式來產生數位影像或是影像處理,而非透過光學過程來達到。」基本上大部分都挺正確的,除了少數一些地方,像是計算攝影學甚至包含自動對焦的部分,也不包含帶來很多好處的光場相機。看來官方定義仍然有些模糊的部分,我們仍然還是不太懂到底甚麼是計算攝影學!
光場相機是一種捕捉景物所形成光場資訊的相機,除了記錄不同位置下光的強度及顏色外,也記錄不同位置下光線的方向,而一般的相機只能記錄不同位置下光的強度。
史丹佛大學的 Marc Levoy 教授是計算攝影學的先驅,目前他正投入 Google Pixel 相機的開發中,在他的文章中提出了另一種解釋:「計算影像技術使我們加強和延伸數位攝影的可行性,使得我們拍出的照片看起來是如此的平常,卻幾乎不可能使用傳統相機辦到。」我更贊同這個定義,在接下來的文章,我將遵從這個定義。
因此,智慧手機是一切的根源——智慧手機別無選擇帶給人們全新的攝影技術:計算攝影。
智慧手機包含帶有雜訊的感光元件和比較粗糙的鏡頭。根據物理定律,他們應該只會帶給我們糟透的影像,但是直到一些開發人員發現如何去打破物理限制:更快的電子快門、強大的處理器以及更好的軟體。
關於計算攝影學,大部分重要的研究多數在 2005-2015 年,不過這些都是過去的科學了。現在,映入咱們眼簾以及放在口袋的,將是前所未有嶄新的技術與知識。

計算攝影學不僅僅是 HDR 或夜間自拍模式。近期的黑洞拍攝如果沒有最新的計算攝影方法,是絕對不可能拍攝出來的。如果要用一般的望遠鏡去拍黑洞,我們將會需要整個地球這麼大的鏡片。但是,藉由放置在地球不同處的八個電波望遠鏡,並且經由一些滿酷的 Python 程式碼,我們得到了世界上第一張事件視界(event horizon)的照片。
不過拿來拍自拍還是很好用啦,不用太擔心。
📝 Computational Photography: Principles and Practice
📝 Marc Levoy: New Techniques in Computational photography
這篇文章中將會穿插一些連結,他們將導向一些我發現很棒的文章 📝或影片 🎥,使你可以更深入去了解其中你有興趣的部分,畢竟我無法在短短的文章中解釋所有東西。
¶ 起源:數位處理 (Digital Processing)
回到 2010 年,Justin Bieber 發表他第一張專輯,哈里發塔(Burj Khalif)剛剛在杜拜啟用,當時我們還沒有能耐可以去記錄下那些壯觀的宇宙現象,因為我們的照片是充滿噪音的兩百萬像素 JEPG。我們有了第一個無法抵抗的願望,是透過使用「經典的(Vintage)」圖片濾鏡來隱藏手機相機的一文不值,這時 Instagram 也出現了。

數學與 Instagram
由於 Instagram 的發布,任何人可以輕鬆地使用照片濾鏡。身為一個基於「研究目的」對曾對 X-Pro II、Lo-Fi、Valencia (都是濾鏡名稱) 做逆向工程的男人,我還記得這些濾鏡基本上包含三個部分:
-
顏色設定(色調、飽和度、亮度、對比、色階等)是基本的參數,如同過去攝影師在早期使用的濾鏡一般
-
色調映射(Tone Mapping)包含一組向量的值,例如他告訴我們「一個色調 128 的紅色應該被改成色調 240」。他通常被使用在單一顏色的圖片中,如同這個,是一個 X-Pro II 濾鏡的範例。

-
疊加(Overlay)——使用半透明的圖片,上面包含灰塵、顆粒、小插圖或是任何東西,使其覆蓋在別的圖片上得到新的效果,不過不常使用。

現代濾鏡不僅只有上述三個參數,但就會在數學方面變得更複雜一些。藉由手機支援硬體 Shader (著色器) 計算與 OpenCL 的支援,這些計算可以輕鬆的在 GPU 上面實現,確實是有夠酷!當然,這我們在 2012 年時就能做到。而現在,任何一個孩子都可以輕鬆透過 CSS來辦到一樣的效果,不過他仍然沒機會邀請一個女孩去舞會就是了。
然而,在濾鏡上的進展仍然持續進行著,像是一些人在 Dehancer 上就實踐了一些非線性的濾鏡,不同於簡單的映射對應的修改方式,這些人用了不少華麗且複雜的轉換函數 (transformations),這使得濾鏡得以有更多的可行性。
你可以藉由非線性的轉換函數來做到非常多的變化,但是就會使得處理變得複雜,而人們並不擅長這種複雜的工作,幸運的是我們可以藉由數值方法或是神經網路來做到,他們做到一樣的事情,但卻簡單了許多!
¶ 自動化調整與「一鍵完成」的夢想
當大家都習慣使用濾鏡之後,我們甚至直接把濾鏡直接整合進相機裡面了。誰是第一個想到把濾鏡放進相機的人已經不可考了,不過我們可以得知早在 iOS 5.0 發布的 2011 年,我們已經可以在裡面看到「自動增強圖片」公開的 API。看來賈伯斯在公開 API 之前早就察覺到濾鏡已經被使用多久了。
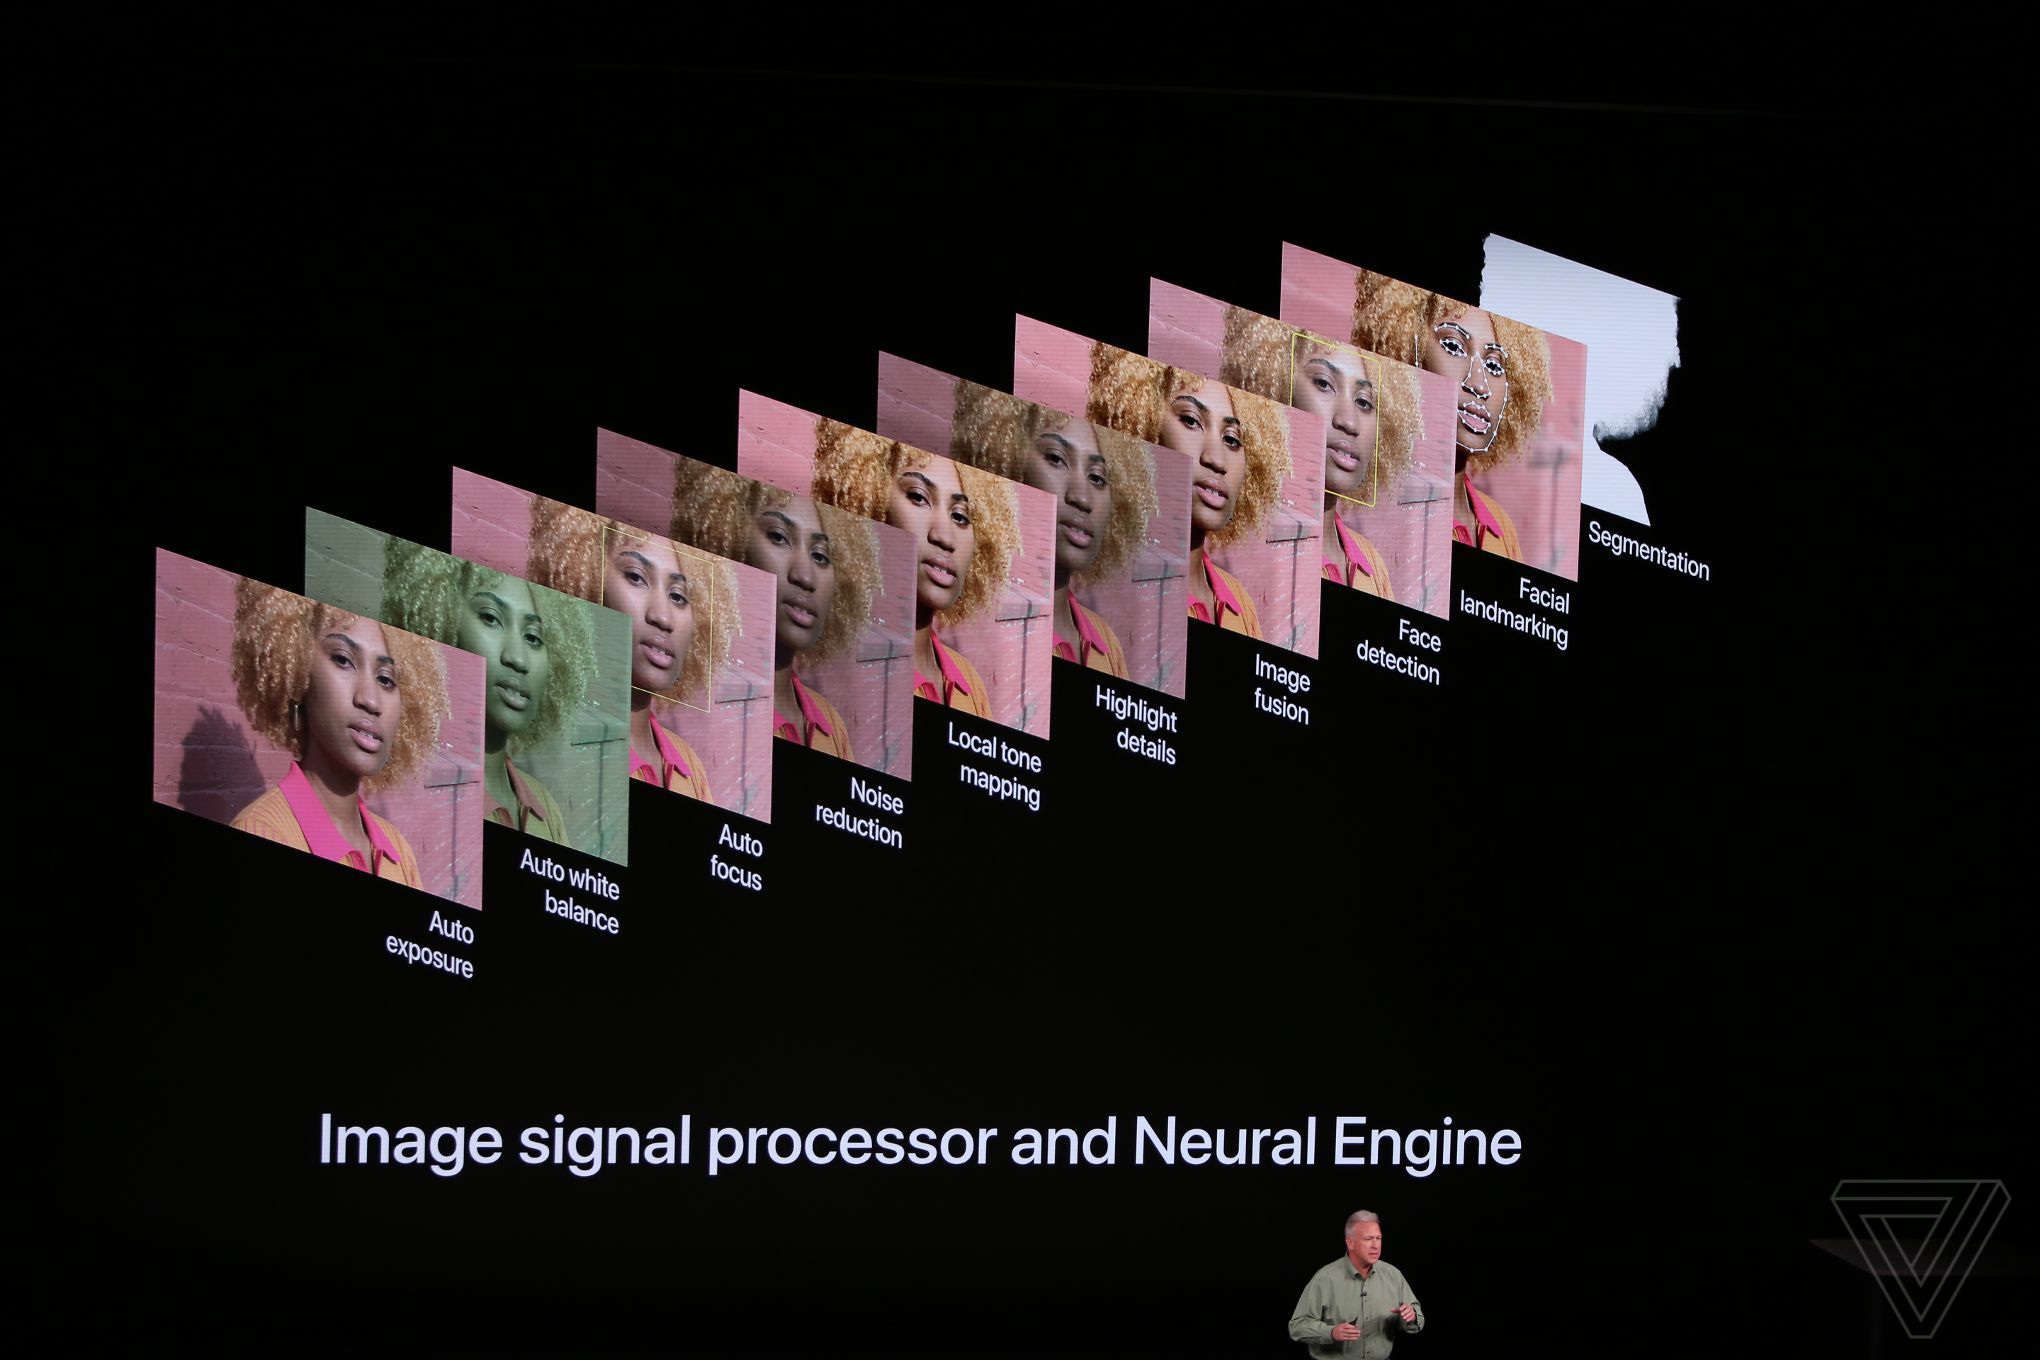
自動化調整圖片在做的事情跟我們使用圖片編輯軟體做的事其實一模一樣,基本上就是修正光線和陰影,增加一些亮度,移除紅眼,修正臉部的顏色等,而使用者根本不會想到這個「神奇的加強版相機」其實背後靠的僅僅就是幾行的程式碼。
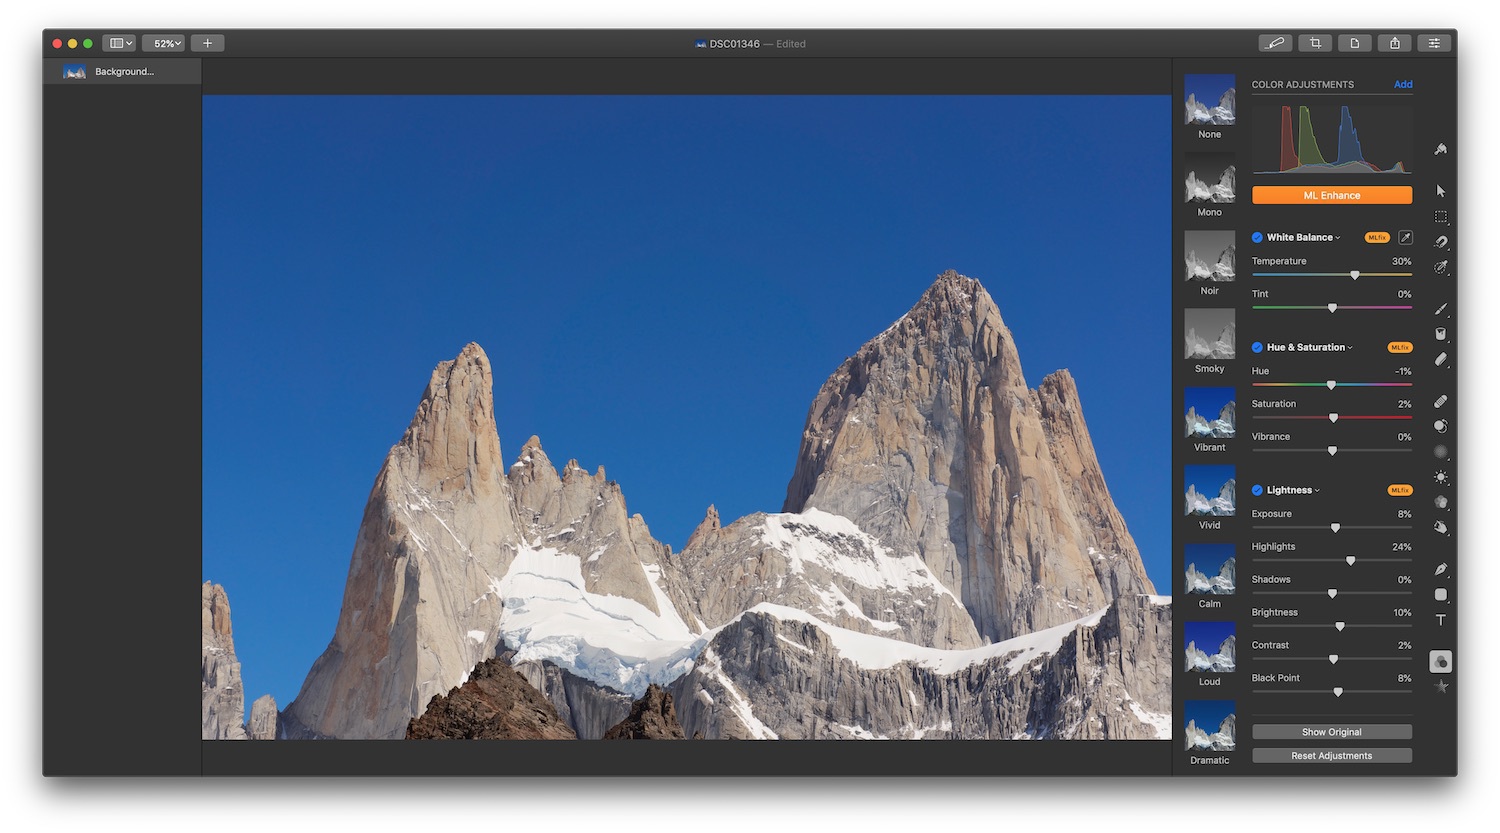
時至今日,「一鍵生成」的戰爭已經轉移至機器學習的領域了。已經厭倦做一堆風格轉換映射的操作的人們,開始轉向 CNN 和 GAN 的懷抱,讓電腦自己去幫我們去調整修圖滑桿。換句話說,我們給機器一張圖片,他會自己去決定各種光學的參數,讓生成的圖片去接近我們所認知的「好的照片」。你可以上 Photoshop 或 Pixelmator Pro 之類的影片編輯軟體的官方網頁,看看他們如何用最新的機器學習特色功能來吸引你買單。你大概可以猜到機器學習不會永遠都行的通,但你永遠可以透過使用一堆資料集來訓練你自己的機器學習模型來做到更好。下面的一些資源也許對你有幫助,或是沒有 XD
📝 Image Enhancement Papers
📝 DSLR-Quality Photos on Mobile Devices with Deep Convolutional Networks
堆疊(Stacking):智慧手機 90% 的功臣
真正的計算攝影學來自於堆疊(Stacking)——一種將好幾張照片一張張疊在一起的技術。對於智慧手機來說,一秒內拍下幾十張照片輕而一舉。因為手機內部的機構沒有任何使快門變慢的部分,像是光圈都是固定的,並且是採用電子快門 (相較於傳統的機械快門)。處理器只需要各素感應器他應該要收多收毫秒的光子,然後我們就得到一張照片了。
技術上來說,手機可以像是拍影片一般的速度去照相(我們一般不會用 60fps 去照相對吧?),它甚至也可以用照片的高畫質去錄影(一般錄影 4k (4000 萬像素) 已經很高畫質了,但相片動輒一億畫畫素),但這樣做都會增加資料傳輸和處理器的負擔,因此軟體終究會因為硬體而有限制。
Stacking 技術已經發展有一段時間了。 甚至發明者的爸爸們也使用 Photoshop 7.0 的插件來收集一些瘋狂銳化的 HDR 照片或製作 18000x600 像素的全景圖,而且…沒人知道下一步該怎麼做。美好的探索時光。
現今人們將其稱為「epsilon photography (微調攝影)」,這意味著我們不斷更改相機參數(曝光、聚焦或位置)並合成出一張原本單靠單次拍攝不可能得到的照片。 但在實踐中,我們稱這技術為堆疊。如今,所有行動裝置相機的創新中有 90% 都基於此。
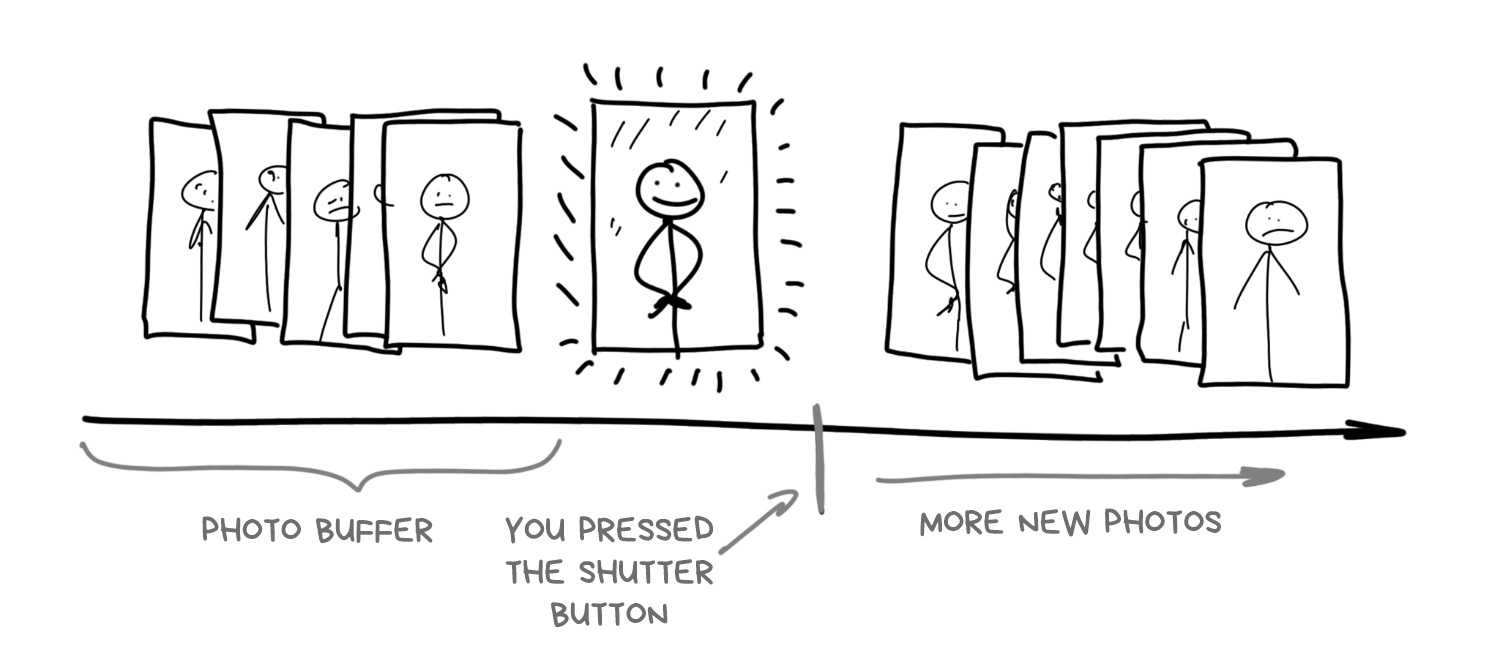
雖然有很多人不在乎,但這對於理解整個行動裝置攝影卻至關重要:現代的智慧型手機相機一打開就開始拍照。 這滿有道理的,畢竟它要在螢幕上顯示圖像給你看。 除了不斷拍照外,它還將高解析度圖片保存在系統的循環緩衝區中,並將它們存儲幾秒鐘。
當您點擊「拍攝照片」按鈕時,實際上已經手機早就拍攝了照片,相機其實只是使用緩衝區中的最後一張照片
如今,這就是任何手機相機的運作方式,至少高階智慧型手機是這樣。緩沖不僅可以實現零快門延遲 (按下快門到真的拍下照片的時間差),這是攝影師期望已久的功能,有時甚至希望快門延遲可以是負的。透過按下按鈕,手機可以瀏覽過去,從緩衝區中去撈 5-10 張最後的照片,並開始對其進行瘋狂地分析和組合。所以我們甚至不再需要使用高動態範圍成像 (HDR) 或夜間模式,手機軟體會從緩衝區去處理好這些照片,用戶甚至都不會意識到拍的照片是被加工過的。
事實上,這就是現在 iPhone 或 Pixel 在做的事情。
¶ 曝光疊加 (Exposure Stacking):高動態範圍成像 (HDR) 與光線控制

一個存在已久的熱門話題是相機傳感器是否可以捕捉我們眼睛可以看見的整個亮度範圍。 有人說不行,因為眼睛最多可以看到 25 個 f-stops,甚至頂級的全畫幅傳感器也就最大達到 14。其他人則覺得不正確,因為我們的眼睛是由大腦輔助的,大腦會自動調整您的瞳孔並通過其神經網絡完成圖像。所以眼睛的瞬時動態範圍實際上不超過10-14 f-stops。太難了!讓我們把這些爭論留給科學家。
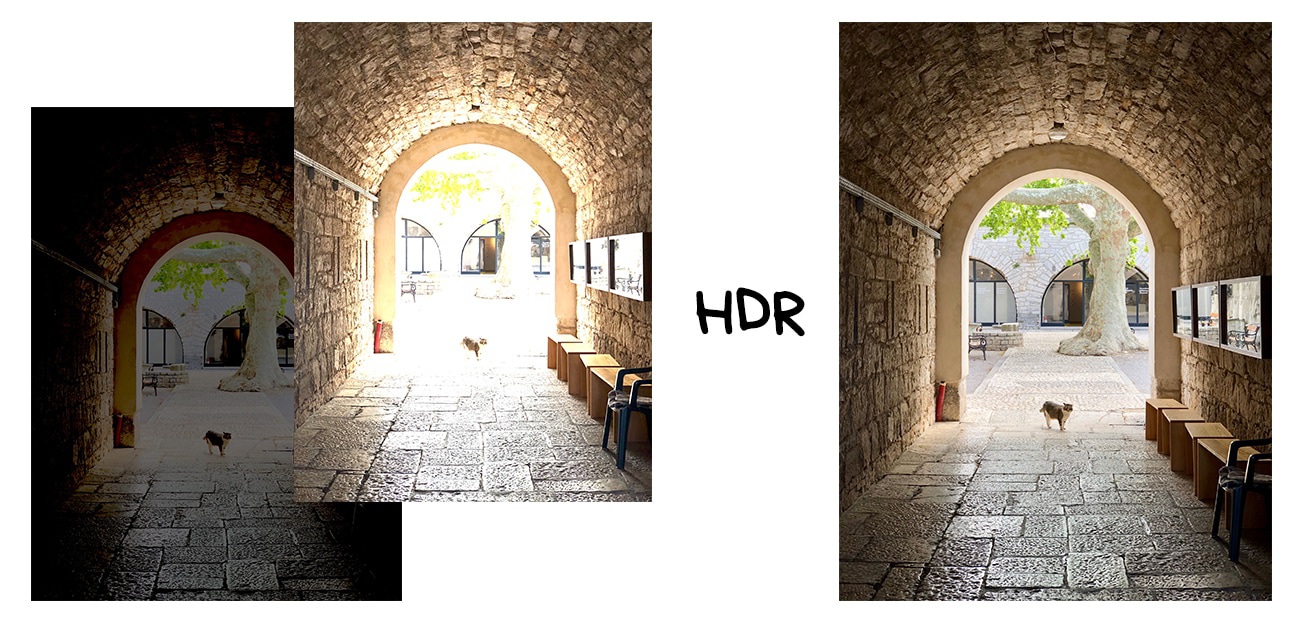
但問題依舊存在—當你使用任何手機拍攝背對藍天的朋友時,如果沒有使用 HDR,你要馬得到一個清楚的天空但朋友是黑的,又或者朋友是清楚的但天空卻過曝了。
人們很久以前就找到了解決方案——使用 HDR(高動態範圍)擴大亮度範圍。當我們不能立即取得大範圍的亮度時,我們可以分三步(或更多)來完成。我們可以用不同的曝光拍攝幾張照片——「正常」的、更亮的、更暗的各一張。然後我們可以用明亮的照片填充陰影的部分,並從較暗的照片中恢復過度曝光的區域。
這裡需要做的最後一件事是解決自動包圍的問題。我們需要將每張照片的曝光量如何分配調整,以免有過度曝光?然而,今天任何理工生都可以使用一些 Python 程式碼來做到這一點。
當最新款 iPhone、Pixel 和 Galaxy 相機內的簡單算法檢測到您在晴天拍攝時,它們會自動開啟 HDR 模式。您甚至可以看到手機如何切換到緩沖模式 (Buffer Mode) 以保存移動的圖像——此時 FPS 下降,螢幕上的圖片變得更加生動。每次切換的瞬間在我的 iPhone X 上都清晰可見。下次仔細看看你的智能手機!
.block-side.block-side__right.width-25 
帶有包圍曝光的 HDR 的主要缺點是它在光線不足的情況下令人難以置信的毫無用武之地。 即使在家用燈的光線下,照片仍然很暗,甚至手機也無法將它們調整堆疊在一起。為了解決這個問題,谷歌早在 2013 年就在 Nexus 智能手機中宣布了一種不同的 HDR 方法。它使用時間疊加 (Time Stacking)。
¶ 時間疊加 (Time Stacking):長時曝光與時間流逝

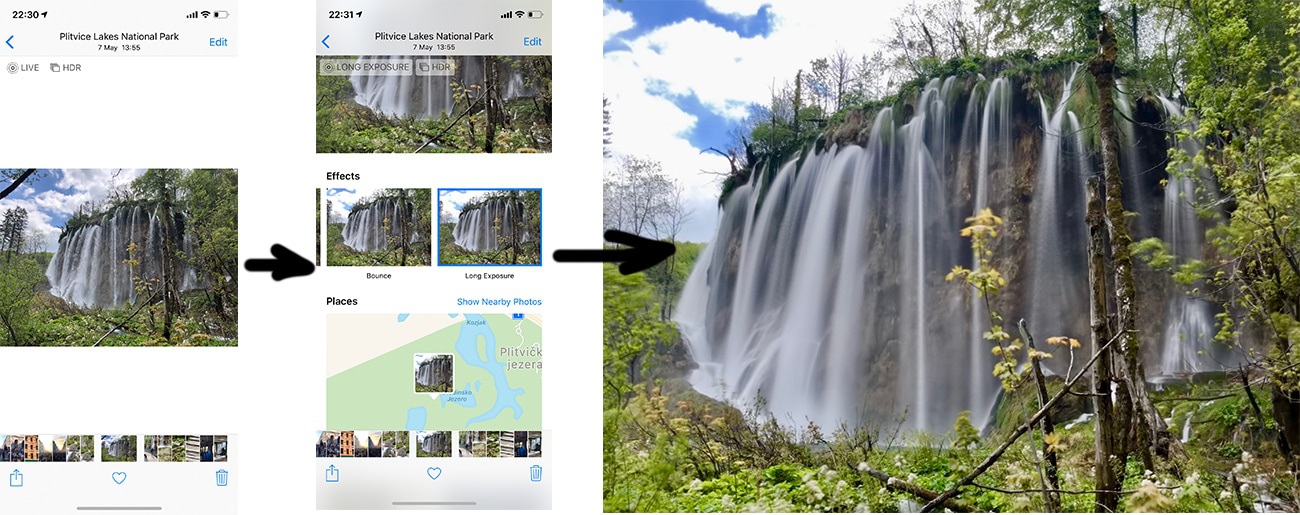
時間疊加可讓您透過一系列短時間曝光的照片獲得長曝光效果。這種方法是由喜歡拍攝夜空中星跡照片的天文愛好者們首創的。即使使用三腳架,也無法做到打開快門兩個小時來拍攝這樣的照片。您必須事先計算所有設置,任何輕微的晃動都會破壞整個拍攝結果。所以他們決定將這個過程分成好多個幾分鐘的照片,然後在 Photoshop 中將圖片堆疊在一起。

因此,相機從來沒有長時間曝光拍攝過。我們透過組合幾個連續鏡頭來模擬效果。長期以來,手機上有很多應用程式都在使用這個技巧,但現在幾乎每個製造商都將其添加到標準相機工具中。
讓我們回到 Google 和它的夜間 HDR。事實證明,使用時間包圍可以在黑暗中創建一個不錯的 HDR。 這項技術首次出現在 Nexus 5 中,被稱為 HDR+。 該技術仍然十分受歡迎,以至於在最新的 Pixel 演示文稿中 它甚至受到稱讚。
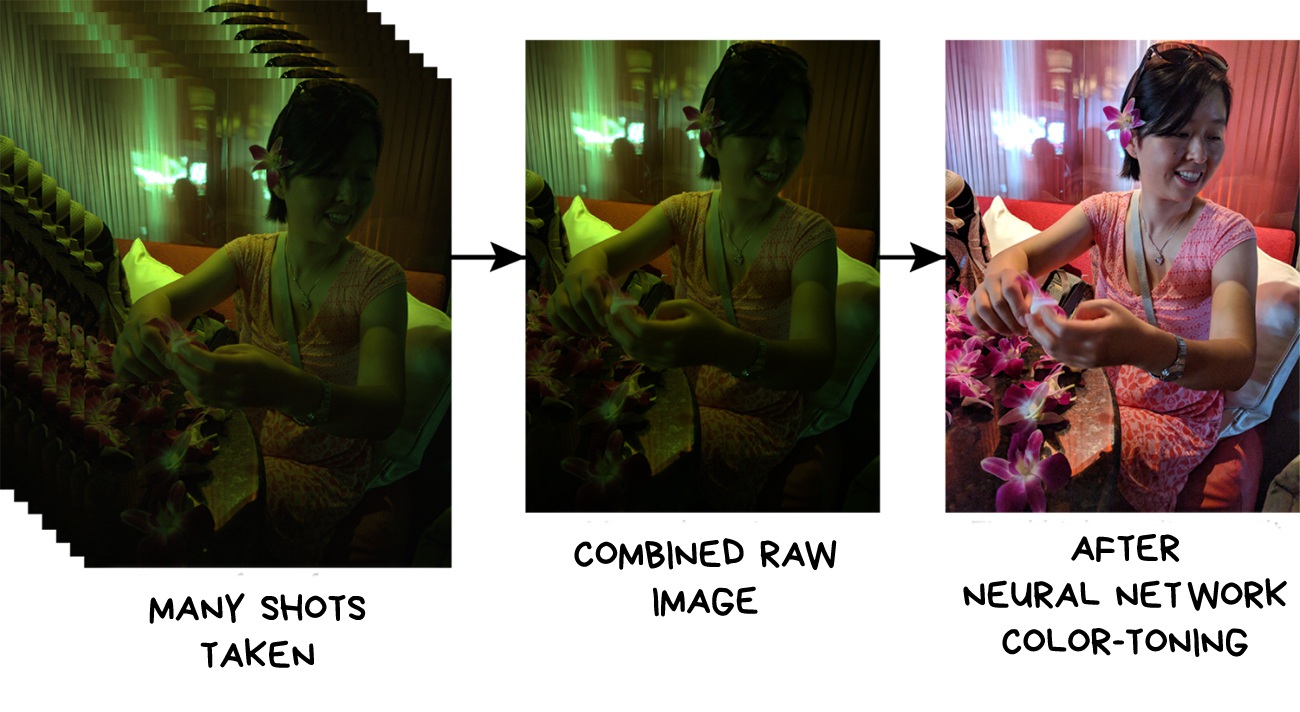
HDR+ 的工作非常簡單:一旦相機檢測到您在黑暗中拍攝,它就會從緩衝區中取出最後 8-15 張 RAW 照片並將它們堆疊在一起。這樣,演算法會收集更多關於鏡頭暗區的訊息,以最大限度地減少噪點像素,避免某些原因導致相機出錯並且未能在每個特定幀上捕捉到光子。
想像一下:你不知道 Capybara 長什麼樣,所以你決定問五個人。他們的故事大致相同,但每個人都會提到任何獨特的細節,因此與僅詢問一個人相比,您可以獲得更多資訊。照片上的像素也會發生同樣的情況。更多資訊、更清晰、噪點更少。
📝 HDR+: Low Light and High Dynamic Range photography in the Google Camera App
組合從同一點捕獲的圖像會產生與上面帶有星星的示例中相同的假長曝光效果。幾十張照片的曝光匯總,一張照片的錯誤在另一張照片上被最小化。想像一下,要實現這一點,您需要在數碼單反相機中猛按快門多少次。

只剩下一件事,就是自動色彩空間映射。在黑暗中拍攝的照片通常會破壞色彩平衡(偏黃或偏綠),因此我們需要手動修復。在早期版本的 HDR+ 中,這個問題是透過簡單的自動色調修復解決的,就像 Instagram 濾鏡一樣。後來,他們使用了神經網絡來復原色彩。
Night Sight 技術 就是這樣誕生的——Pixel 2、3 和更高版本中的「夜間攝影」技術。描述說「HDR+ 是建立在機器學習技術之上」。事實上,它只是神經網絡和所有 HDR+ 後處理步驟的一個花哨名稱。機器接受了「之前」和「之後」照片數據集的訓練,以從一組黑暗和遭亂的照片中製作出一張漂亮的圖像。
順便說一下,這個數據集是公開的。 也許蘋果公司的人會接受它並最終教他們“世界上最好的相機”在黑暗中拍攝?
269 / 5000
Translation results
此外,Night Sight 計算鏡頭中物體的 運動矢量 以標準化模糊,這肯定會出現在長時間曝光中。 因此,智能手機可以從其他鏡頭中取出鋒利的部分並將它們堆疊起來。 .
📝 Night Sight: Seeing in the Dark on Pixel Phones
📝 Introducing the HDR+ Burst Photography Dataset
¶ Motion Stacking
Panorama, super-zoom and noise control

Panorama has always been a favorite kids toy. World’s history knows no cases when a sausage photo was interesting to anyone but its author. However, it’s still worth to talk about it though because that’s how stacking got into many people’s lives.
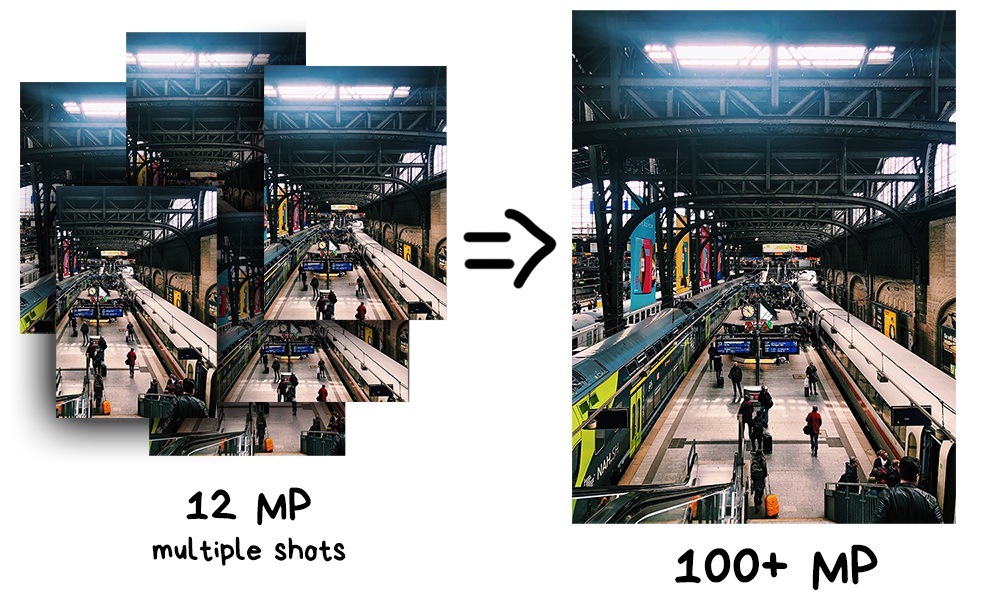
The very first useful application for panorama is making super-resolution photos. By combining multiple slightly shifted images, you can get a much higher resolution image than the camera provides. Thus you can receive a photo in hundreds of gigapixels resolution, which is very useful if you need to print it for a house-sized billboard.
📝 A Practical Guide to Creating Superresolution Photos with Photoshop
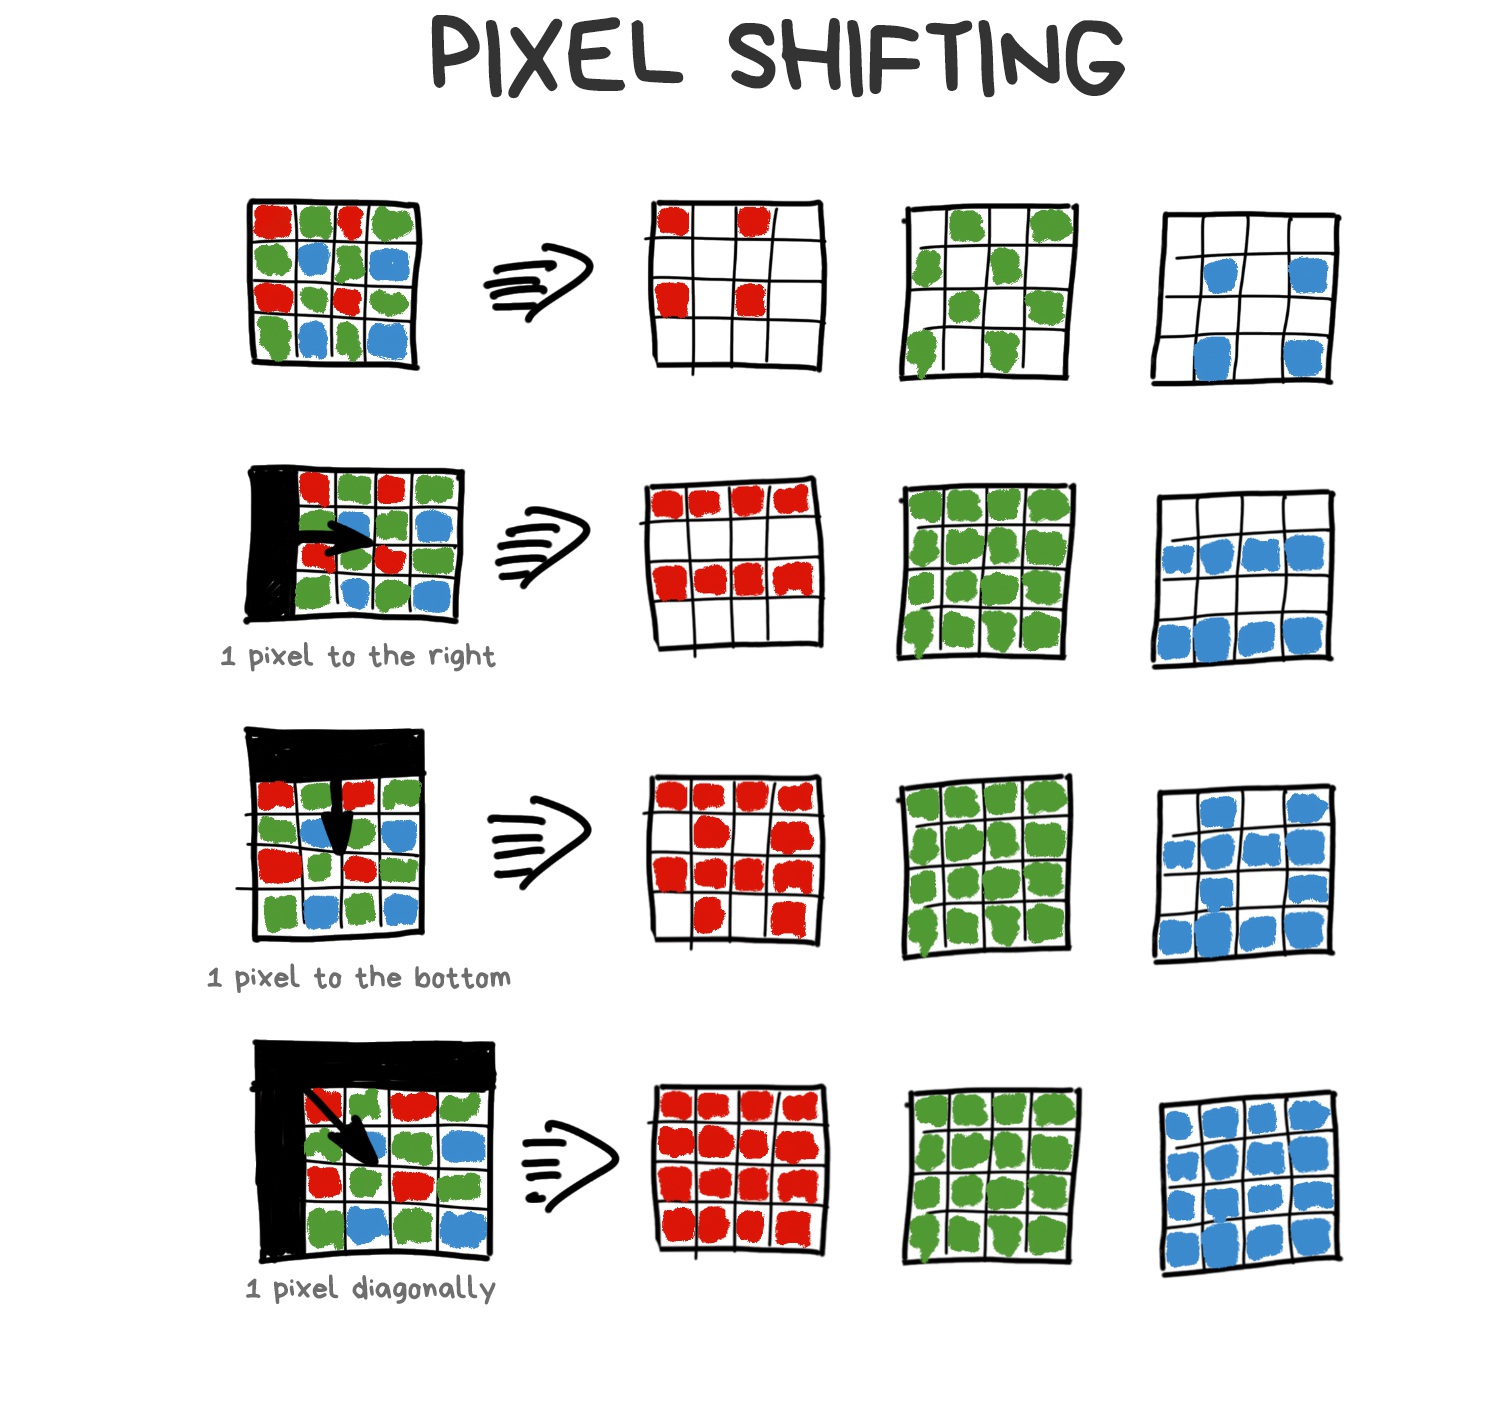
Another and more interesting approach called Pixel Shifting. Some mirrorless cameras like Sony and Olympus started supporting it in 2014, but they’re still asking you to combine the result yourself. Typical DSLR innovations.
Smartphones have succeeded here for a hilarious reason. When you take a picture, your hands are shaking. This “problem” became the basis for the implementation of native super-resolution on smartphones.
To understand how it works, we need to remember how any camera’s sensor works. Each pixel (photodiode) can capture only the intensity of light, i.e., the number of photons which broke through. However, a pixel cannot measure the color (wavelength). In order to get an RGB-image, we had to hack it around and cover the whole sensor with a grid of multicolored glasses. Its most popular implementation is called Bayer filter and is used today in most sensors.
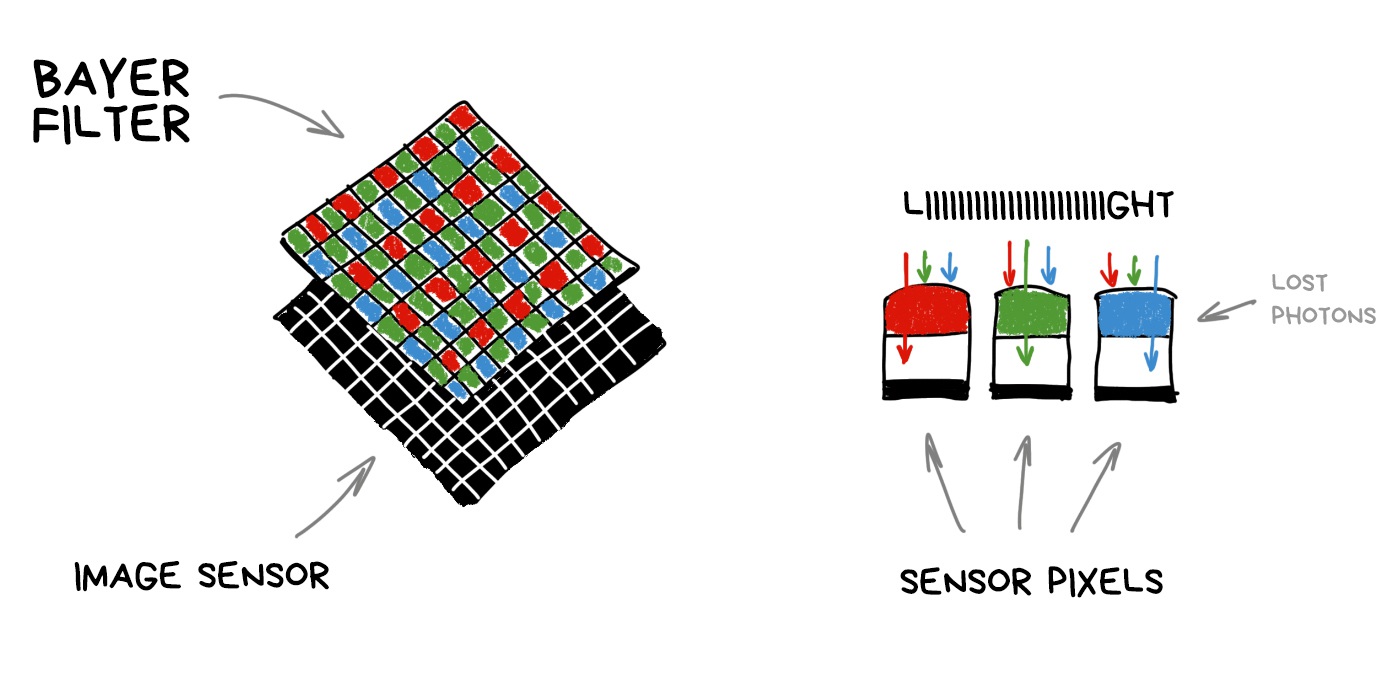
It turns out that each pixel of the sensor catches only R, G or B-component because rest of the photons are mercilessly reflected by Bayer filter. Missing components are computed by averaging nearby pixels later.
.block-side.block-side__right 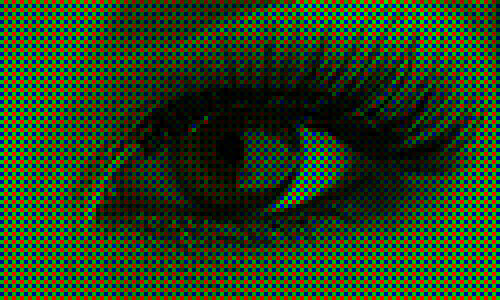
Made by analogy with the human eye, the Bayer filter has more green cells than others. Thus, out of 50 million pixels on the sensor, about 25 million will only (!) capture the green light, while red and blue will capture 12.5 million each. The rest is averaged. This process called debayering or demosaicing and this is that fat and funny kludge which keeps everything together.
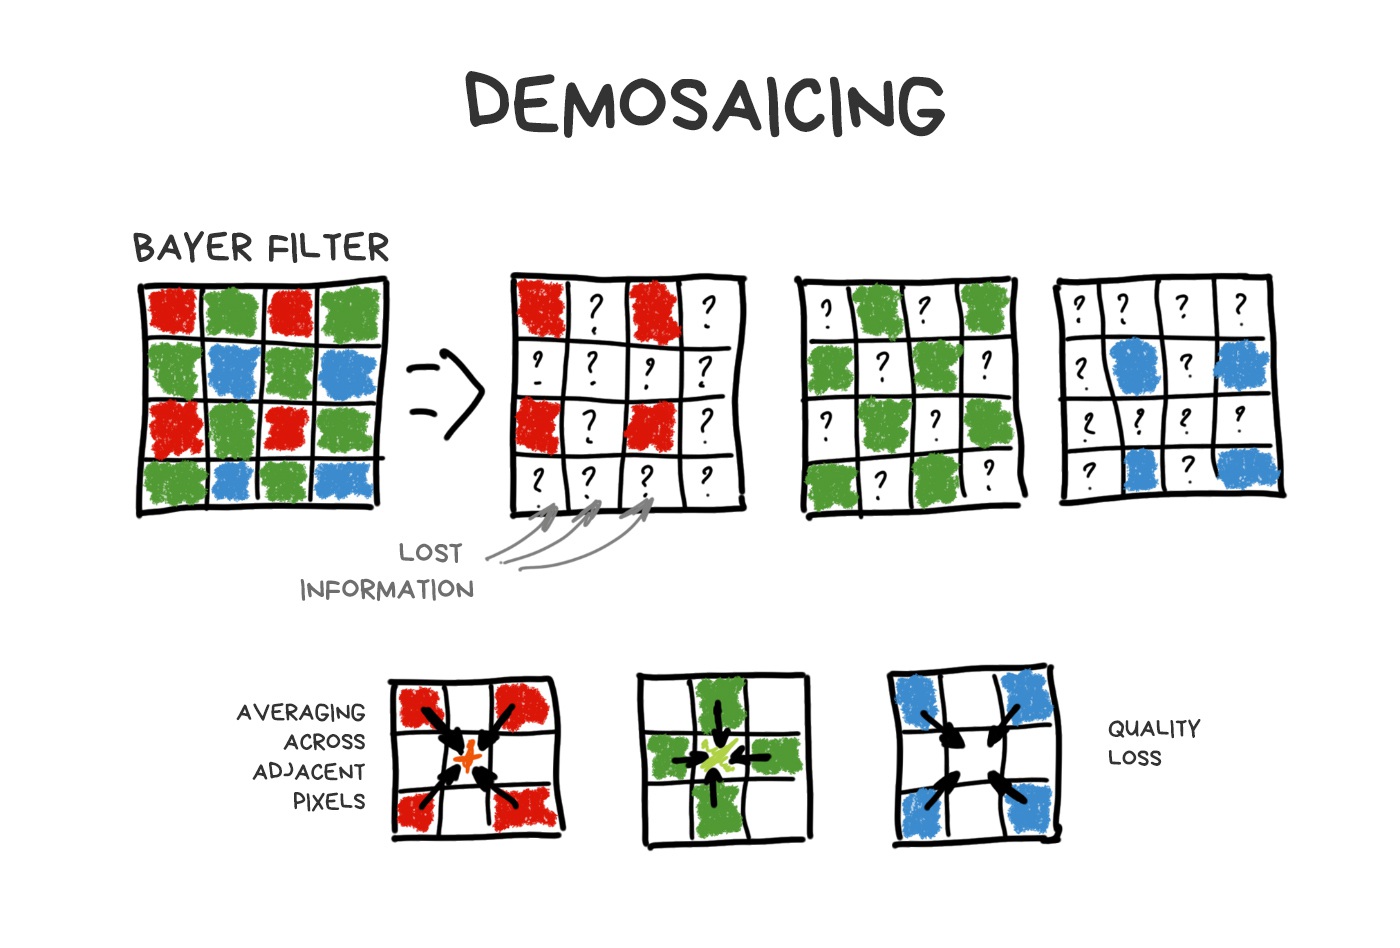
% In fact, each sensor has its own tricky and (of course) patented demosaicing algorithm, but in this story we don’t care.
Other types of sensors (such as Foveon) didn’t get that popular. Some rare smartphone manufacturers like Huawei though tried to play with non-Bayer filters to improve sharpness and dynamic range. Mostly unsuccessful.
Thanks to the Bayer filter, we lose a ton of photons, especially in the dark. Thus, we came up with the idea of Pixel Shifting — shift the sensor by one-pixel up-down-left-right to catch them all. The photo doesn’t appear to be 4 times larger, as you might think, it just helps the demosaicing algorithm do its job better — now it can average colors not by neighboring pixels, but by 4 versions of itself.
.block-side.block-side__right.width-25 
Our shaking hands make Pixel Shifting natural for mobile photography. And that’s how it implemented in the latest versions of Google Pixel. You notice it when zooming on your Android phone. This zooming called Super Res Zoom (yes, I also enjoy the harsh naming). Chinese manufacturers already copied it to their phones, although it’s worse than the original.
📝 SIGGRAPH 2019: Handheld Multi-frame Super-resolution
📝 See Better and Further with Super Res Zoom on the Pixel 3
Stacking of slightly shifted photos allows us to collect more information about every pixel to reduce noise, sharpen and raise the resolution without increasing the physical number of sensor megapixels. Modern Android phones do it automatically, while their users don’t even realize.
¶ Focus Stacking
DoF and refocus in post-production

The method came from macro photography, where the depth of field has always been a problem. To keep the entire object in focus, you had to take several shots, moving focus back and forth, and combine them later into one sharp shot in photoshop. The same method is often used by landscape photographers to make the foreground and background sharp as shark.
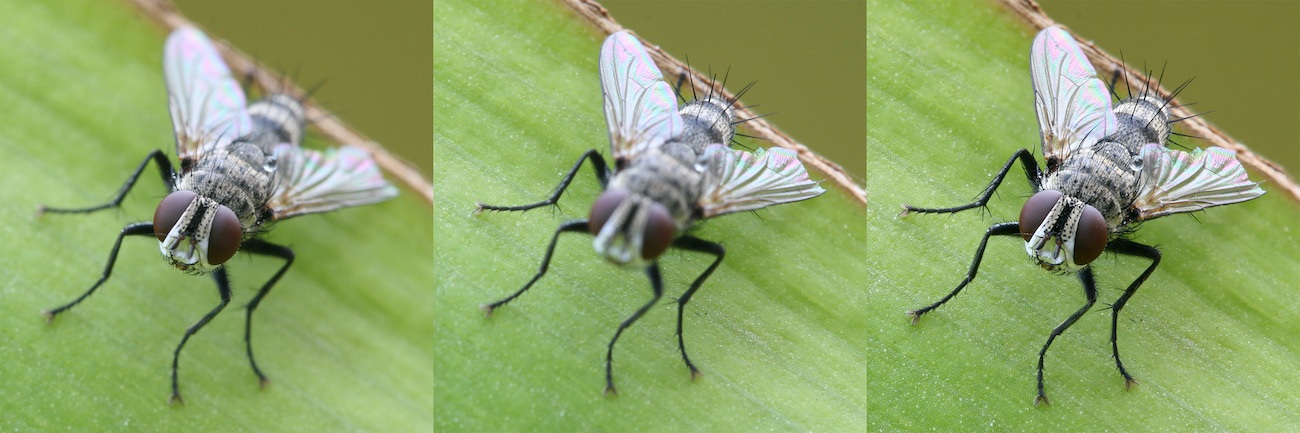
Of course, it all migrated to smartphones. With no hype, though. Nokia released Lumia 1020 with “Refocus App” in 2013, and Samsung Galaxy S5 did the same in 2014 with “Selective Focus”. Both used the same approach — they quickly took 3 photos: focused one, focus shifted forth and shifted back. The camera then aligned the images and allowed you to choose one of them, which was introduced as a “real” focus control in the post-production.
There was no further processing, as even this simple hack was enough to hammer another nail in the coffin of Lytro and analogs that used a fair refocus. Let’s talk about them, by the way (topic change master 80 lvl).
Computational Sensor
Plenoptic and Light Fields
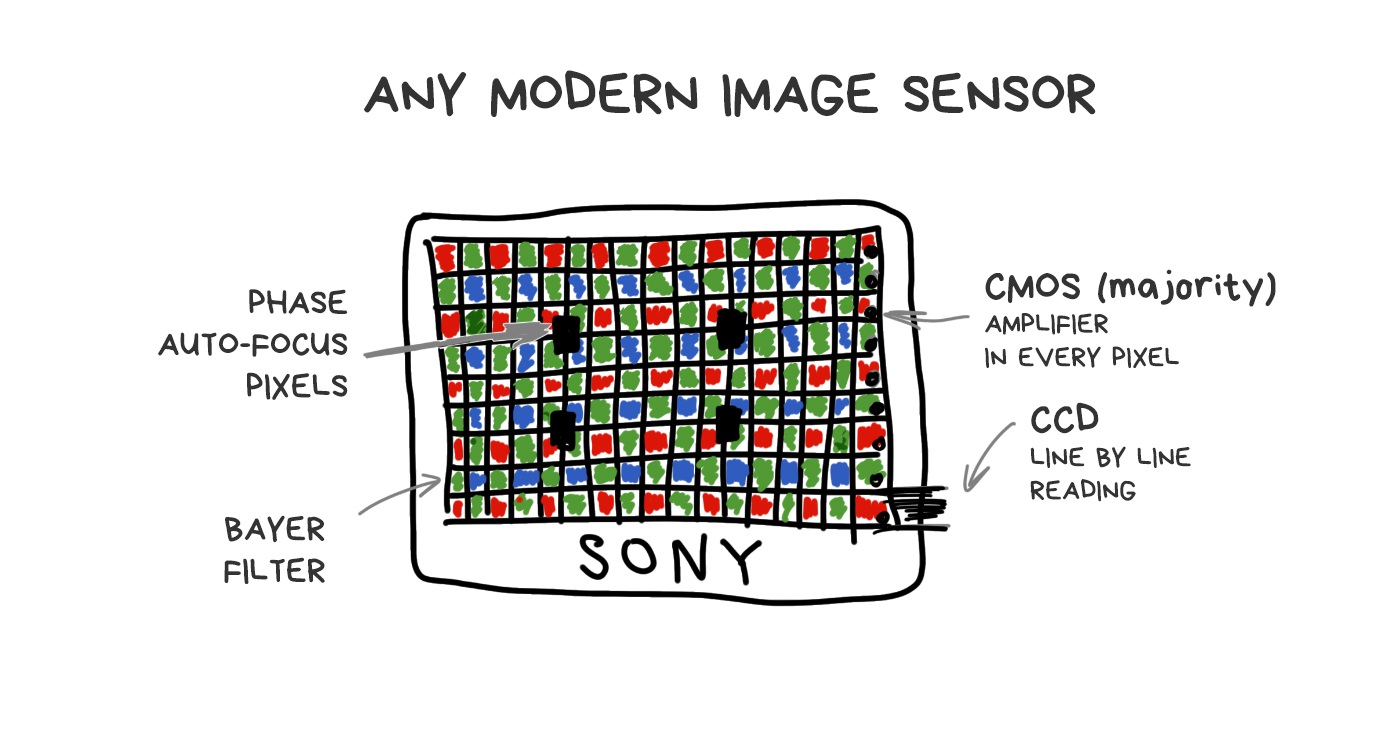
Well, our sensors are shit. We simply got used to it and trying to do our best with them. They haven’t changed much in their design from the beginning of time. Technical process was the only thing that improved — we reduced the distance between pixels, fought noise, and added specific pixels for phase-detection autofocus system. But even if we take the most expensive camera to try to photograph a running cat in the indoor light, the cat will win.
🎥 The Science of Camera Sensors
.block-side.block-side__right.width-25 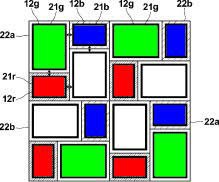
We’ve been trying to invent a better sensor for a long time. You can google a lot of researches in this field by “computational sensor” or “non-Bayer sensor” queries. Even the Pixel Shifting example can be referred to as an attempt to improve sensors with calculations.
The most promising stories of the last twenty years, though, come to us from plenoptic cameras.
To calm your sense of impending boring math, I’ll throw in the insider’s note — the last Google Pixel camera is a little bit plenoptic. With only two pixels in one, there’s still enough to calculate a fair optical depth of field map without having a second camera like everyone else.
Plenoptics is a powerful weapon that hasn’t fired yet.
¶ Plenoptic Camera
.block-side.block-side__right.width-25 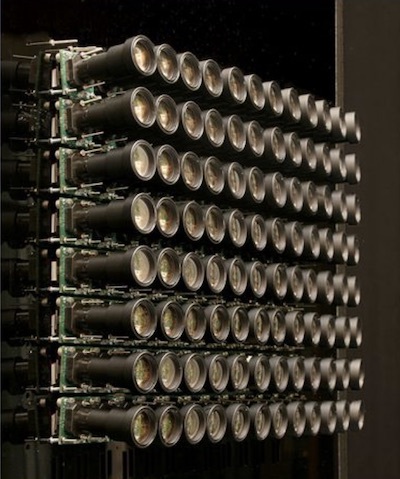
Invented in 1994. For the first time assembled in Stanford in 2004. The first consumer product — Lytro, released in 2012. The VR industry is now actively experimenting with similar technologies.
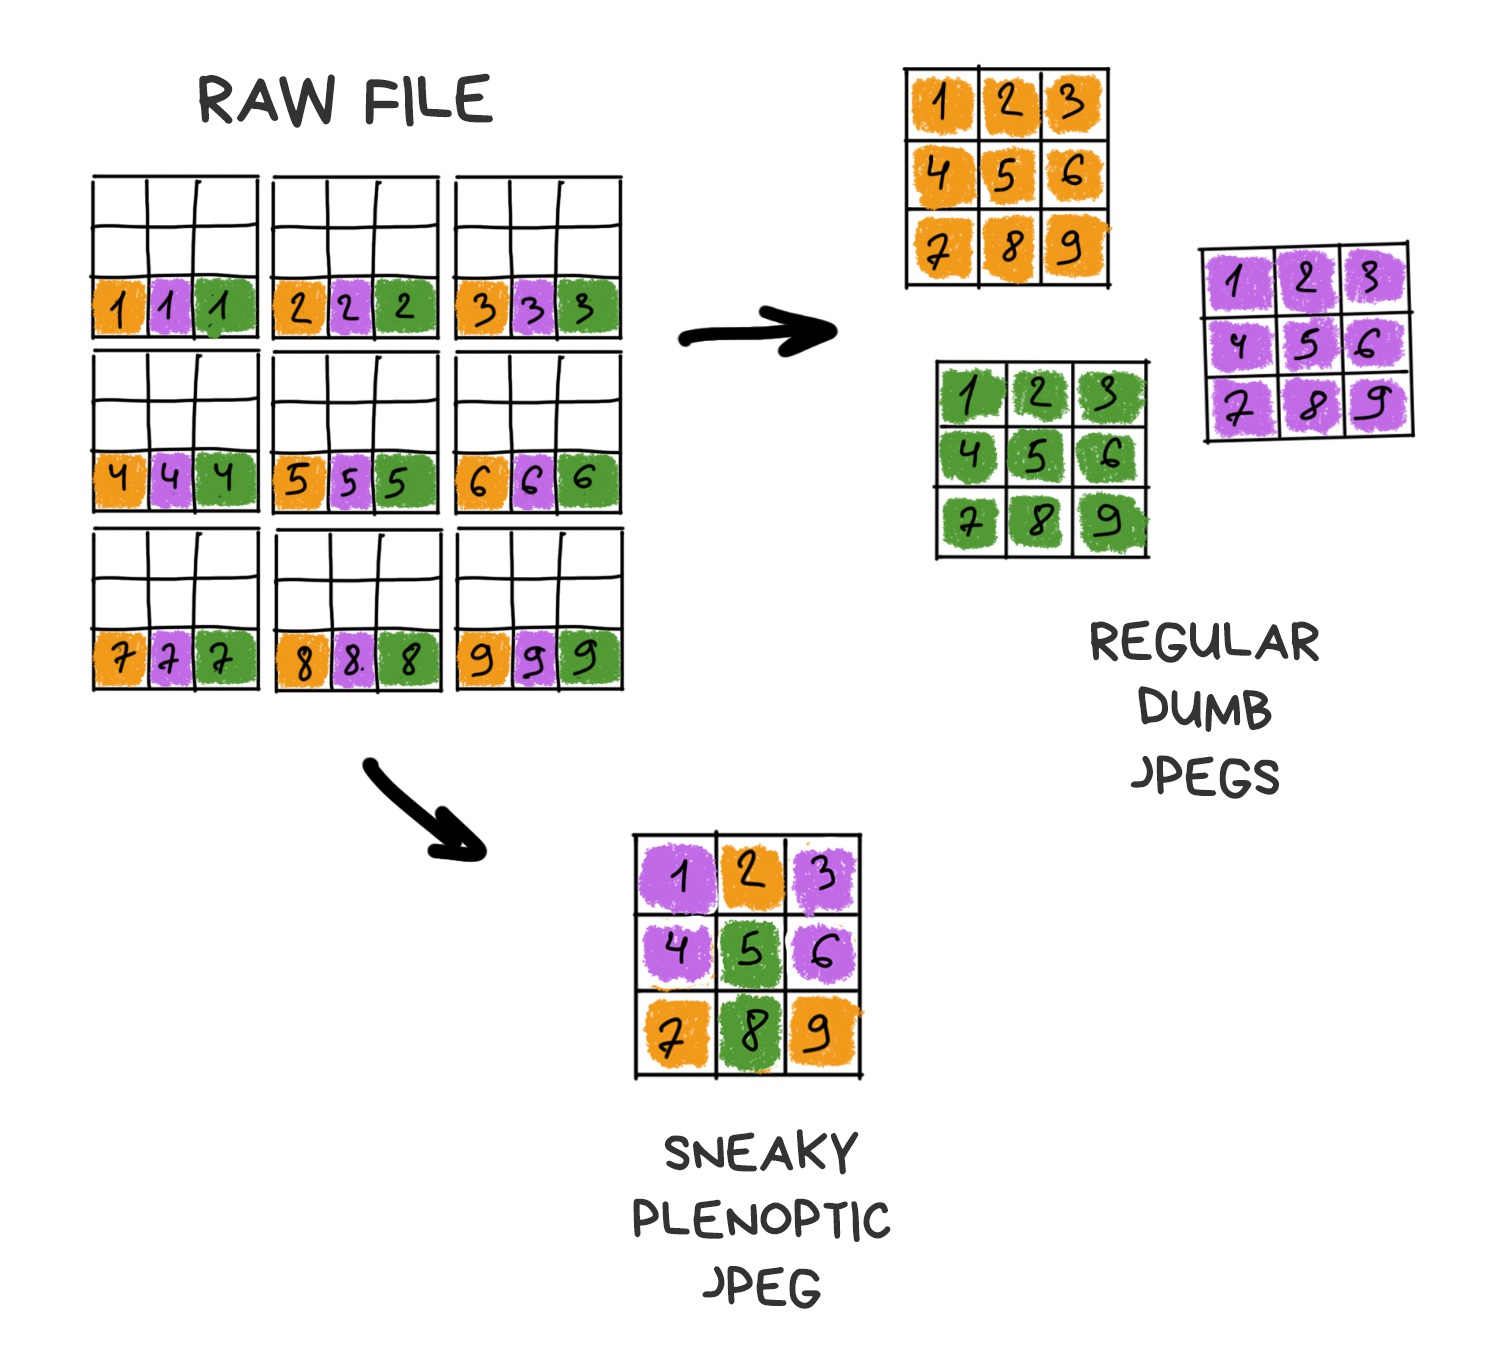
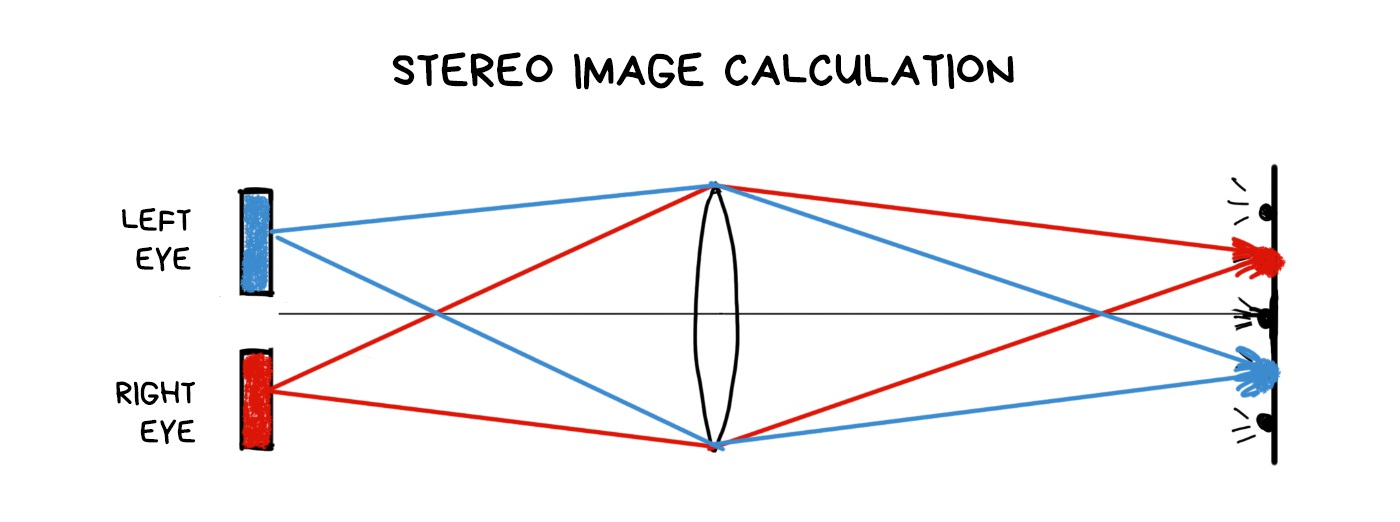
Plenoptic camera differs from the normal one by only one modification. Its sensor covered with a grid of lenses, each of which covers several real pixels. Somehow like that:
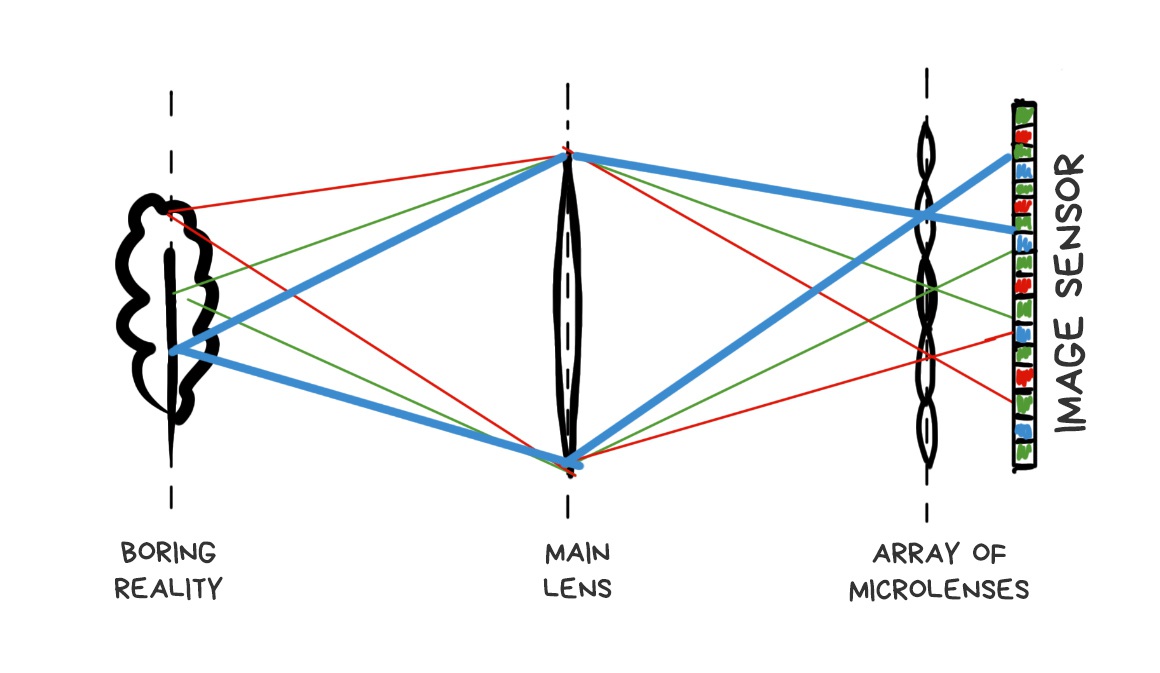
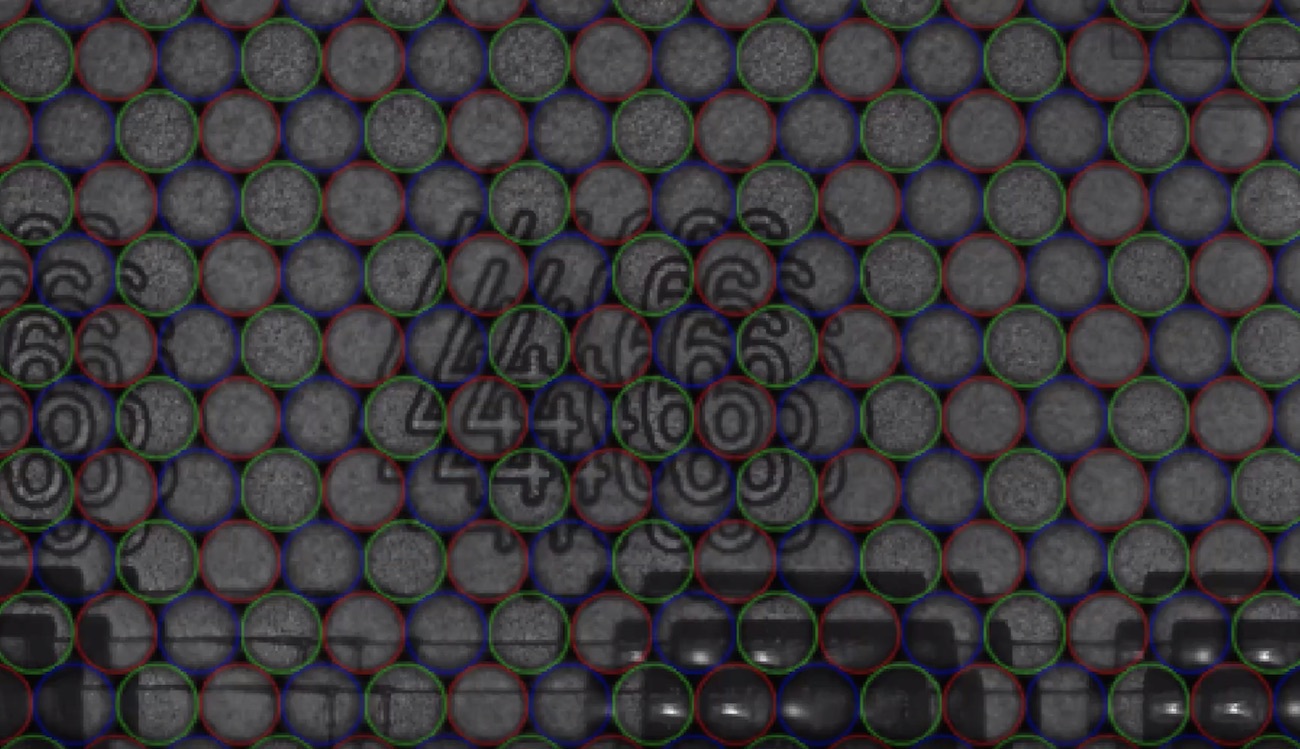
If we place the grid and sensor at the right distance, we’ll see sharp pixel clusters containing mini-versions of the original image on the final RAW image.
🎥 Muted video showing RAW editing process
Apparently, if you take only one central pixel from each cluster and build the image only from them, it won’t be any different from one taken with a standard camera. Yes, we lose a bit in resolution, but we’ll just ask Sony to stuff more megapixels in the next sensor.
That’s where the fun part begins. If you take another pixel from each cluster and build the image again, you again get a standard photo, only as if it was taken with a camera shifted by one pixel in space. Thus, with 10x10 pixel clusters, we get 100 images from “slightly” different angles.
The more the cluster size, the more images we have. Resolution is lower, though. In the world of smartphones with 41-megapixel sensors, everything has a limit, although we can neglect resolution a bit. We have to keep the balance.
📝 plenoptic.info - about plenoptics, with python code samples
Alright, we’ve got a plenoptic camera. What can we do with it?
¶ Fair refocusing
The feature that everyone was buzzing about in the articles covering Lytro is a possibility to adjust focus after the shot was taken. “Fair” means we don’t use any deblurring algorithms, but rather only available pixels, picking or averaging in the right order.
.block-side.block-side__right 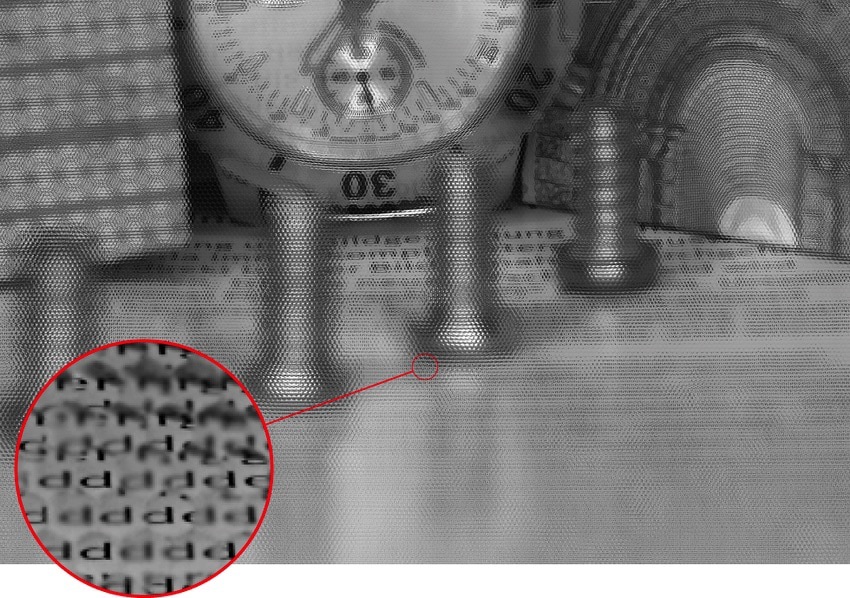
A RAW photo taken with a plenoptic camera looks weird. To get the usual sharp JPEG out of it, you have to assemble it first. The result will vary depending on how we select the pixels from the RAW.
The farther is the cluster from the point of impact of the original ray, the more defocused the ray is. Because the optics. To get the image shifted in focus, we only need to choose the pixels at the desired distance from the original — either closer or farther.
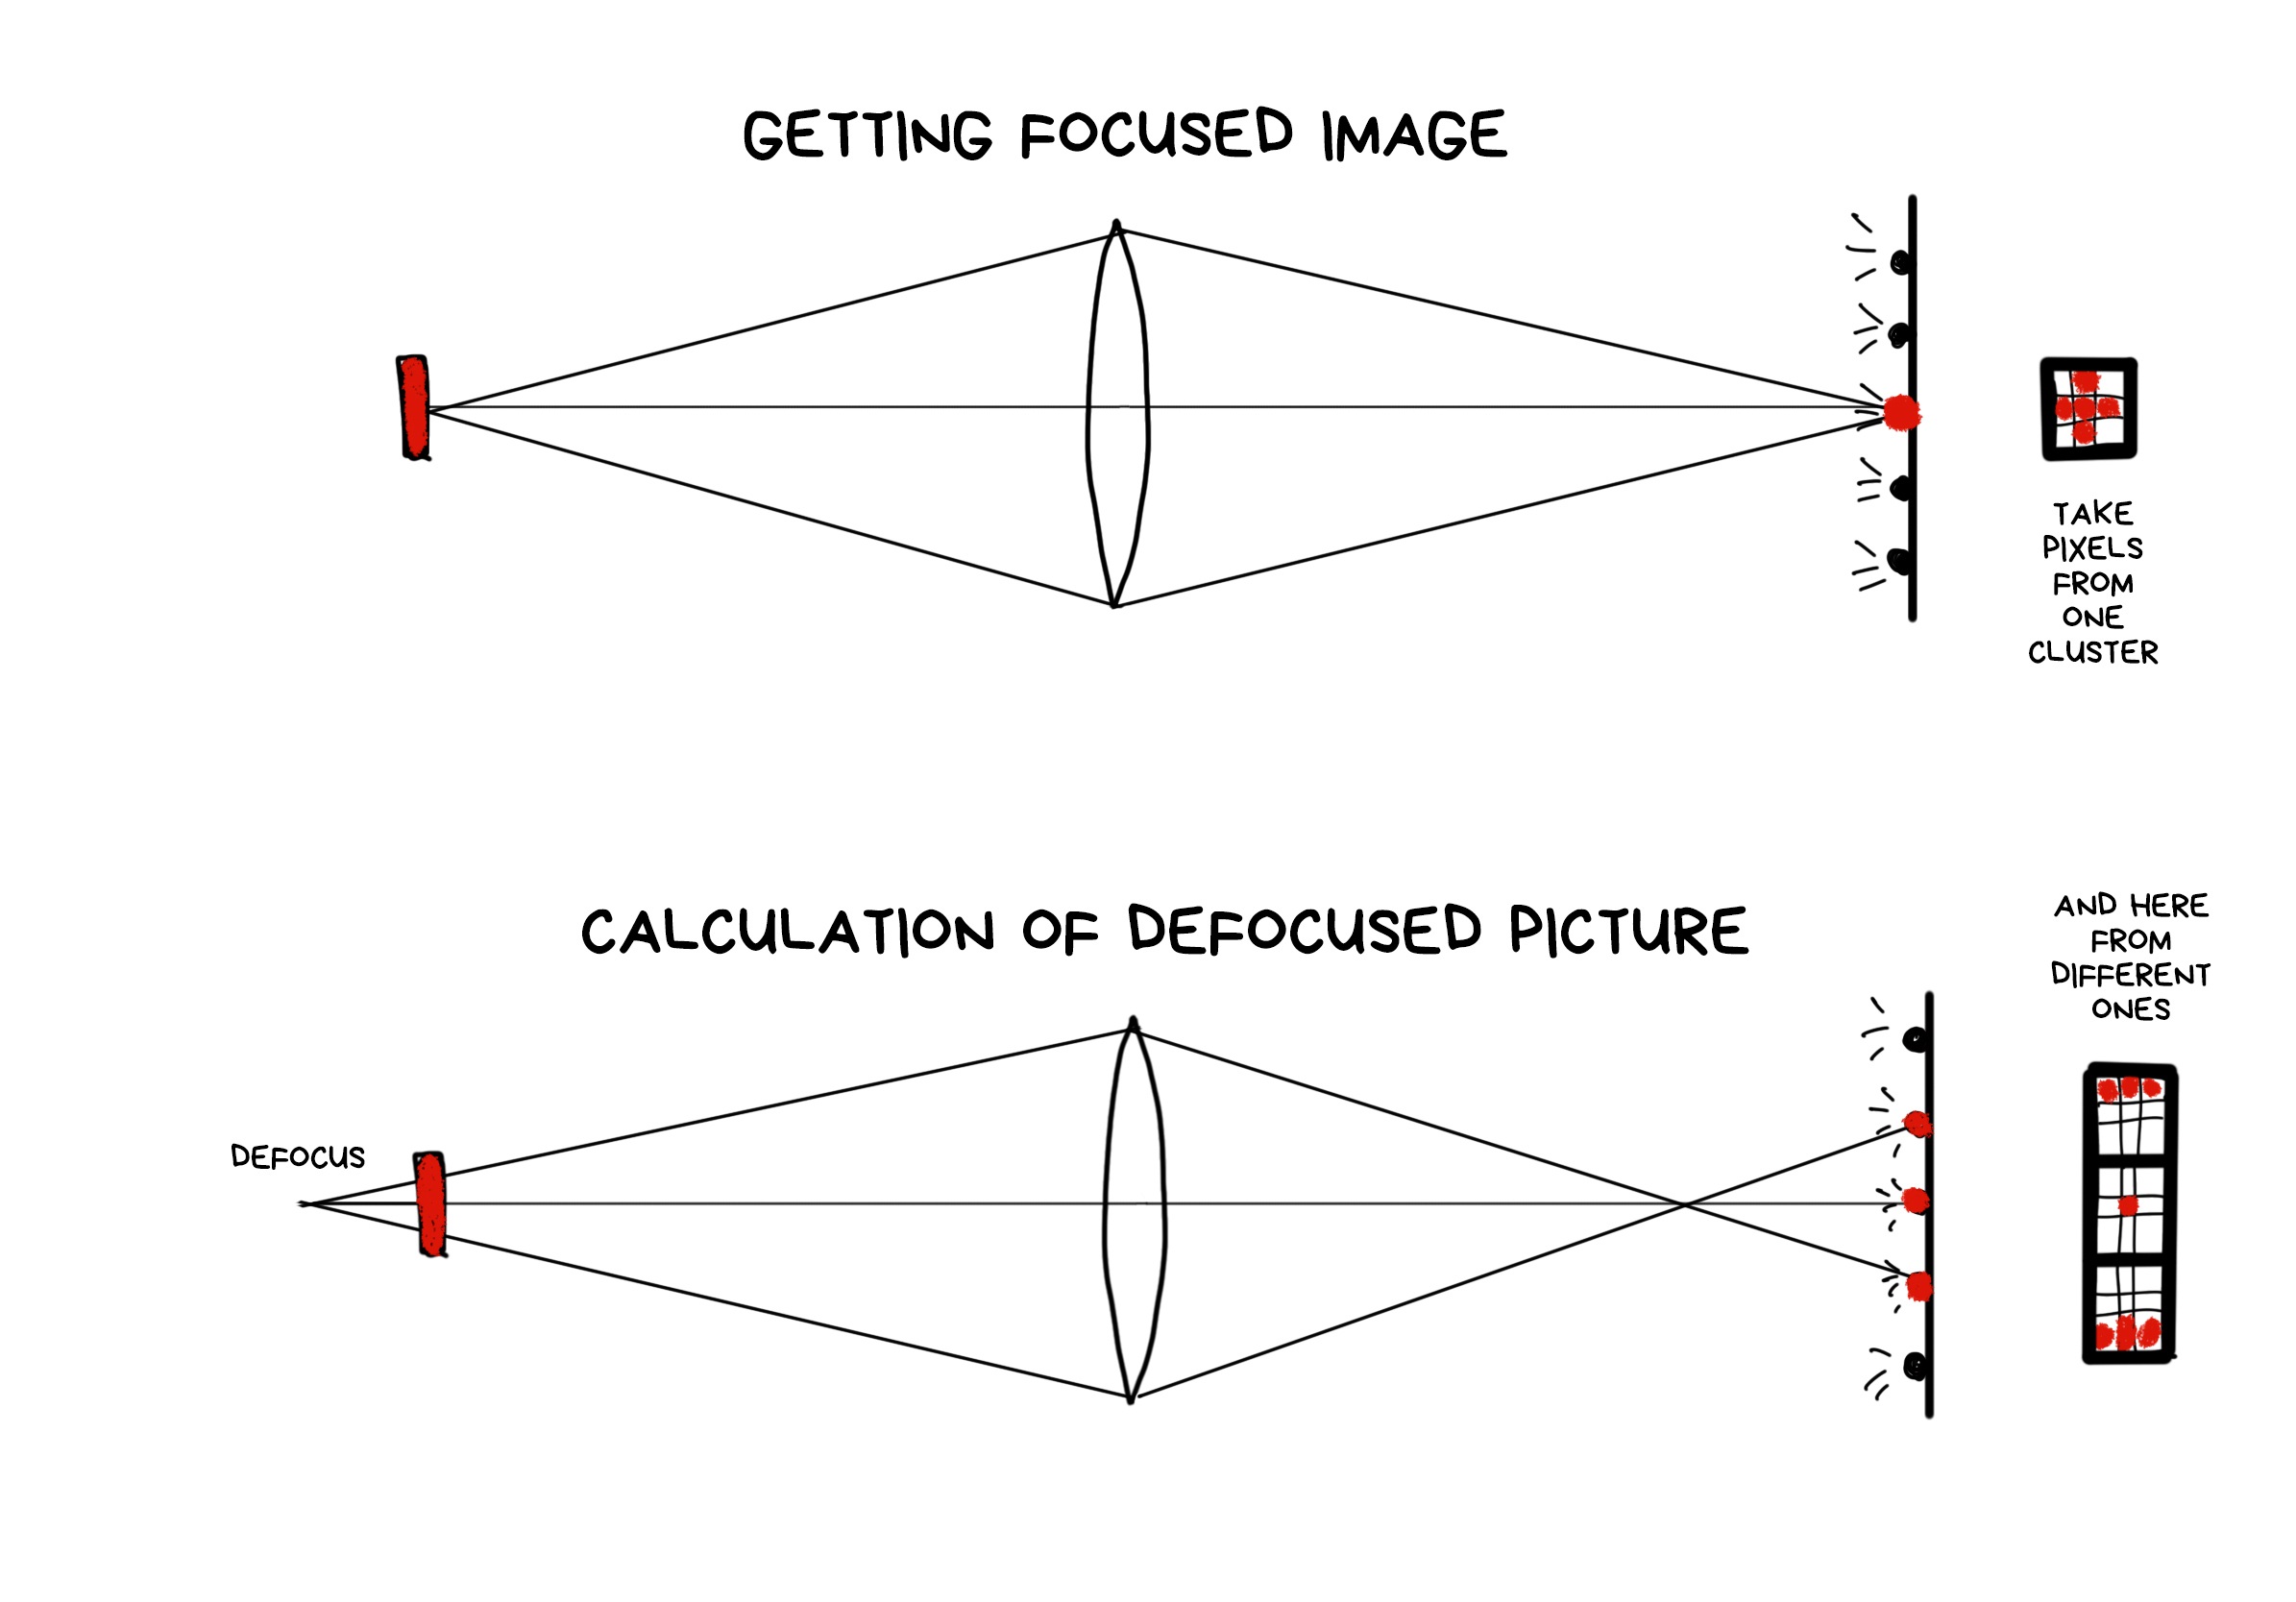
The process of shifting the focus forward is a bit more complicated as we have fewer pixels in these parts of the clusters. In the beginning, Lytro developers didn’t even want to let the user focus manually because of that — the camera made a decision itself using the software. Users didn’t like that, so the feature was added in the late versions as “creative mode”, but with very limited refocus for exactly that reason.
¶ Depth Map and 3D using a single lens
One of the simplest operations in plenoptics is to get a depth map. You just need to gather two different images and calculate how the objects are shifted at them. More shift — farther away from the camera.
Google recently bought and killed Lytro, but used their technology for its VR and… Pixel’s camera. Starting Pixel 2, the camera became “a little bit” plenoptic, though with only two pixels per cluster. As a result, Google doesn’t need to install a second camera like all the other cool kids. Instead, they can calculate a depth map from one photo.

📝 Portrait mode on the Pixel 2 and Pixel 2 XL smartphones
The depth map is built on two shots shifted by one sub-pixel. This is enough to calculate a binary depth map and separate the foreground from the background to blur it out in the fashionable bokeh. The result of this stratification is still smoothed and “improved” by neural networks which are trained to improve depth maps (rather than to observe, as many people think).
% The trick is that we got plenoptics in smartphones almost at no charge. We already put lenses on these tiny sensors to increase the luminous flux at least somehow. In the next Pixel phones, Google has plans to go further and cover four photodiodes with a lens.
¶ Slicing layers and objects
You don’t see your nose because your brain combines a final image from both of your eyes. Close one eye, and you will see a huge Egyptian pyramid at the edge.
The same effect can be achieved in a plenoptic camera. By assembling shifted images from pixels of different clusters, we can look at the object as if from several points. Same as our eyes do. It gives us two cool opportunities. First is we can estimate the approximate distance to the objects, which allows us easily separate the foreground from the background as in life. And second, if the object is small, we can completely remove it from the photo. Like a nose. Optically, for real, with no photoshop.
Using this, we can cut out trees between the camera and the object or remove the falling confetti, as in the video below.

¶ “Optical” stabilization with no optics
From a plenoptic RAW, you can make a hundred of photos with several pixels shift over the entire sensor area. Accordingly, we have a tube of lens diameter within which we can move the shooting point freely, thereby offsetting the shake of the image.

Technically, stabilization is still optical, because we don’t have to calculate anything — we just select pixels in the right places. On the other hand, any plenoptic camera sacrifices the number of megapixels in favor of plenoptic capabilities, and any digital stabilizer works the same way. It’s nice to have it as a bonus, but using it only for its sake is doubtful.
The larger sensor and lens, the bigger window for movement. The more camera capabilities, the more ozone holes from supplying this circus with electricity and cooling. Yeah, technology!
¶ Fighting with Bayer filter
Bayer filter is still necessary even with a plenoptic camera. We haven’t come up with any other way of getting a colorful digital image. And using a plenoptic RAW, we can average the color not only by the group of nearby pixels, as in the classic demosaicing, but also using dozens of its copies in neighboring clusters.
It’s called “computable super-resolution” in some articles, but I would question it. In fact, we reduce the real resolution of the sensor in these same dozen times first in order to proudly restore it again. You have to try hard to sell it to someone.
But technically it’s still more interesting than shaking the sensor in a pixel shifting spasm.

¶ Computational aperture (bokeh)
.block-side.block-side__right 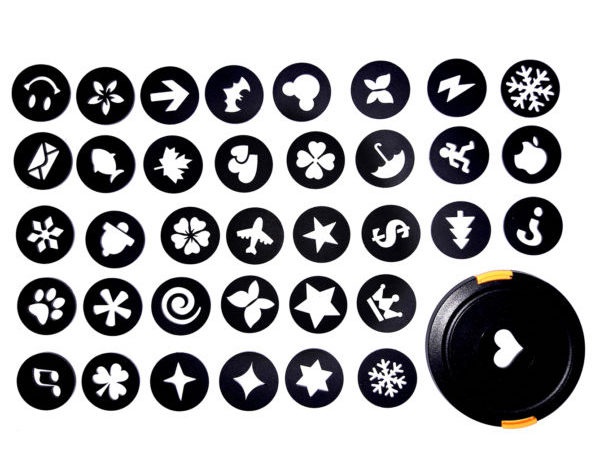
Those who like to shoot bokeh hearts will be thrilled. Since we know how to control the refocus, we can move on and take only a few pixels from the unfocused image and others from the normal one. Thus we can get an aperture of any shape. Yay! (No)
¶ Many more tricks for video
So, not to move too far away from the photo topic, everyone who interested could check out the links above and below. They contain about half a dozen other interesting applications of a plenoptic camera.
🎥 Watch Lytro Change Cinematography Forever
¶ Light Field
More than a photo, less than VR
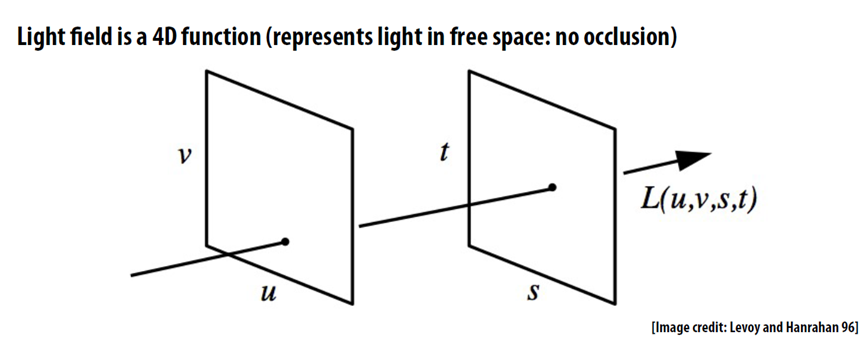
Usually, the explanation of plenoptic starts from light fields. And yes, from the science perspective, the plenoptic camera captures the light field, not just the photo. Plenus comes from the Latin “full”, i.e., collecting all the information about the rays of light. Just like a Parliament plenary session.
Let’s get to the bottom of this to understand what is a light field is and why do we need it.
Traditional photo is two-dimensional. There, where ray hit a sensor will be a pixel on a photo. The camera doesn’t give a shit where the ray came from, whether it accidentally fell from aside or was reflected by a lovely lady’s ass. The photo captures only the point of intersection of the ray with the surface of the sensor. So it’s kinda 2D.
Light field image is the same, but with a new component — the origin of the ray. Means, it captures the ray vector in 3D space. Like calculating the lighting of a video game, but the other way around — we’re trying to catch the scene, not create it. The light field is a set of all the light rays in our scene — both coming from the light sources and reflected.
The light field is essentially a visual model of the space around it. We can easily compute any photo within this space mathematically. Point of view, depth of field, aperture — all these are also computable.
I love to draw an analogy with a city here. Photography is like your favourite path from your home to the bar you always remember, while the light field is a map of the whole town. Using the map, you can calculate any route from point A to B. In the same way, knowing the light field, we can calculate any photo.
For an ordinary photo it’s an overkill, I agree. But here comes the VR, where the light fields there are one of the most promising areas.
Having a light field model of an object or a room allows you to see this object or a room from any point in space as if everything around is virtual reality. It’s no longer necessary to build a 3D-model of the room if we want to walk through it. We can “simply” capture all the rays inside it and calculate a picture of the room. Simply, yeah. That’s what we’re fighting over.
📝 Google AR and VR: Experimenting with Light Fields
Computational Optics
Saying optics, I with the guys from Stanford mean not only lenses but everything in between the object and sensor. Even the aperture and shutter. Sorry, photography snobs. I feel your pain.
¶ Multi-camera
.block-side.block-side__right.width-25 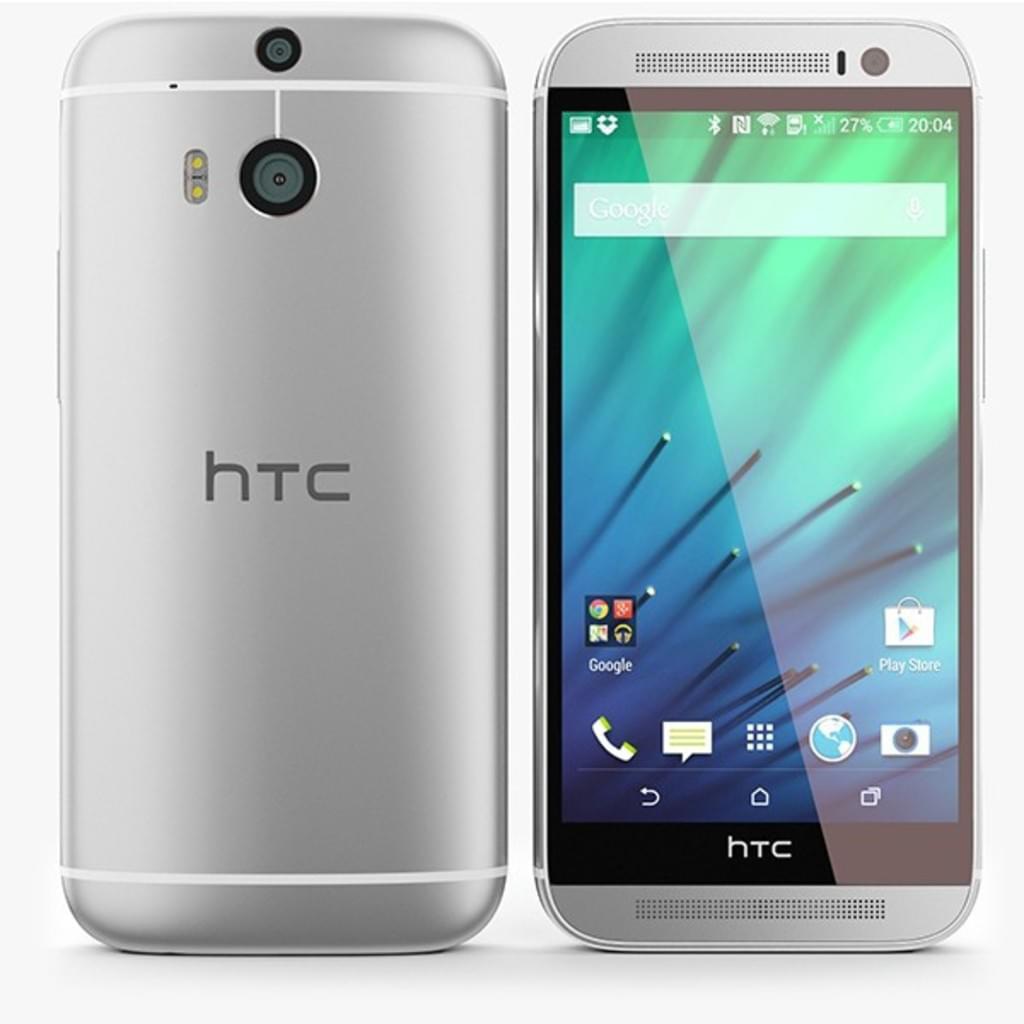
In 2014, the HTC One (M8) was released and became the first smartphone with two cameras and amusing computational photography features such as replacing the background with rain or sparkles.
The race has begun. Everybody started putting two, three, five lenses into their smartphones, trying to argue whether telephoto or wide-angle lens is better. Eventually, we got the Light L16 camera. 16-lensed, as you can guess.
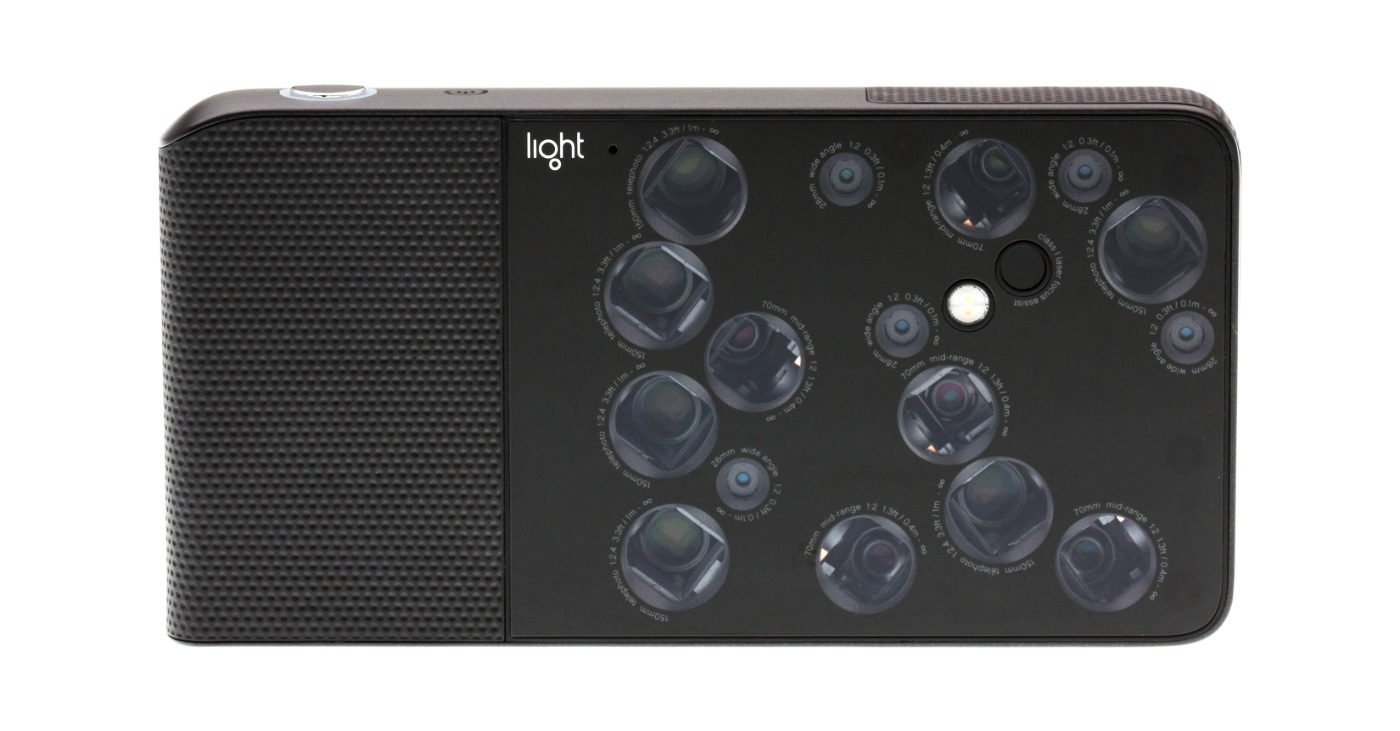
L16 was no longer a smartphone, but rather a new kind of pocket camera. It promised to reach the quality of top DSLRs with a high-aperture lens and full-frame sensor while yet fitting into your pocket. The power of computational photography algorithms was the main selling point.
.block-side.block-side__right 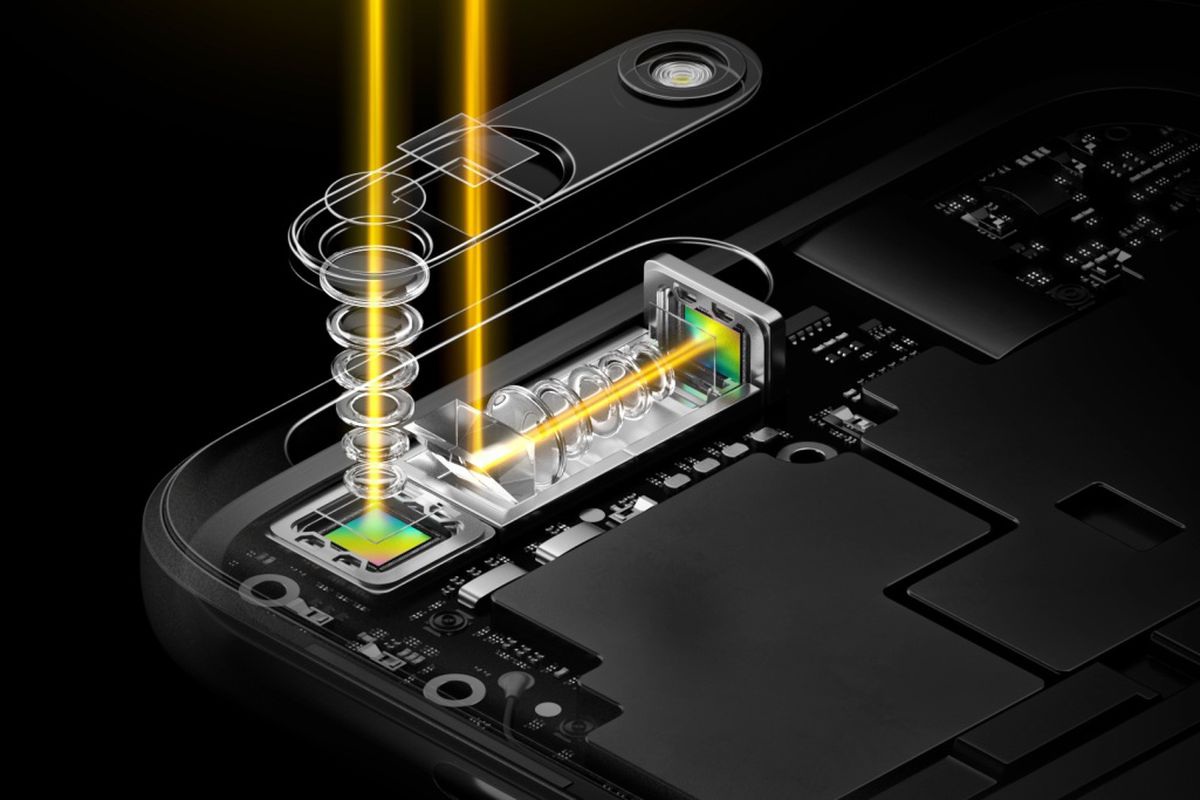
It had 16 lenses: 5 x 28mm wide-angle and 5 x 70mm and 6 x 150mm telephoto. Each telephoto was periscope-style, meaning that the light did not flow directly through the lens to the sensor, but was reflected by a mirror inside the body. This configuration made it possible to fit a sufficiently long telephoto into a flat body, rather than stick out a “pipe” from it. Huawei recently did the same thing in the P30 Pro.
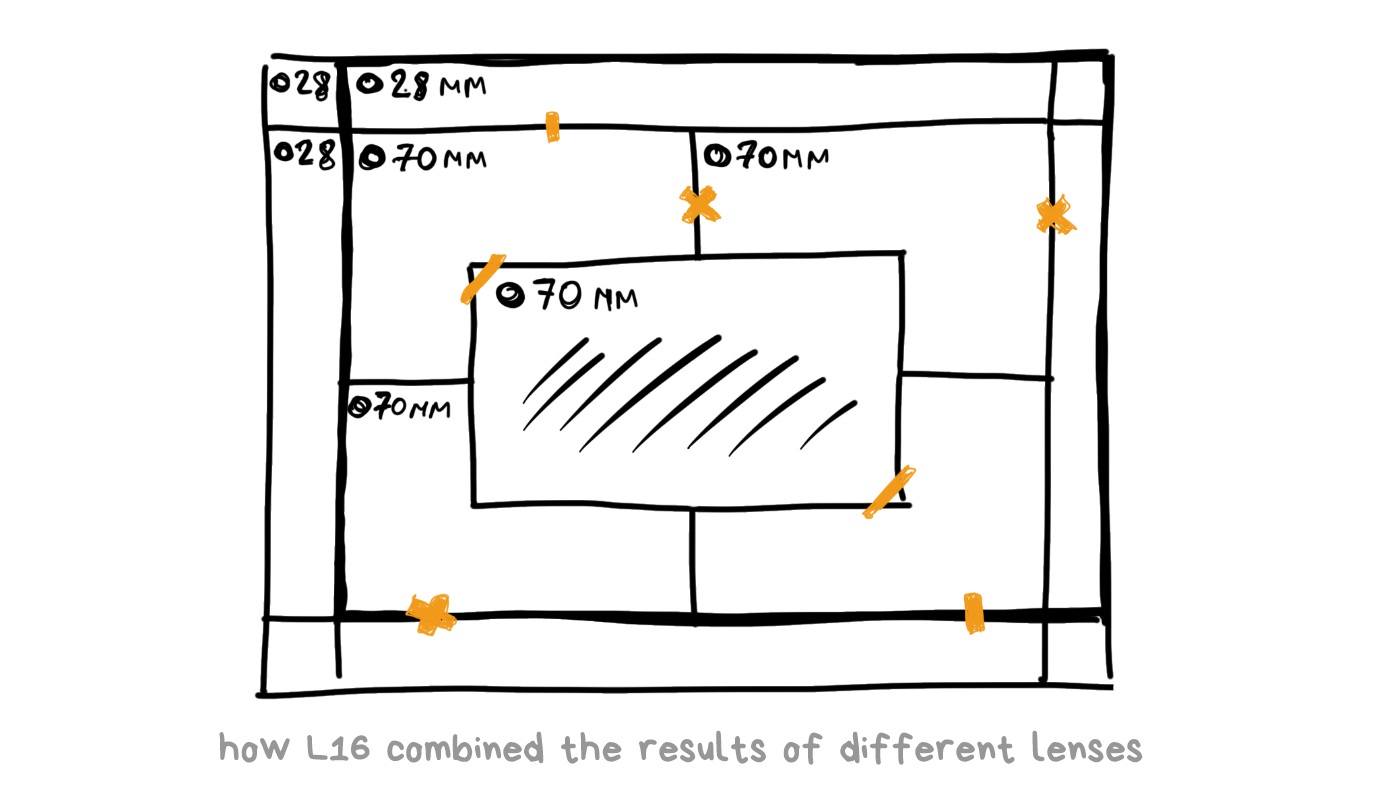
Each L16 photo was shot simultaneously on 10 or more lenses, and then the camera combined them to get a 52-megapixel image. According to the creators’ idea, simultaneous shooting with several lenses made it possible to catch the same amount of light as with the large digital camera lens, artfully bypassing all the laws of optics.
Talking of software features, the first version had a depth of field and focus control in post-production. Minimal set. Having photos from different perspectives made it possible to compute the depth of the image and apply a decent software blur. Everything seemed nice on paper, so before the release, everybody even had hope for a bright computing future.
In March 2018, Light L16 penetrated the market and… miserably failed. Yes, technologically it was in the future. However, at a price of $2000 it had no optical stabilization, so that the photos were always blurred (no wonder with 70-150 mm lenses), the autofocus was tediously slow, the algorithms of combining several pictures gave strange sharpness fluctuations, and there was no use for the camera in the dark, as it had no algorithms such as Google’s HDR+ or Night Sight. Modern $500 point-and-shoot cameras with RAW support were able to do it from the start, so sales were discontinued after the first batch.
However, Light did not shut down at this point (hehe, pun). It raised the cash and continues to work on the new version with redoubled force. For instance, their technologies used in the recent Nokia 9, which is a terrible dream of trypophobe. The idea is encouraging, so we are waiting for further innovations.
🎥 Light L16 Review: Optical Insanity
Coded Aperture
Deplur + Depth Map
We’re entering the area of telescopes, X-rays, and other fog of war. We won’t go deep, but it’s safer to fasten your seatbelts. The story of the coded aperture began where it was physically impossible to focus the rays: for gamma and X-ray radiation. Ask your physics teacher; they will explain why.
The essence of the coded aperture is to replace the standard petal diaphragm with a pattern. The position of the holes should ensure that the overall shape is maximally varied depending on the defocus — the more diverse, the better. Astronomers invented the whole range of such patterns for their telescopes. I’ll cite the very classical one here.
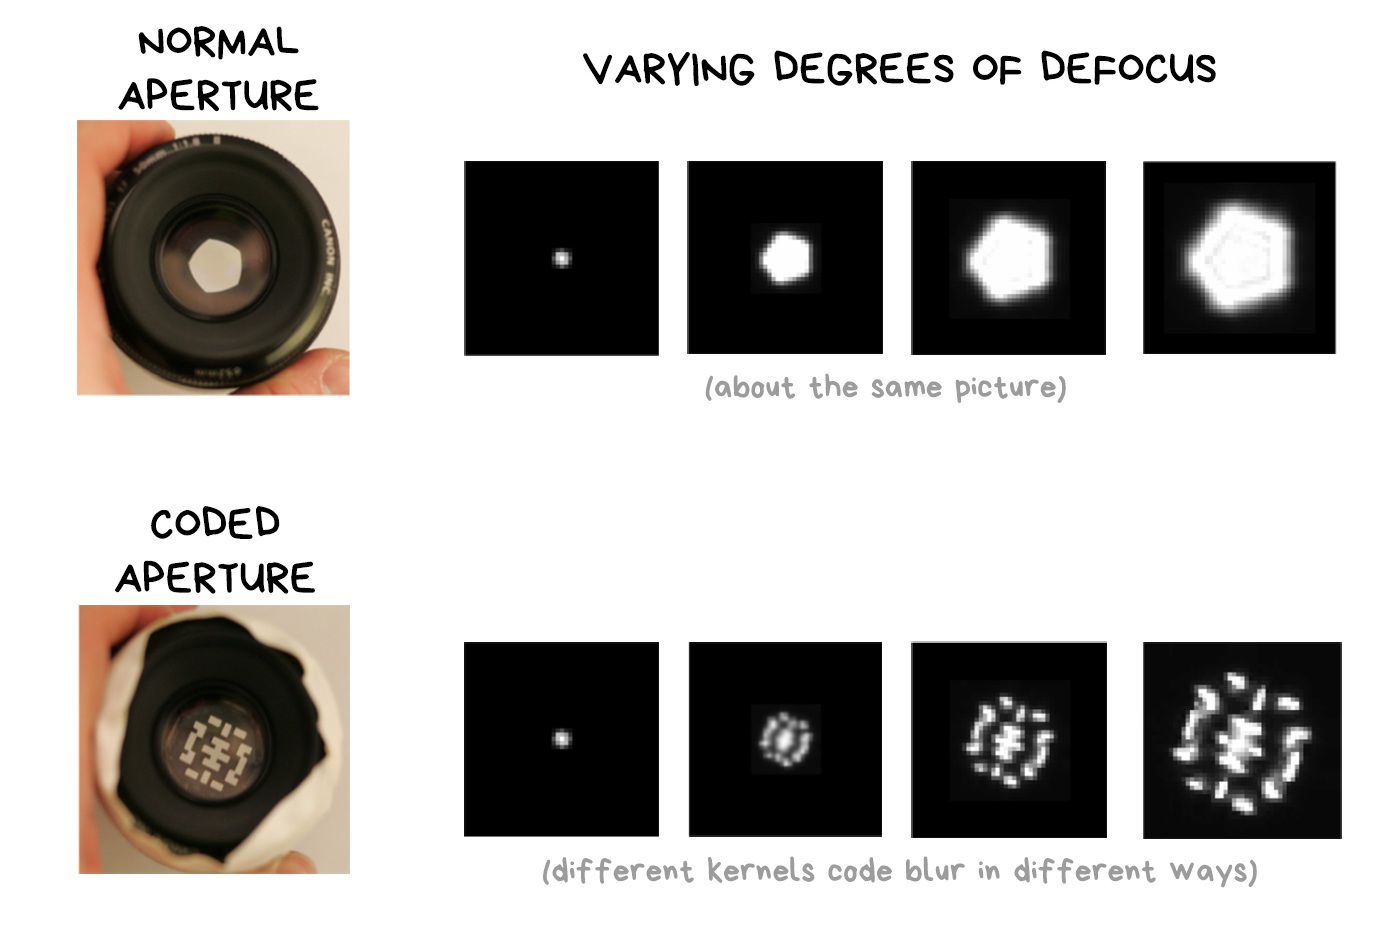
How does this work?
When we focus on the object, everything beyond our depth of field is blurred. Physically, blur is when a lens projects one ray onto several pixels of the sensor due to defocus. So a street lamp turns into a bokeh pancake.
Mathematicians use the term convolution and deconvolution to refer to these operations. Let’s remember these words cause they sound cool!
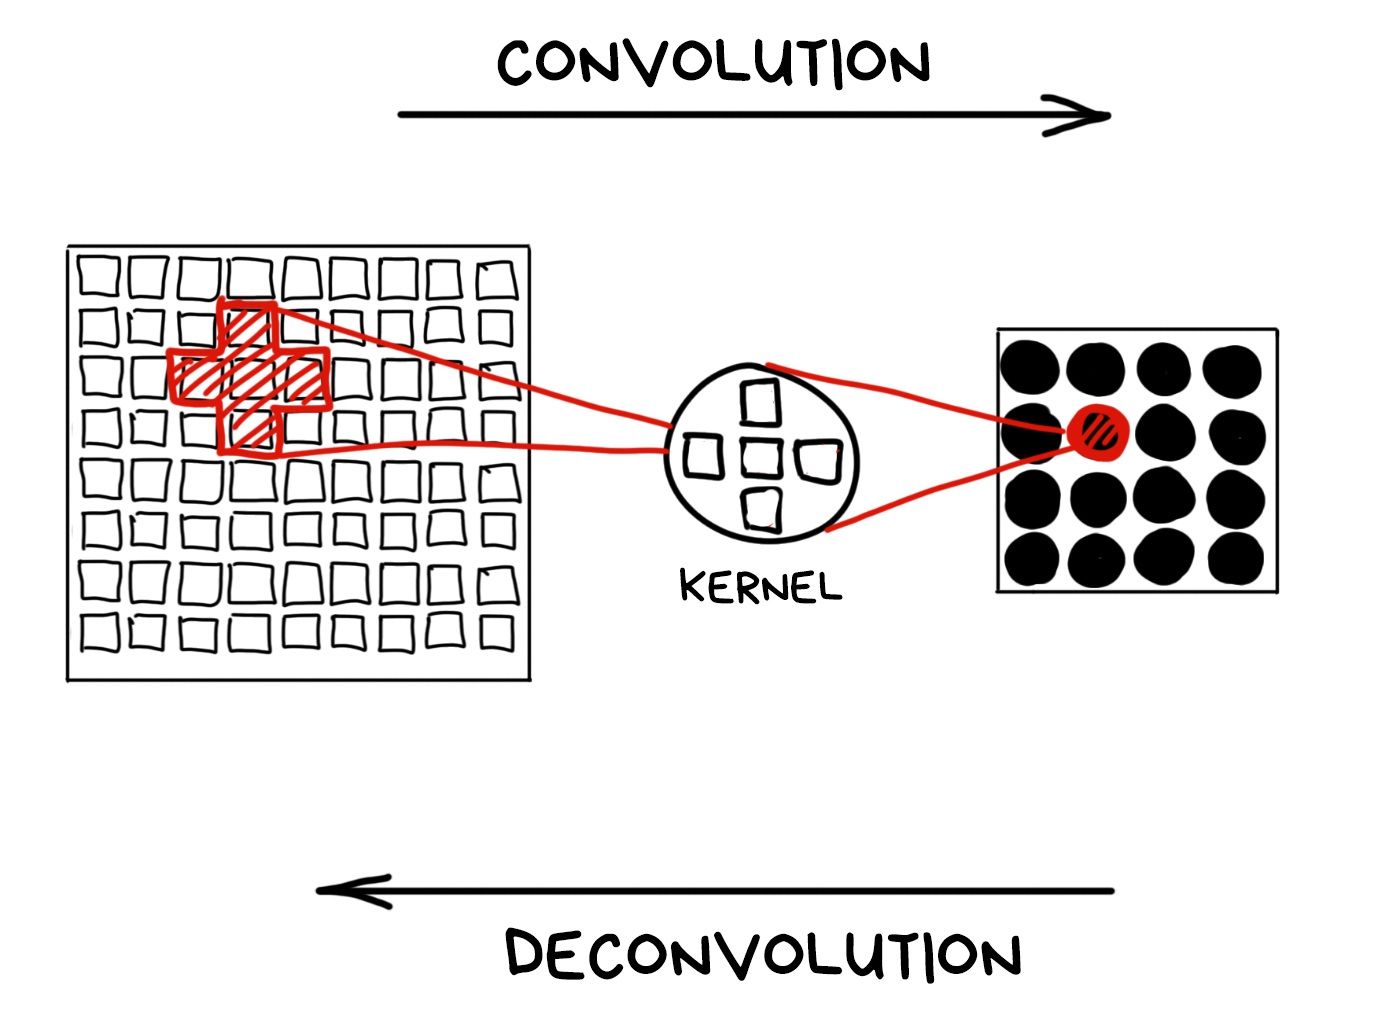
Technically, we can turn any convolution back if we know the kernel. That’s what mathematicians say. In reality, we have a limited sensor range and non-ideal lens, so all of our bokeh is far from the mathematical ideal and cannot be fully restored.
📝 High-quality Motion Deblurring from a Single Image
We can still try if we know the kernel of the convolution. Not gonna keep you waiting — the kernel is actually the shape of the aperture. In other words, the aperture makes a mathematical convolution using pure optics.
The problem is that the standard round aperture remains round at any level of blurring. Our kernel is always about the same; it’s stable, but not very useful. In case of encoded aperture, rays with different defocus degrees will be encoded with different kernels. Readers with IQ > 150 have already guessed what will happen next.
The only issue remains is to understand which kernel is encoded in each area of the image. You can try it on manually, by testing different kernels and looking where the convolution turns out to be more accurate, but this is not our way. A long time ago, people invented the Fourier transform for this. Don’t want to abuse you with calculus, so I’ll add a link to my favorite explanation for those who are interested.
🎥 But what is the Fourier Transform? A visual introduction
All you need to know is that the Fourier transform allows you to find out which waves are dominant in the pile of overlapped ones. In the case of music, the Fourier will show the frequency of the notes in the complex chord. In the case of photography, it is the main pattern of overlapping light rays, which is the kernel of the convolution.
Since the form of the coded aperture is always different depending on the distance to the object — we can calculate that distance mathematically using only one simple image shot with a regular sensor!
Using the inverse convolution on the kernel, we can restore the blurred areas of the image. Bring back all the scattered pixels.
That’s how most deblur tools work. It works even with an average round aperture, yet the result is less accurate.
The downside of the coded aperture is the noise and light loss, which we can’t ignore. Lidars and fairly accurate ToF-cameras have wholly negated all the ideas of using a coded aperture in consumer gadgets. If you’ve seen it somewhere, write in comments.
📝 Image and Depth from a Conventional Camera with a Coded Aperture
📝 Coded Aperture. Computational Photography WS 07/08
🎥 Coded aperture projection (SIGGRAPH 2008 Talks)
¶ Phase Coding (Wavefront Coding)
According to the latest news, the light is half the wave. Coding the aperture, we control the transparency of the lens, means we control the wave amplitude. Besides the amplitude, there is a phase, which can also be coded.
And yes. It can be done with an additional lens, which reverses the phase of light passing through it. Like on the Pink Floyd cover.
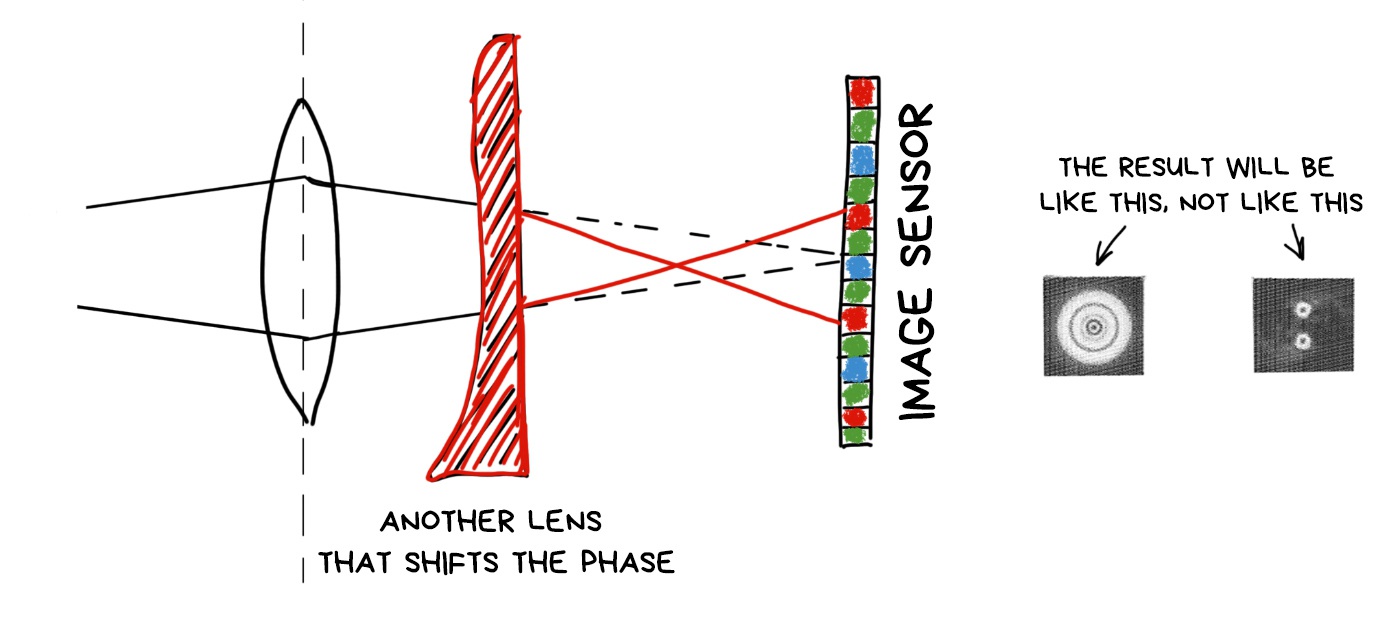
Then everything works like any other optical encoding. Different areas of the image encoded in different ways, and we can algorithmically recognize and fix them somehow. To shift the focus, for example.
What is good about phase coding is that we don’t lose brightness. All photons reach the sensor, unlike in the coded aperture, where they bump into impenetrable parts of it (after all in the other half of the standards said that light is a particle).
The bad part is that we will always lose sharpness, as even the utterly focused objects will be smoothly blurred in the sensor, and we will have to call Fourier to gather them together for us. I’ll attach the link with more detailed description and examples of photos below.
📝 Computational Optics by Jongmin Baek, 2012
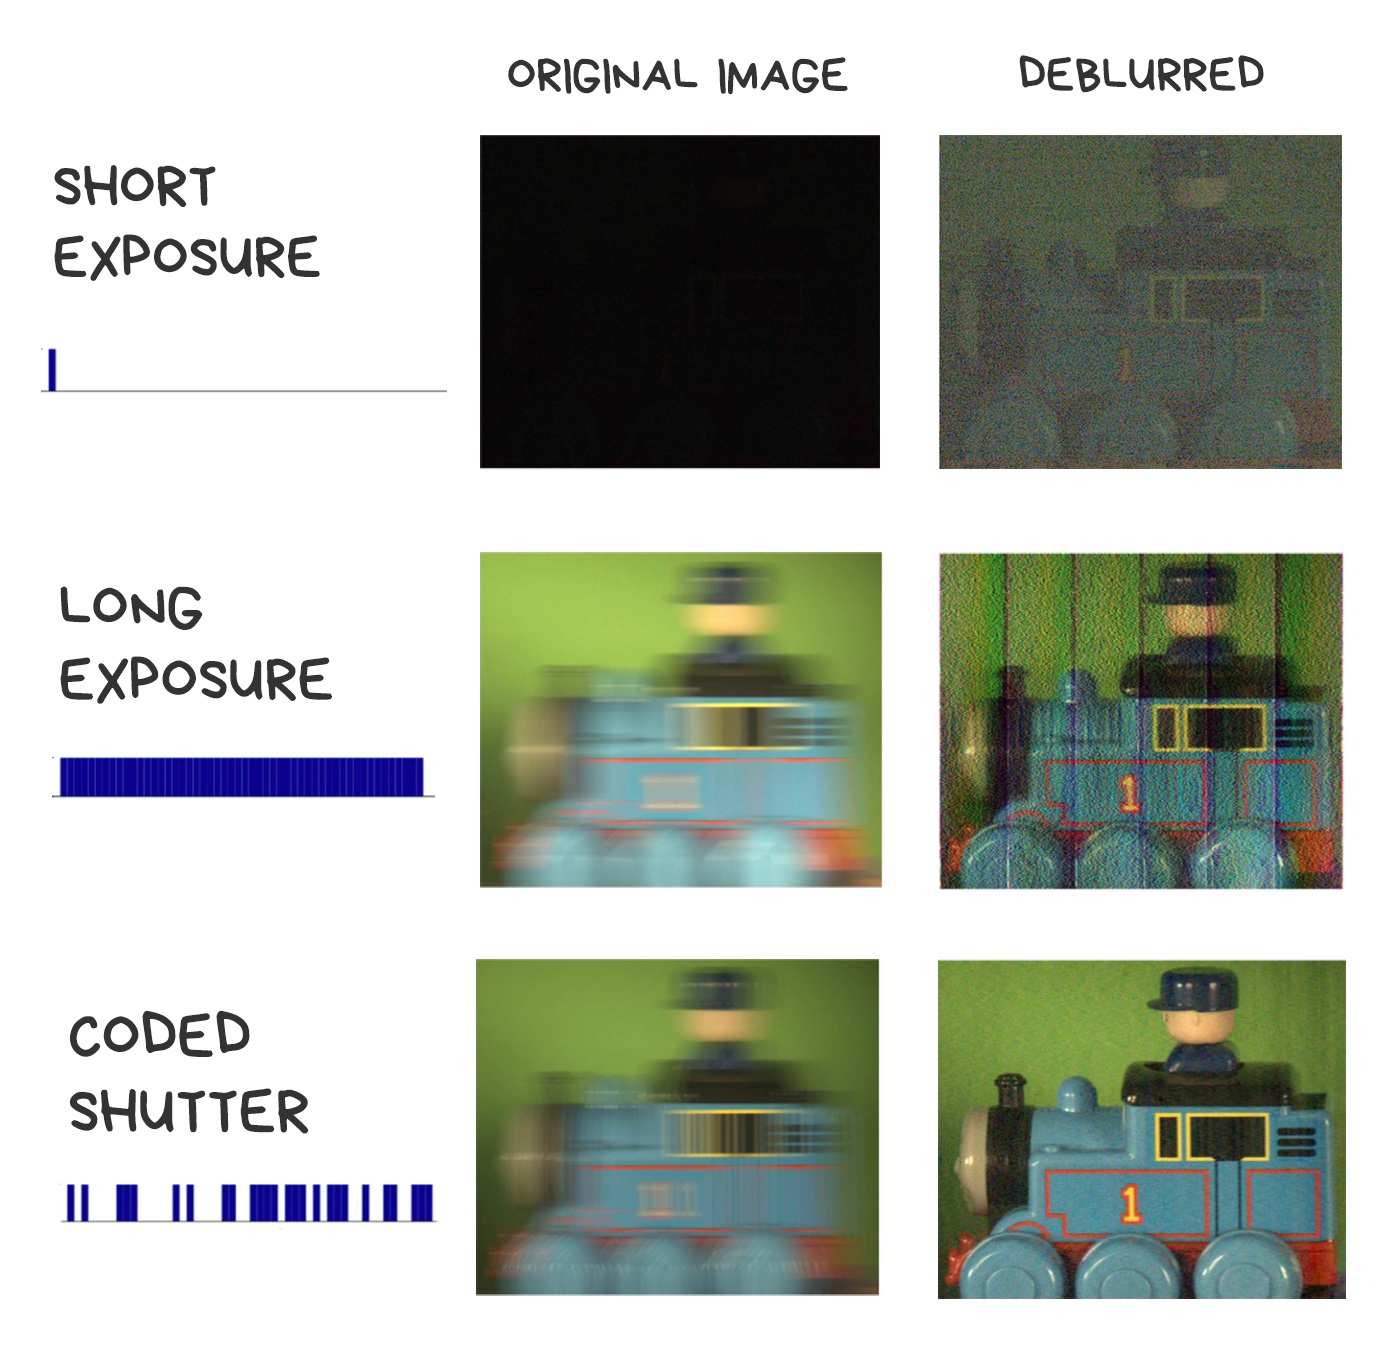
¶ Flutter Shutter
Fighting the motion blur
The last thing we can code throughout the path of light to the sensor is the shutter. Instead of usual “open — wait — close” cycle, we will move the shutter several times per shot to result with the desired shutter speed. Sort of as in a multi-exposure, where one shot is exposed several times.
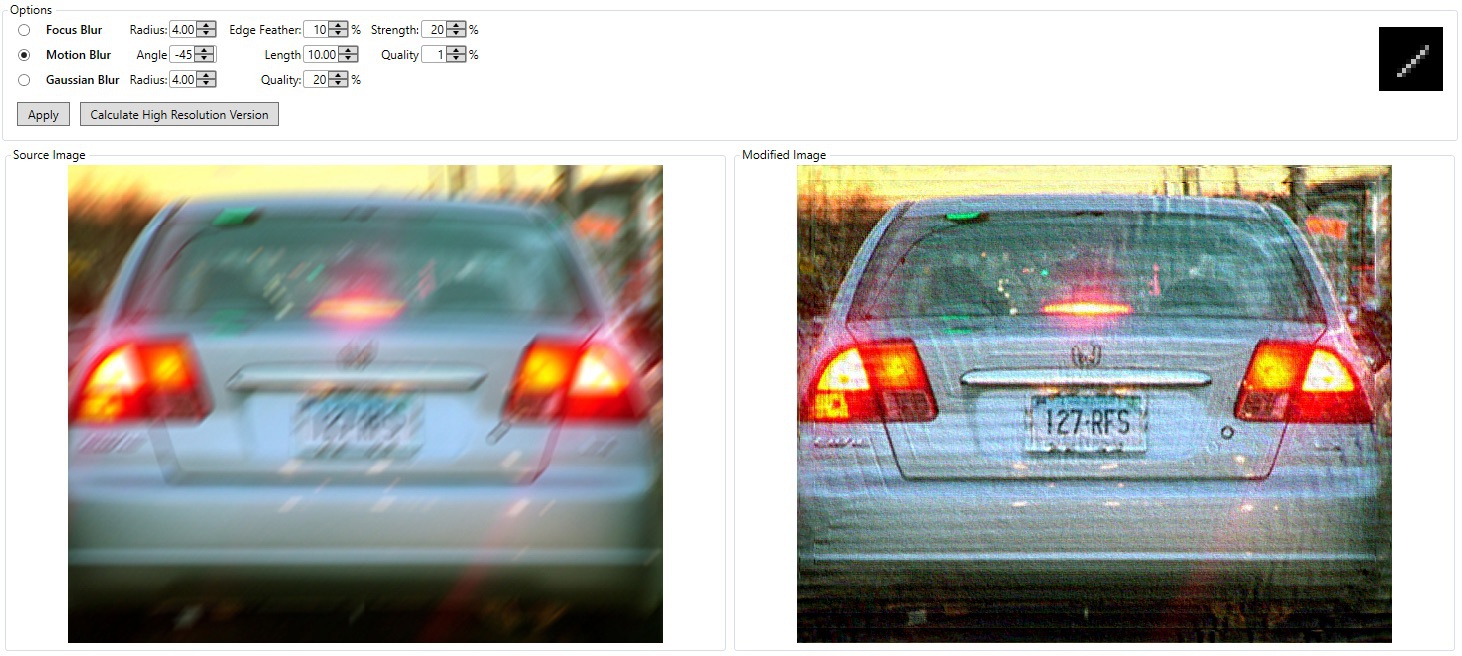
Let’s imagine we decided to take pictures of a fast-moving car at night to see its license plate afterward. We don’t have a flash, we can’t use slow shutter speed, either we’ll blur everything. It is necessary to lower the shutter speed, but so we get to a completely black image, and won’t recognize the car. What to do?
It also is possible to take this shot in flutter shutter movements, so that the car smear not evenly, but like a “ladder” with a known interval. Thus, we encode the blur with a random sequence of open-close of the shutter, and we can try to decode it with the same inverse convolution. Appears it works much better than trying to get back pixels, evenly blurred with long shutter speed.
There are several algorithms for that. For the hardcore details, I’ll again include links to some smart Indian guys’ work.
📝 Coded exposure photography: motion deblurring using fluttered shutter
🎥 Flutter Shutter Coded Filter
Computational Lighting
Soon we’ll go so goddamn crazy, so we’d want to control the lighting after the photo was taken too. To change the cloudy weather to a sunny one, or to change the lights on a model’s face after shooting. Now it seems a bit wild, but let’s talk again in ten years.
We’ve already invented a dumb device to control the light — a flash. They have come a long way: from the large lamp boxes that helped avoid the technical limitations of early cameras, to the modern LED flashes that spoil our pictures, so we mainly use them as a flashlight.
¶ Programmable Flash
It’s been a long time since all smartphones switched to Dual LED flashes — a combination of orange and blue LEDs with brightness being adjusted to the color temperature of the shot. In the iPhone, for example, it’s called True Tone and controlled by a small piece of code with a hacky formula. Even developers are not allowed to control it.
📝 Demystifying iPhone’s Amber Flashlight

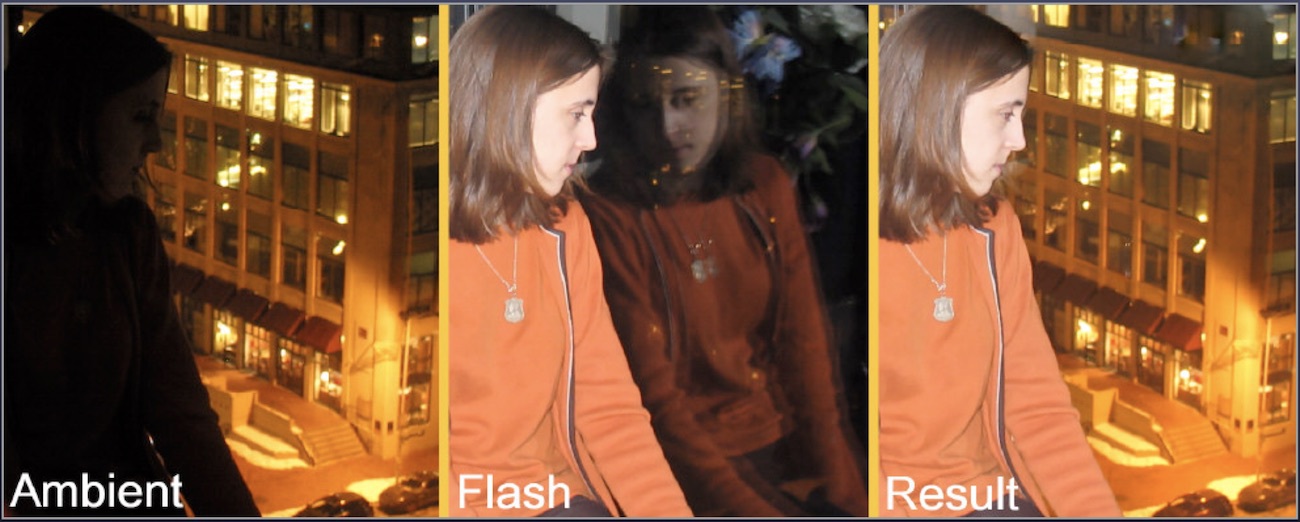
Then we started to think about the problem of all flashes — the overexposed faces and foreground. Everyone did it in their own way. iPhone got Slow Sync Flash, which made camera artificially increase shutter speed in the dark. Google Pixel and other Android smartphones start using their depth sensors to combine images with and without flash, quickly made one by one. The foreground was taken from the photo without the flash when the background remained illuminated.
The further use of a programmable multi-flash is vague. The only interesting application was found in computer vision, where it was used once in assembly scheme (like for Ikea book shelves) to detect the borders of objects more accurately. See the article below.
📝 Non-photorealistic Camera:
Depth Edge Detection and Stylized Rendering using Multi-Flash Imaging
¶ Lightstage
Light is fast. It’s always made light coding an easy thing to do. We can change the lighting a hundred times per shot and still not get close to its speed. That’s how Lighstage was created back in 2005.
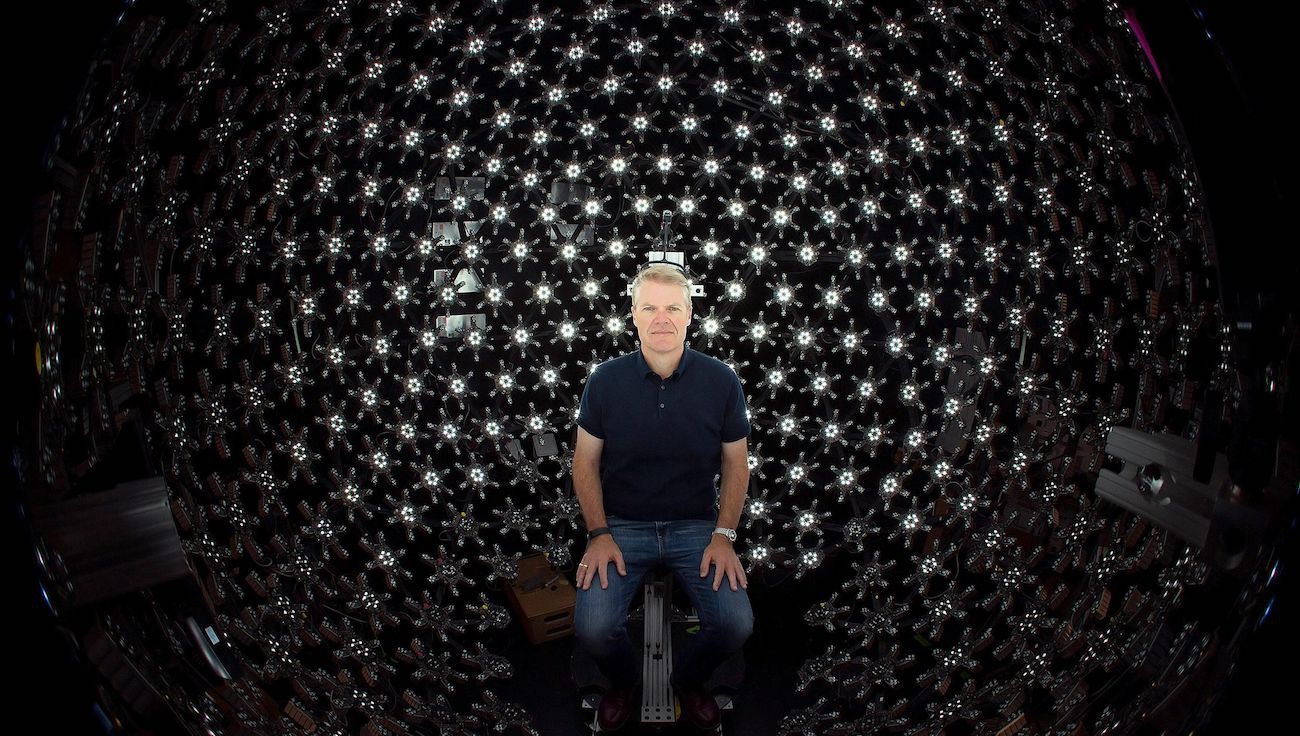
The essence of the method is to highlight the object from all possible angles in each shot of a real 24 fps movie. To get this done, we use 150+ lamps and a high-speed camera that captures hundreds of shots with different lighting conditions per shot.
A similar approach is now used when shooting mixed CGI graphics in movies. It allows you to fully control the lighting of the object in the post-production, placing it in scenes with absolutely random lighting. We just grab the shots illuminated from the required angle, tint them a little, done.

Unfortunately, it’s hard to do it on mobile devices, but probably someone will like the idea. I’ve seen the app from guys who shot a 3D face model, illuminating it with the phone flashlight from different sides.
¶ Lidar and Time-of-Flight Camera
Lidar is a device that determines the distance to the object. Thanks to a recent hype of self-driving cars, now we can find a cheap lidar on any dumpster. You’ve probably seen these rotating thingys at their roof? These are lidars.
We still can’t fit a laser lidar into a smartphone, but we can go with its younger brother — time-of-flight camera. The idea is ridiculously simple — a special separate camera with an LED-flash above it. The camera measures how quickly the light reaches the objects and creates a depth map of the image.
The accuracy of modern ToF cameras is about a centimeter. The latest Samsung and Huawei top models use them to create a bokeh map and for better autofocus in the dark. The latter, by the way, is quite good. I wish everybody had one.
Knowing the exact depth of field will be useful in the coming era of augmented reality. It will be much more accurate and effortless to shoot at the surfaces with lidar to make the first mapping in 3D than analyzing camera images.
¶ Projector Illumination
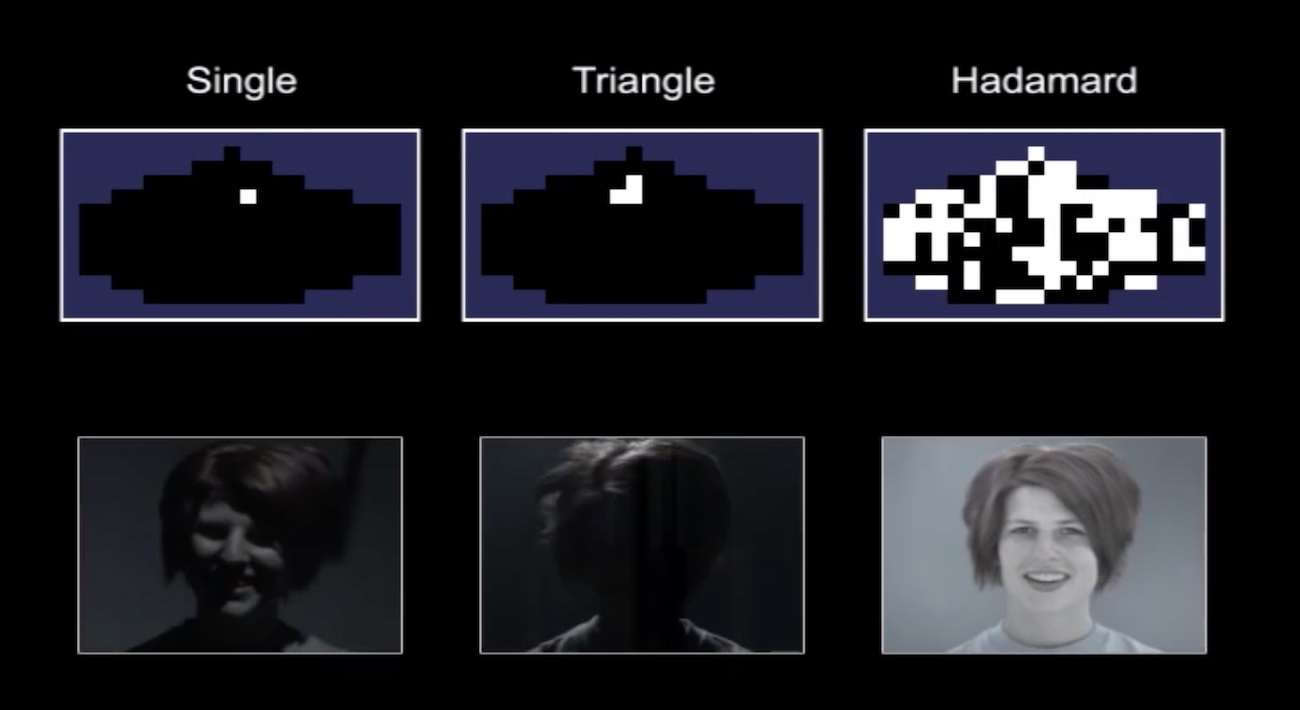
To finally get serious about the computational lighting, we have to switch from regular LED flashes to projectors — devices that can project a 2D picture on a surface. Even a simple monochrome grid will be a good start for smartphones.
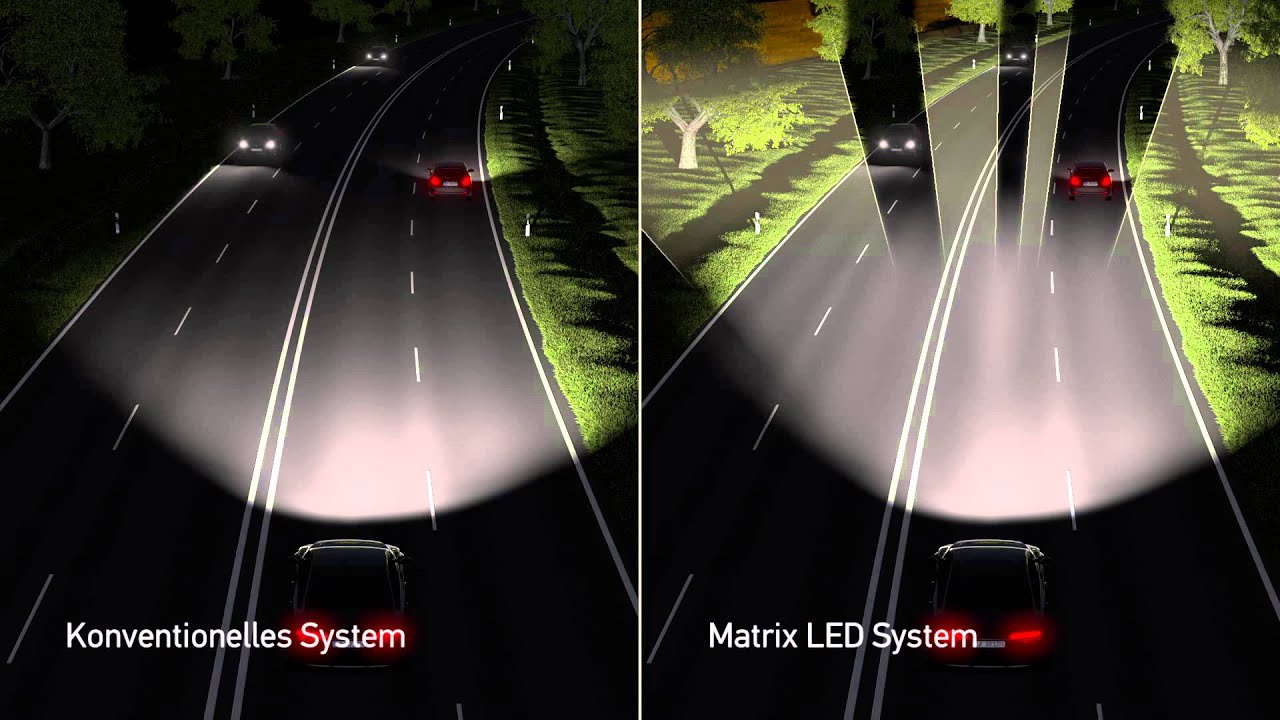
The first benefit of the projector is that it can illuminate only the part of the image that needs to be illuminated. No more burnt faces in the foreground. Objects can be recognized and ignored, just like laser headlights of modern car don’t blind the oncoming drivers but illuminate pedestrians. Even with the minimum resolution of the projector, such as 100x100 dots, the possibilities are exciting.
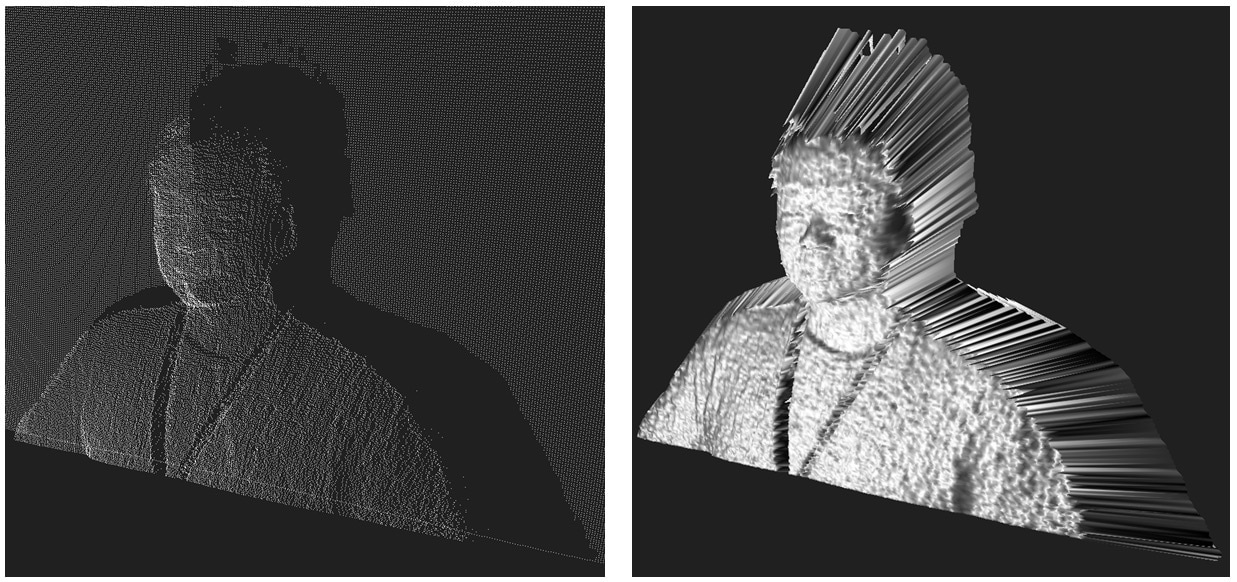
The second and more realistic use of the projector is to project an invisible grid on a scene to detect its depth map. With a grid like this, you can safely throw away all your neural networks and lidars. All the distances to the objects in the image now can be calculated with the simplest computer vision algorithms. It was done in Microsoft Kinect times (rest in peace), and it was great.
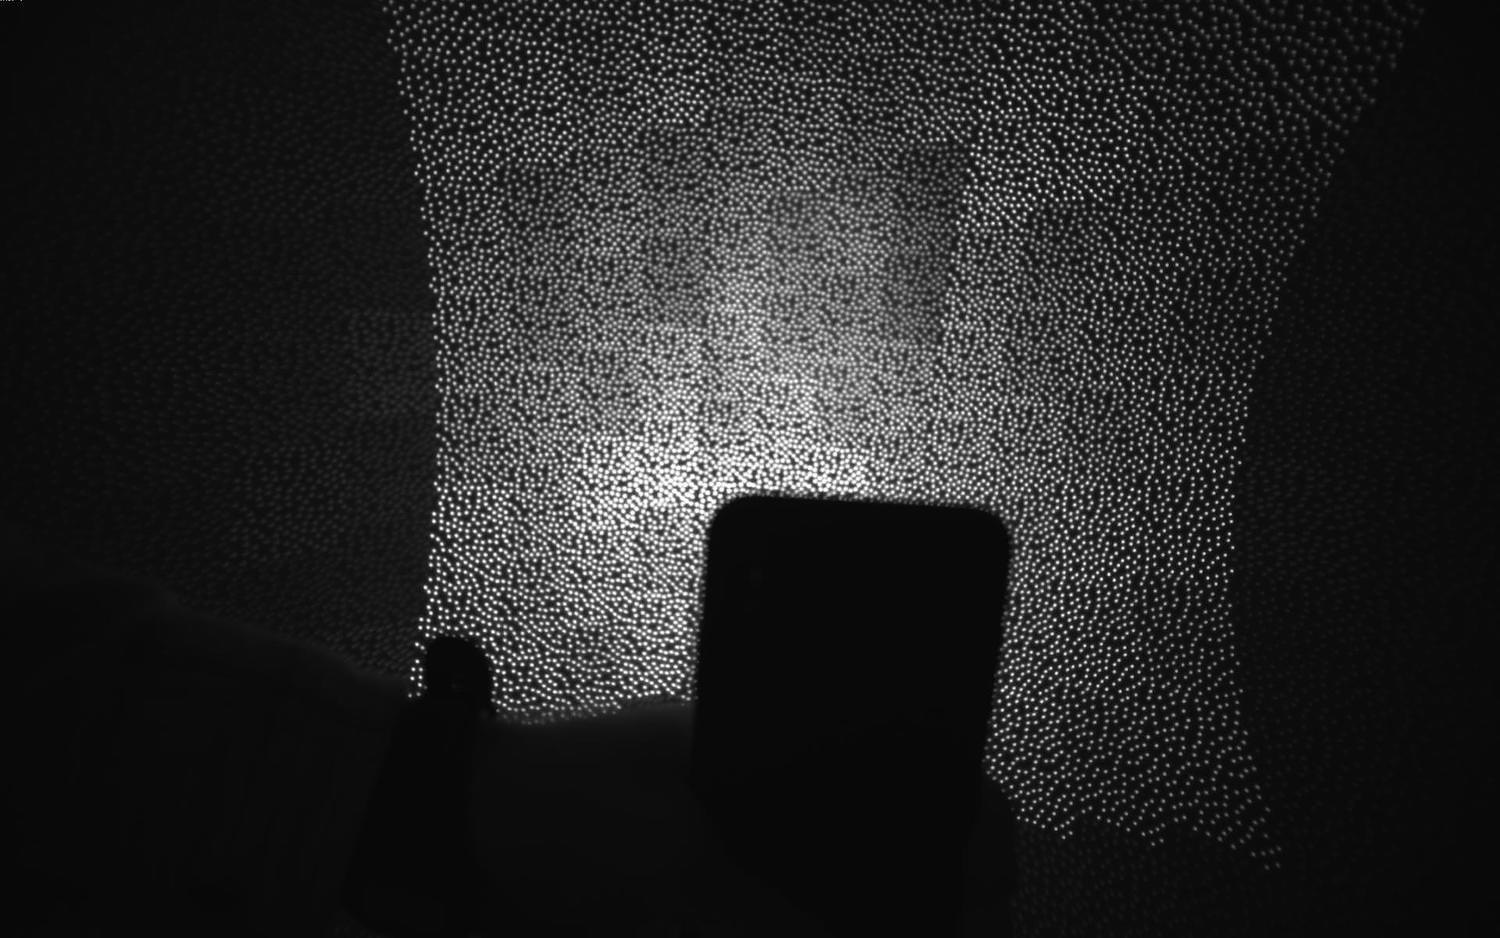
Of course, it’s worth to remember here the Dot Projector for Face ID on iPhone X and above. That’s our first small step towards projector technology, but quite a noticeable one.
The Future of Photography
Controlling the 3D scene and Augmented Reality
.block-side.block-side__right.width-25 
It’s time to reflex a bit. Observing what major technology companies are doing, it becomes clear that our next 10 years will be tightly tied to augmented reality. Today AR still looks like a toy to play with 3D wifey, to try on sneakers, to see how the makeup looks, or to train the U.S. Army. Tomorrow we won’t even notice we’re using it every day. Dense flows of cash in this area are already felt from the Google and Nvidia offices.
For photography, AR means the ability to control the 3D scene. Scan the area, like smartphones with Tango do, add new objects, like in HoloLenz, all such things. Don’t worry about the poor graphics of modern AR-apps. As soon as game dev companies invade the area with their battle royales, everything becomes much better than PS4.
.block-media.block-media__2 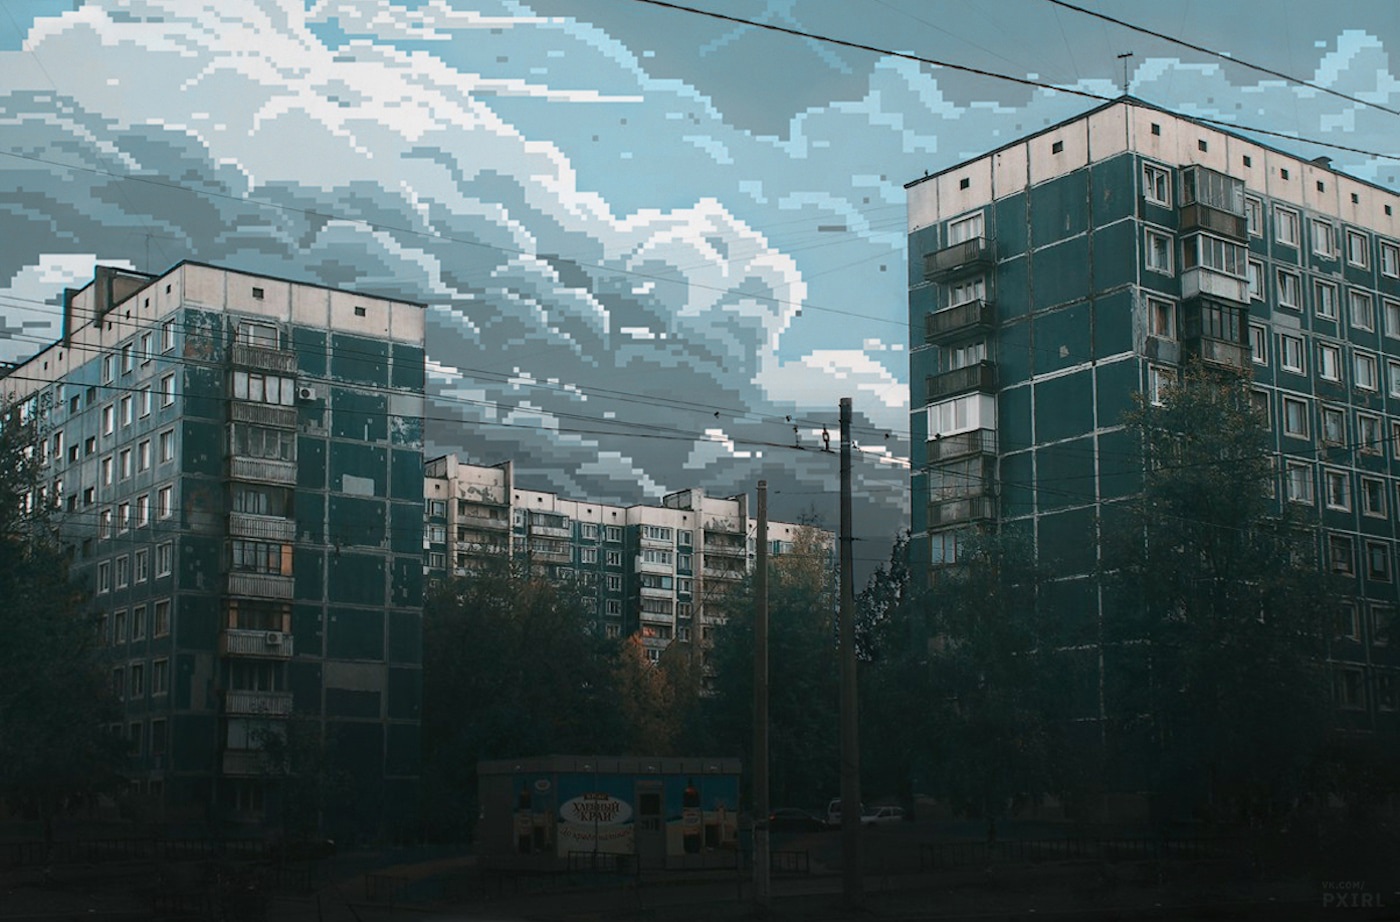
% By Defected Pixel
Remember that epic fake Moon Mode presented by Huawei? If you missed it: when Huawei camera detects you’re going to take a photo of moon, it puts a pre-prepared high-resolution moon picture on top of your photo. Because it looks cooler, indeed! True Chinese cyberpunk.
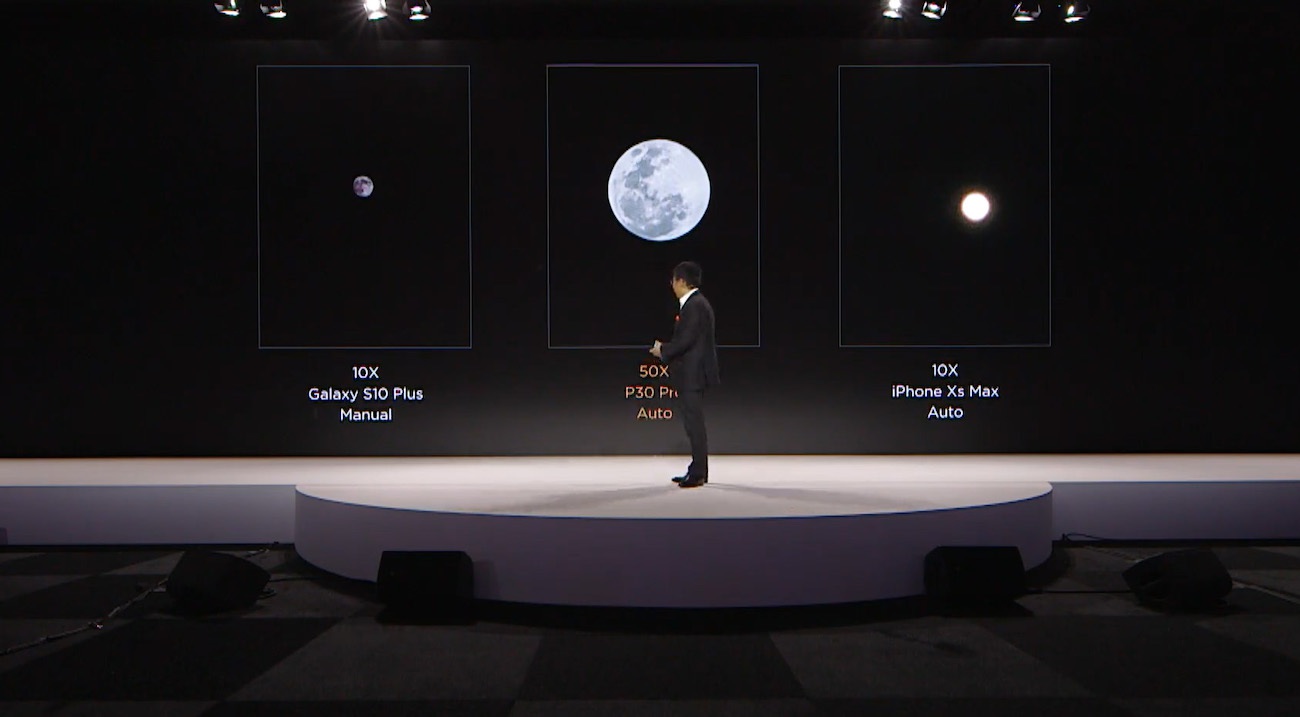
When all the jokes were joked in twitter, I thought about that situation — Huawei gave people exactly what they promised. The moon was real, and the camera lets you shoot it THIS awesome. No deception. Tomorrow, if you give people the opportunity to replace the sky on their photos with beautiful sunsets, half the planet will be amazed.
In the future, machines will be “finishing up” and re-painting our photos for us
Pixel, Galaxy and other Android-phones have some stupid AR-mode today. Some let you add cartoon characters to take photos with them, others spread emojis all over the room, or put a mask on your face just like in a Snapchat.
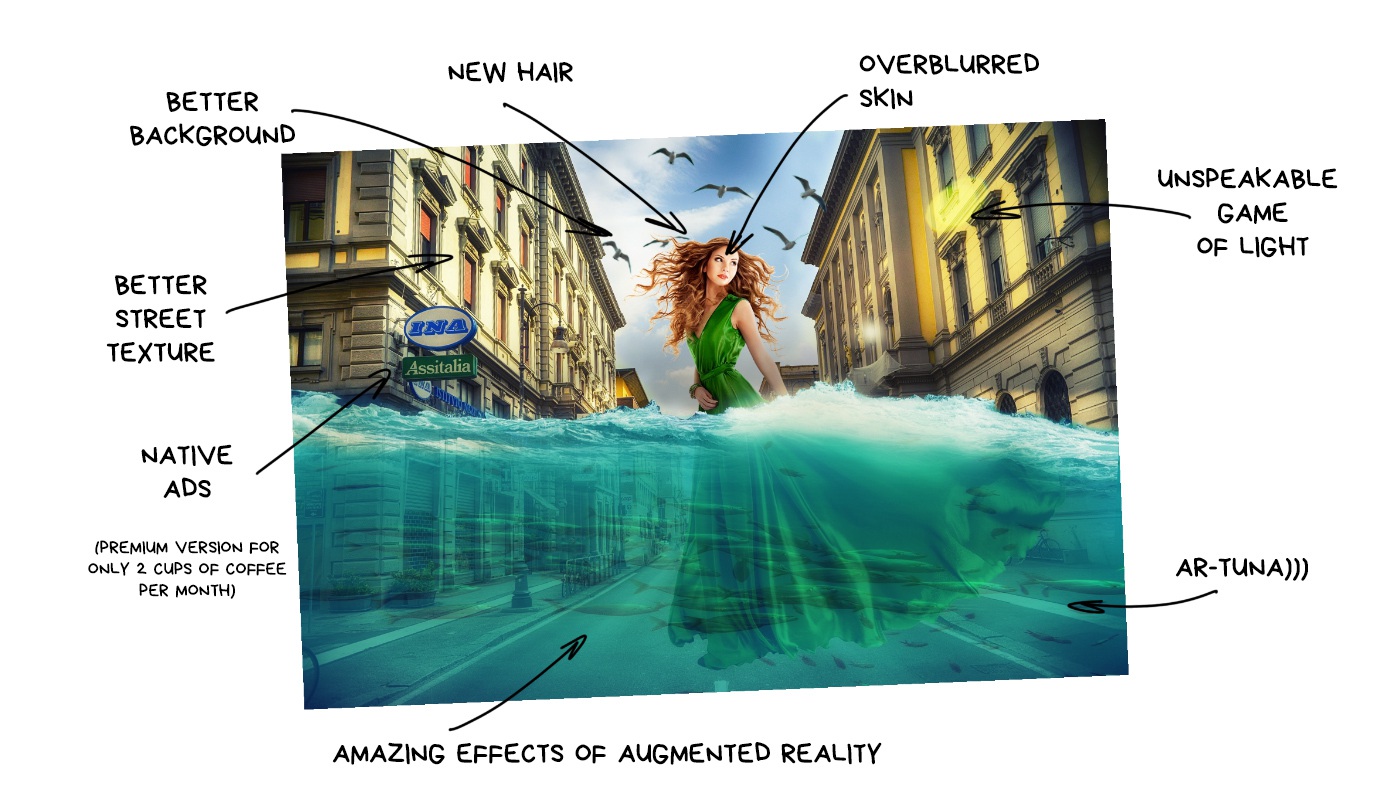
These are just our first naive steps. Today, Google camera has Google Lens, that finds information about any object you point your camera at. Samsung does the same with Bixby. For now, these tricks are only made to humiliate the iPhone users, but it’s easy to imagine the next time you’re taking a pic with the Eiffel Tower, your phone says: you know, your selfie is shit. I’ll put a nice sharp picture of the tower in the background, fix your hair, and remove a pimple above your lip. If you plan to post it to Instagram, VSCO L4 filter will work the best for it. You’re welcome, leather bastard.
After a while, the camera will start to replace the grass with greener one, your friends with better ones, and boobs with bigger ones. Or something like that. A brave new world.
In the beginning it’s gonna look ridiculous. Probably even terrible. The photo-aesthetes will be enraged, the fighters for natural beauty will launch a company to ban neural networks usage, but the mass audience will be delighted.
Because photography always was just a way to express and share emotions. Every time there is a tool to express more vividly and effectively, everyone starts using it — emoji, filters, stickers, masks, audio messages. Some will already find the list disgusting, but it can be easily continued.
Photos of the “objective reality” will seem as boring as your great-grandmother’s pictures on the chair. They won’t die but become something like paper books or vinyl records — a passion of enthusiasts, who see a special deep meaning in it. "Who cares of setting up the lighting and composition when my phone can do the same". That’s our future. Sorry.
The mass audience doesn’t give a shit about objectivity. It needs algorithms to make their faces younger, and vacations cooler than their coworker or neighbor. The augmented reality will re-draw the reality for them, even with a higher level of detail than it really is. It may sound funny, but we’ll start to improve the graphics in the real world.
And yes, as it always does, it all starts with teenagers with their “strange, stupid hobbies for idiots”. That’s what happens all the time. When you stop understanding something — this IS the future.
.block-iframe
Conclusion
.block-text.nocomments
Throughout history, each human technology becomes more advanced as soon as it stops copying living organisms. Today, it is hard to imagine a car with joints and muscles instead of wheels. Planes with fixed wings fly 800+ km/h — birds don’t even try. There are no analogs to the computer processor in nature at all.
The most exciting part of the list is what’s not in it. Camera sensors. We still haven’t figured out anything better than imitating the eye structure. The same crystalline lens and a set of RGGB-cones as retina has.
Computational photography has added a “brain” to this process. A processor that handles visual information not only by reading pixels through the optic nerve but also by complementing the picture based on its experience. Yes, it opens up a lot of possibilities for us today, but there is a hunch we’re still trying to wave with hand-made wings instead of inventing a plane. One that will leave behind all these shutters, apertures, and Bayer filters.
The beauty of the situation is that we can’t even imagine today what it’s going to be.
And it’s wonderful.
==========
Product challenges
- latency optimization
- quality
projection:
super-res zoom:
- multi-frames super resolution
- natural physiological tremor
- tree? solution: kernel regression and interpolation
product challenges
- moving object
- low light / noise scenes
- extreme aliasing
inject motion by the optical image stabilizer(OIS)
