Dependency Injection In Angular 2
- 2016-12-19
- Liu, An-Chi 劉安齊
前言
注入依賴 (Dependency injection, DI) 是 Angular 最大的特色和賣點。他是一種非常重要的設計模式。他讓不同的 Components 可以注入依賴在整個網頁程式。Components 不需要知道依賴如何產生,也不需要知道彼此需要依賴。
摘要
- 一個 Injector (注入)用
providers建立 dependencies(依賴)。 Providers 會知道如何去建立 dependencies。- TS 中的型別註釋(Type annotations)可以被用來要求 dependencies 。此外每個 Component 都會有自己的 injector,組成一個架構譜。
- 用一個一個 provider 如
@NgModule、@Component或@Directive來建立 Injector- 在 Component 的
constructor注入服務。
Why DI?
非 DI 版本實例 Car:
export class Car {
  public engine: Engine;
  public tires: Tires;
  public description = 'No DI';
  constructor() {
    this.engine = new Engine();
    this.tires = new Tires();
  }
  // Method using the engine and tires
  drive() {
    return `${this.description} car with ` +
      `${this.engine.cylinders} cylinders and ${this.tires.make} tires.`
  }
}
這樣缺點是靈活度很低,Car的所有零件都被寫死了,以後想要給改變零件Engine、Tires,是否要寫新的 Class?當零件越來越多,每個零件都可以換來換去,出錯的機率就很大了。
再來看看 DI 版本的 Car:
export class Car {
  public description = 'DI';
  constructor(public engine: Engine, public tires: Tires) { }
}
let car = new Car(new Engine(), new Tires());
現在car可以輕鬆裝上 Engine和Tires了。
如果想要換零件,只是在宣告car的時候裝上新的零件延伸 Class。
class V8Engine {
  constructor(public cylinders: number) { }
}
// 換上不同的引擎
let bigCylinders = 12;
let car = new Car(new V8Engine(bigCylinders), new Tires());
一個 Class 從外部接收依賴而非內部創建,這就是依賴注入(DI)。
但每次要使用一個物件Car,需要自己製造零件Engine、Tires,還要自己組裝零件實在是很費工夫的事情,若是可以直接使用一個物件Car,但所以東西都製造也組裝好了,那該有多好!這時候我們有個injector已經幫你註冊組裝好,就如同品牌產品,直接領取一點也不費工夫,這便是注入依賴框架在做的事情囉!
//直接開走,不需要自己裝輪胎,不需要自己裝引擎
let car = injector.get(Car);
Angular DI
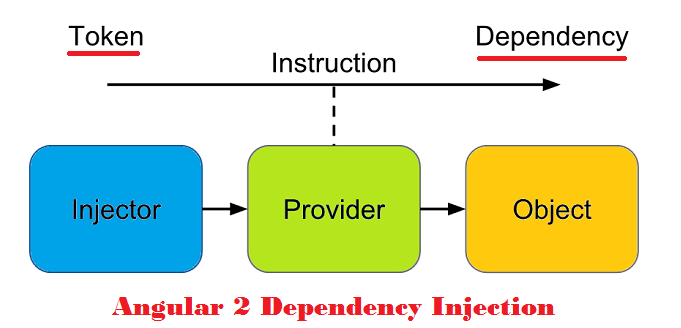
先看看這張圖

在 Angular 2 中 DI 基本上是由三個東西組成的:
- Injector - 會被實例依賴的注入對象。
- Provider - 告訴 Injector 如何創建一個依賴實例的架構譜。
- Dependency - 創建對象的 Type
實現
Angular提供自己的 DI 框架,還可以把這個框架獨立運用到其他系統中。
Angular在啟動時會自動創建 injector。
bootstrap(AppComponent);
此時只需對provider參數註冊實例。
bootstrap(AppComponent,
         [MyService]); // 不建議,但行得通
但這樣當很多的 Class 都要註冊時,便顯得非常不實際了。
所以我們不會在 bootstrap 裡面放入所有要註冊的東西。
組件內註冊
對於許多組件會用到的服務、通道,最上層也就是組件本身了。換言之,除了這個組件其他組件用不到,那麼我們不需要把這些服務、通道注入依賴在全域,只要在組件之下就好。
舉例:
import { Component }          from 'angular2/core';
import { HeroListComponent }  from './hero-list.component';
import { HeroService }        from './hero.service';
@Component({
  selector: 'my-heroes',
  template: `
  <h2>Heroes</h2>
  <hero-list></hero-list>
  `,
  providers:[HeroService],
  directives:[HeroListComponent]
})
export class HeroesComponent { }
其中的 providers:[HeroService], 只向 HeroesComponent 和旗下子組件 HeroListComponent 提供服務。
在執行 HeroesComponent 的時候, DI 會找到之前註冊的服務,然後取得 HeroService 實例,調用裡面的函數,這一切都是以 DI 形式進行。
import { Component }   from 'angular2/core';
import { Hero }        from './hero';
import { HeroService } from './hero.service';
@Component({
  selector: 'hero-list',
  template: `
  <div *ngFor="#hero of heroes">
    {{hero.id}} - {{hero.name}}
  </div>
  `,
})
export class HeroListComponent {
  heroes: Hero[];
  constructor(heroService: HeroService) {
    this.heroes = heroService.getHeroes();
  }
}
隱形式 DI
奇怪?沒看到有使用 DI 的語法啊?
這是因為 Angular 會自動幫我們完成。
injector = Injector.resolveAndCreate([Car, Engine, Tires, Logger]);
let car = injector.get(Car);
單例實例
injector 默認提供的 DI 都是單例實例,所以 HeroesComponent 和 HeroListComponent 會共享同一個實例。意思是,HeroesComponent 若是對 DI 實例做變化,HeroListComponent 下次使用這個 DI 實例時,會是已經變化過的實例。
Why @Injectable()?
看一下下面的程式碼:
import { Injectable } from '@angular/core';
@Injectable()
export class Logger {
  logs: string[] = []; // capture logs for testing
  log(message: string) {
    this.logs.push(message);
    console.log(message);
  }
}
注意到裡面有 @Injectable() 了嗎?
照自面上意思就是要注入這個 class,但之前沒有使用 @Injectable 也可以使用 DI 呀?
這是因為 @Component、@Directive、@Pipe,都是 Injectable 的子型。
而這邊因為都沒有裝飾器,所以需要加上 Injectable 來告訴 ts,讓他產生 metadata,才能正常編譯。
總結
DI 是非常重要技巧,算是一種很常用的設計模式, Angular 中也無所不在。
