Angular 2 Input(s) & Output(s) 傻傻分不清
- 2017-01-03
- Liu, An-Chi 劉安齊
前言
Angular 2 中 Components 之間的關係示意層一層的,就長得向下面這張圖。
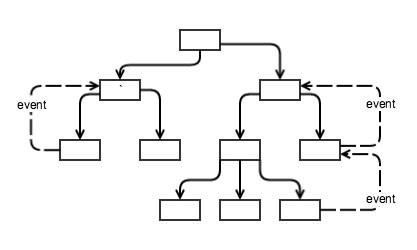
每個格子就是一個組件,資訊向下傳遞很容易,而為了維護資料傳遞的單一性,向上傳遞需要觸發事件 (event)。所以現在當 child component 需要被 parents 知道的時候,child 會被 parents 觸發事件。parent component 會採取任何可能的行為來串聯他底下的組件,通常就是單方向往下資訊傳遞。藉由區隔向上和向下的資料傳遞,事情就變得比較簡單和比較好管理。
@Input() & inputs
@Input 的目的是確認資料綁定 input 特性 (properties)是可以在改變時被追蹤的。基本上來說,它是 Angular 將 DOM 藉由特性綁定 (property bindings) 直接在組件注入數值的方法。
講了這麼多還是不太懂?還是直接看 Code 吧! 先看看 Plunker 範例吧!
AppComponent 長這樣,可以看到裡面有兩個 Components:HelloComponent、GoodbyeComponent
// app/app.component.ts
import {Component, Input} from 'angular2/core';

import HelloComponent from './hello.component';

import GoodbyeComponent from './goodbye.component';
@Component({

selector: 'app',

template: <div> 	    <hello-component [myName]="name"></hello-component> 	    <hello-component myName="Other World"></hello-component> 	    <goodbye-component [myName]="name"></goodbye-component> 	    <goodbye-component myName="Your World"></goodbye-component> 	  </div>,

directives: [HelloComponent, GoodbyeComponent]

})

export class App {

name: string;
constructor() {

this.name = "World";

}

}
先告訴大家顯示結果會是
Hello, World!
Hello, Other World!
Good Bye, World!
Good Bye, Your World!
先來看看另外兩個 Components 裡面是甚麼
// app/hello.component.ts
import {Component, Input} from 'angular2/core';
@Component({

selector: 'hello-component',

template: '<p>Hello, {{myName}}!</p>',

inputs: ['myName']

})

export default class HelloComponent {

myName: string;
constructor() {}

}
// app/goodbye.component.ts

import {Component, Input} from 'angular2/core';

@Component({
	selector: 'goodbye-component',
	template: '<p>Good Bye, {{myName}}!</p>',
})
export default class GoodbyeComponent {
  @Input()
  myName: string;

  constructor() {}
}
大家來找碴,找到不一樣的地方了嗎?
...
@Component({
	selector: 'hello-component',
	template: '<p>Hello, {{myName}}!</p>',
	inputs: ['myName']
})
...
...
export default class GoodbyeComponent {
  @Input()
  myName: string;
  ...
}
一個是放在 @Component 裡面加入 inputs,一個則是在 export 加入 @Input,其實兩個方法都可以,從範例可以看到 Hello 和 GoodBye 分別採用這兩種方法,都可以成功執行。
所以 @Input() 是啥?
回到 AppComponent
template: `<div>
            <hello-component [myName]="name"></hello-component>
            <hello-component myName="Other World"></hello-component>
            <goodbye-component [myName]="name"></goodbye-component>
            <goodbye-component myName="Your World"></goodbye-component>
          </div>`,
在 selector 裡面我們有看到 myName,這個就是「向下」連結的意思,剛剛我們在 @Input() 後面宣告 myName 就是告訴 Child 他的 Parent 會呼叫他。
  ...
  @Input()
  myName: string;
  ...
[myname]="thisName" 如果這樣寫代表 Child 的值和當前這個 Component 的 thisName 這個變數做綁定,如果 myname="Something" 則是直接將 "Something" 這串值指定給 Child。
@Output() & outputs
@Output是用來觸發組件的客製化事件並提供一個通道讓組件之間彼此溝通。
一樣先看看 Plunker 範例吧!
@Output() 和 outputs 狀況跟 @Input() 和 inputs 一樣,就不重複說明了。
現在來理解甚麼是 @Output() 吧!
剛剛說過 @Input 是由上到下的概念,就是 Parent 給定甚麼,Child 就會有甚麼。
@Output 不一樣,是由下影響上,意思就是 Child 先有變化,進而改變了 Parent。
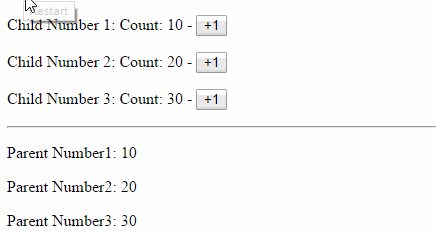
這個範例就是由 Child 的按鈕執行 Child 的函數,進而回傳給 Parent,Parent 的值才改變。
P.S. 這邊分別用到三種綁定方式,用看得比較快,就不說明了
