3D Pointcloud Projection on 2D Image in C++
- 2025-10-01
- Liu, An-Chi 劉安齊
在機器人領域或自駕車領域,為了得知目前場域(scene)裡面的 3D 建模實況,會透過 3D 攝影機或是光達來取得點雲圖(pointcloud),基本上就是一堆 3D 座標的點組成的 3x3 矩陣。透過分析這些 3D 點雲我們可以知道機器人要抓取的目標位置,或是得知自駕車周遭是否有障礙物。一種常見的分析方法是將 3D 點雲以一個相機的視角,投射到 2D 座標上做分析,就如同我們使用相機將 3D 的世界拍成一張 2D 的圖片一樣,在處理一些問題時可以讓維度直接降低,減少複雜度。
¶ 座標投射的數學
座標的投射基本上就是矩陣運算,我們會用以下算式將一個點從世界座標系統(World Coordinate System,客觀的視角)轉換到相機座標系統(Camera Coordinate System,以相機視角來看的座標):
$$\begin{bmatrix} u’ \\ v’ \\ w \end{bmatrix} = \mathbf{K} \begin{bmatrix} \mathbf{R} & \mathbf{t} \end{bmatrix} \begin{bmatrix} X_w \\ Y_w \\ Z_w \\ 1 \end{bmatrix}$$
其中 $K$ 是 3x3 矩陣,是觀測相機的內在參數,專有名稱是 intrinsics,其定義為:
$$\mathbf{K} = \begin{bmatrix}
f_x & s & c_x \\
0 & f_y & c_y \\
0 & 0 & 1
\end{bmatrix}$$
其中:
- $f_x, f_y$: x 和 y 方向的焦點
- $c_x, c_y$: 投射到圖片的 x 和 y 方向的中心點
- $s$: 扭曲量,非零代表有光學上的扭曲
intrinsics 在一個系統中通常會永遠固定,因為相機的參數應該是一個固定的常數
$R$ 是 3x3 矩陣,代表朝著相機旋轉變化(rotation),而 $t$ 則是 1x3 的面向相機的位移向量(translation),這兩個加起來組成 4x3 向量,將點以相機為原點做轉移(transformation),這個 4x3 矩陣又稱作 extrinsics。
舉例來說,以下的 extrinsics 代表沒有旋轉(左方旋轉矩陣各方向維持 1 ),並朝相機座標的 z 軸 +20 方向平移:
$$\mathbf{Extrinsics} = \begin{bmatrix}
1 & 0 & 0 & 0 \\
0 & 1 & 0 & 0 \\
0 & 0 & 1 & 20
\end{bmatrix}$$
extrinsics 在系統中是一個變數,取決於觀測者想要如何進行觀測
最後我們看到世界座標系中的 3D 點是一個四維向量 $(X_w, Y_w, Z_w, 1)$,這是因為他是以齊次座標(homogeneous coordinates)來表示,在做投影時會將維度擴展一度以讓數學能正確運算。
現在我們可以算出新的座標了,將 intrinsics 和 extrinsics 相乘,再乘上原始的世界座標,於是我們可以得到新的 3D 座標 $(u’, v’, w)$。
新座標是以相機視角投射的新作標,但我們只需要 2D 的座標來投射到圖片上,所以需要做正規化處理,將 z 統一為 1 ,於是我們會得到最終 3D 點投射到 2D 平面的座標 $(u, v)$:
$$u = \frac{u’}{w}, \quad v = \frac{v’}{w}$$
注意到 $w$ 代表相機座標的 Z 軸,除了用來正規化外,也可以保留作為平面點的深度資訊。
¶ 程式
這邊我用 C++ 來做解釋,你需要事先安裝 Eigen 和 OpenCV,這兩個函式庫都可以透過 apt 或 brew 來安裝,應該是相對簡單的。雖然這邊用 C++ 來示範,但概念其實用任何程式語言或函式庫都是一樣的。
首先我們會定義好 3D 點雲、intrinsics、extrinsics:
std::vector<Eigen::Vector3d> points;   // All 3D points in world coordinates
Eigen::Matrix3d K;                     // Intrinsic matrix
Eigen::Matrix<double, 3, 4> extrinsic; // Extrinsic matrix
根據我們前面提到的公式,我們可以去做投影:
std::vector<Eigen::Vector3d> project() {
    std::vector<Eigen::Vector3d> projected;
    Eigen::Matrix<double, 3, 4> projMatrix = K * extrinsic;
    for (const auto &pt : points) {
        Eigen::Vector4d hom(pt.x(), pt.y(), pt.z(), 1.0);
        Eigen::Vector3d projectedPoint = projMatrix * hom;
        double z = projectedPoint.z();
        if (z > 0) {
            // 存入圖片的 x、y 座標,並保留相機視角的 z 資訊,用來之後上色辨識用
            projected.emplace_back(projectedPoint.x() / z, projectedPoint.y() / z, z);
        }
    }
    return projected;
}
基本上就是照著公式做矩陣運算而已,並沒有特別的地方。
完整的程式碼:
#include <Eigen/Dense>
#include <iostream>
#include <opencv2/opencv.hpp>
#include <opencv2/viz.hpp>
#include <random> // For random point generation if needed
#include <vector>

class PointCloudTransformer {
  public:
    std::vector<Eigen::Vector3d> points;   // All 3D points in world coordinates
    Eigen::Matrix3d K;                     // Intrinsic matrix
    Eigen::Matrix<double, 3, 4> extrinsic; // Extrinsic matrix

    PointCloudTransformer() {
        // Default camera intrinsics
        K << 800.0, 0.0, 640.0,
             0.0, 800.0, 480.0,
             0.0, 0.0, 1.0;

        // Default extrinsics (camera at origin looking along Z)
        extrinsic << 1, 0, 0, 0,
                     0, 1, 0, 0,
                     0, 0, 1, 100.0; // Move camera along Z

        std::cout << "intrinsic\n" << K << "\n";
        std::cout << "extrinsic\n" << extrinsic << "\n";
    }

    void generateCube(int size = 10, double spacing = 1.2) {
        points.clear();
        for (int x = -size; x <= size; ++x) {
            for (int y = -size; y <= size; ++y) {
                for (int z = -size; z <= size; ++z) {
                    if (std::abs(x) == size || std::abs(y) == size || std::abs(z) == size) { // Surface only
                        points.emplace_back(x * spacing, y * spacing, z * spacing + 10.0);   // Offset in Z
                    }
                }
            }
        }
        std::cout << "Generated " << points.size() << " points.\n";
    }

    void applyTransformation(const Eigen::Affine3d &transform) {
        for (auto &pt : points) {
            pt = transform * pt;
        }
    }

    std::vector<Eigen::Vector3d> project() {
        std::vector<Eigen::Vector3d> projected;
        Eigen::Matrix<double, 3, 4> projMatrix = K * extrinsic;
        for (const auto &pt : points) {
            Eigen::Vector4d hom(pt.x(), pt.y(), pt.z(), 1.0);
            Eigen::Vector3d projectedPoint = projMatrix * hom;
            double z = projectedPoint.z();
            if (z > 0) {
                projected.emplace_back(projectedPoint.x() / z, projectedPoint.y() / z, z);
            }
        }
        return projected;
    }

    void visualize(const std::vector<Eigen::Vector3d> &projected, const std::string &filename = "output.jpg") {
        // find the max and min depth for coloring
        double minDepth = std::numeric_limits<double>::max();
        double maxDepth = std::numeric_limits<double>::lowest();
        for (const auto &pt : projected) {
            if (pt.z() < minDepth)
                minDepth = pt.z();
            if (pt.z() > maxDepth)
                maxDepth = pt.z();
        }
        const double depthRange = maxDepth - minDepth;
        const double cliff = 200.0;

        cv::Mat image(960, 1280, CV_8UC3, cv::Scalar(255, 255, 255)); // White bg
        for (const auto &pt : projected) {
            if (pt.z() > 0) {
                int u = static_cast<int>(pt.x()), v = static_cast<int>(pt.y());

                int depthValue = (depthRange > 0) ? static_cast<int>(cliff * (pt.z() - minDepth) / depthRange) : 128;

                if (u >= 0 && u < image.cols && v >= 0 && v < image.rows) {
                    cv::circle(image, cv::Point(u, v), 2, cv::Scalar(255 - depthValue, depthValue / 2, depthValue), -1);
                }
            }
        }

        // Show 2D projection
        cv::imshow("Projection", image);

        // Create a WCloud object
        cv::Mat cloudMat(points.size(), 1, CV_64FC3);
        cv::Mat colors(points.size(), 1, CV_8UC3);
        for (size_t i = 0; i < points.size(); ++i) {
            cloudMat.at<cv::Vec3d>(i, 0) = cv::Vec3d(points[i].x(), points[i].y(), points[i].z());
            // Color based on depth (projected.z())
            double depth = projected[i].z();
            int depthValue = (depthRange > 0) ? static_cast<int>(255.0 * (depth - minDepth) / depthRange) : 128;
            colors.at<cv::Vec3b>(i, 0) = cv::Vec3b(255 - depthValue, depthValue / 2, depthValue);
        }
        cv::viz::WCloud cloud(cloudMat, colors);
        cloud.setRenderingProperty(cv::viz::POINT_SIZE, 3.0);

        cv::viz::Viz3d window("3D Points");
        window.setBackgroundColor(cv::viz::Color::white());

        // Show the cloud
        window.showWidget("Cloud", cloud);

        // Add coordinate system
        window.showWidget("Coordinate Widget", cv::viz::WCoordinateSystem(20));

        // Keep both windows open and interactive
        while (!window.wasStopped()) {
            int key = cv::waitKey(30);
            if (key == 27) { // ESC key
                break;
            }
            window.spinOnce(30);
        }
    }
};

int main() {
    PointCloudTransformer pct;
    pct.generateCube();

    double angle = M_PI / 6; // 30 degrees in radians
    Eigen::Affine3d rotationY = Eigen::Affine3d(Eigen::AngleAxisd(angle, Eigen::Vector3d::UnitY()));
    Eigen::Affine3d rotationX = Eigen::Affine3d(Eigen::AngleAxisd(angle, Eigen::Vector3d::UnitX()));
    Eigen::Affine3d translation = Eigen::Affine3d(Eigen::Translation3d(2, 1, -5));
    Eigen::Affine3d scaling = Eigen::Affine3d(Eigen::Scaling(1.8));

    Eigen::Affine3d transform = rotationY * rotationX * translation * scaling;
    pct.applyTransformation(transform);

    auto projected = pct.project();
    pct.visualize(projected);

    return 0;
}
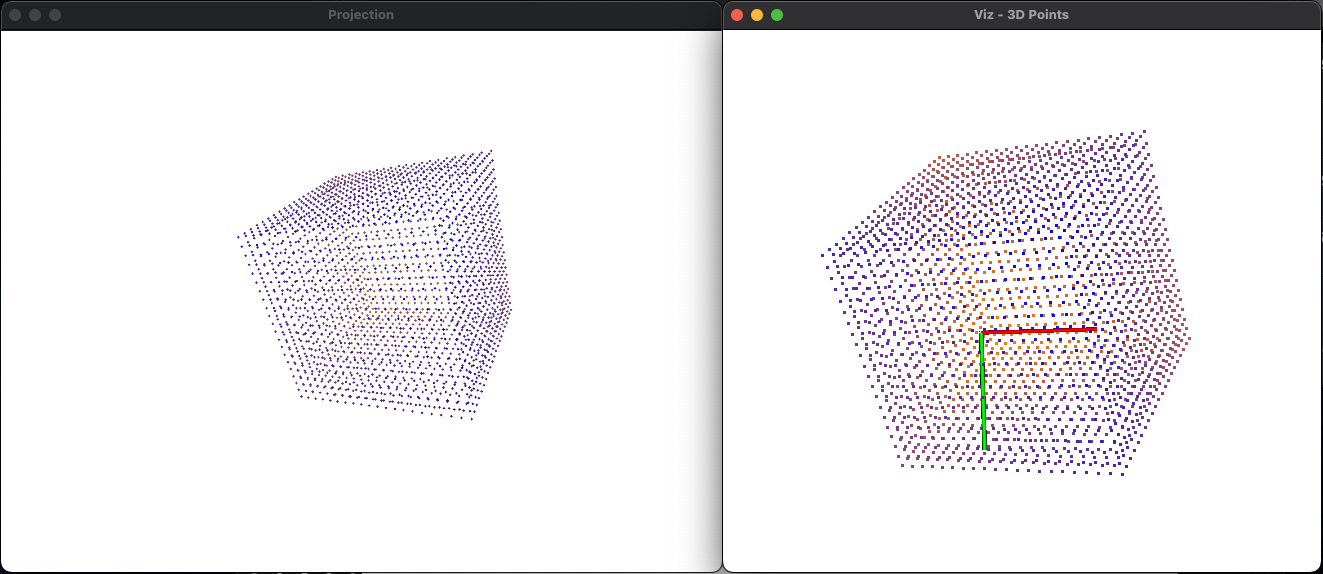
這個程式會生成兩個畫面,一個是 2D 的投射圖片,一個是 3D 的點雲模型。
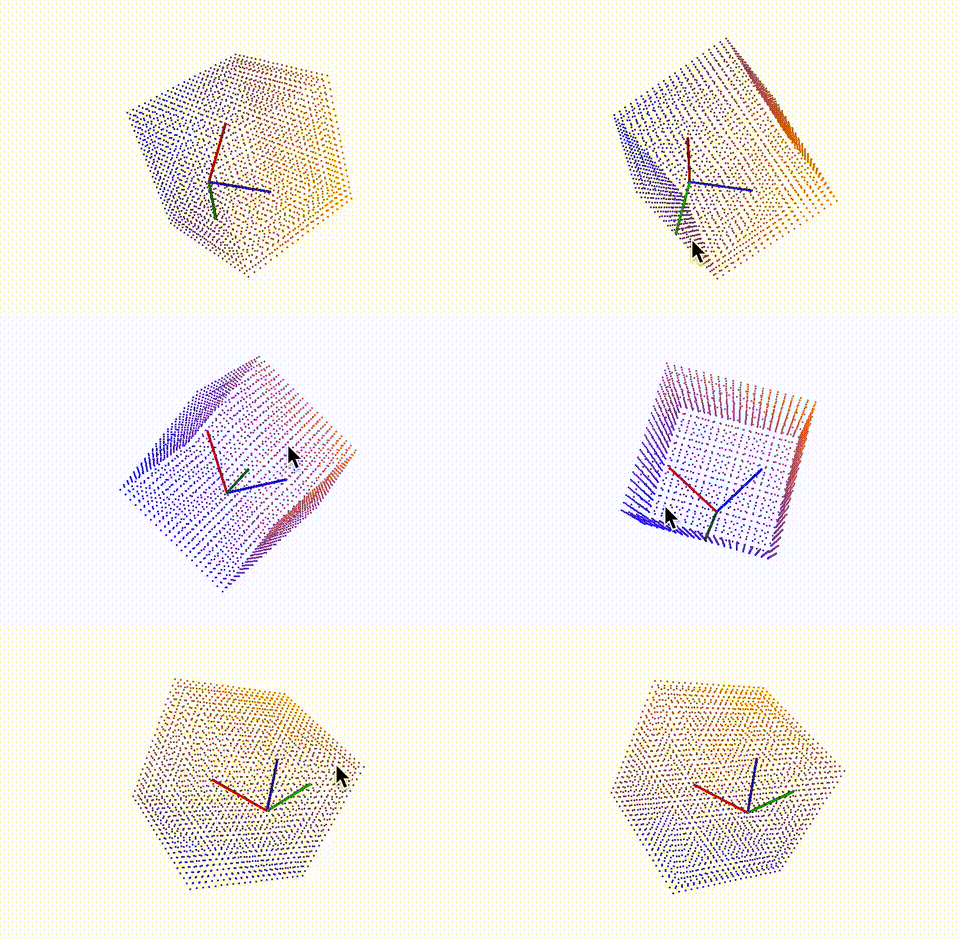
其中 3D 的點雲你可以去做各種旋轉:

紅軸是 X 軸、綠軸是 Y 軸、藍軸是 Z 軸,當我們將 3D 模型的座標軸與圖片對齊之後(圖片是以左上角為原點),就會發現畫面長一樣,也證明說我們做的投影是正確的。

(左邊是圖片,右邊是點雲)
推薦大家實際執行看看程式,另外目前點雲是一個方塊,你也可以自己生成各種樣子的點雲來試試!
